JavaScript Web Workers Tutorial with HTML, CSS, Vanilla JS
Hey there, future pro coders! If you’ve ever built a web application and noticed it freezing up during a heavy task, you’re in the right place. Today, we’re diving into the wonderful world of JavaScript Web Workers. These amazing tools help you run complex operations in the background. This means your user interface stays smooth and responsive. It’s truly a game-changer for user experience! We’re going to build a simple demo. It will clearly show you the power of Web Workers.
What We Are Building: A Responsive UI Demo with JavaScript Web Workers!
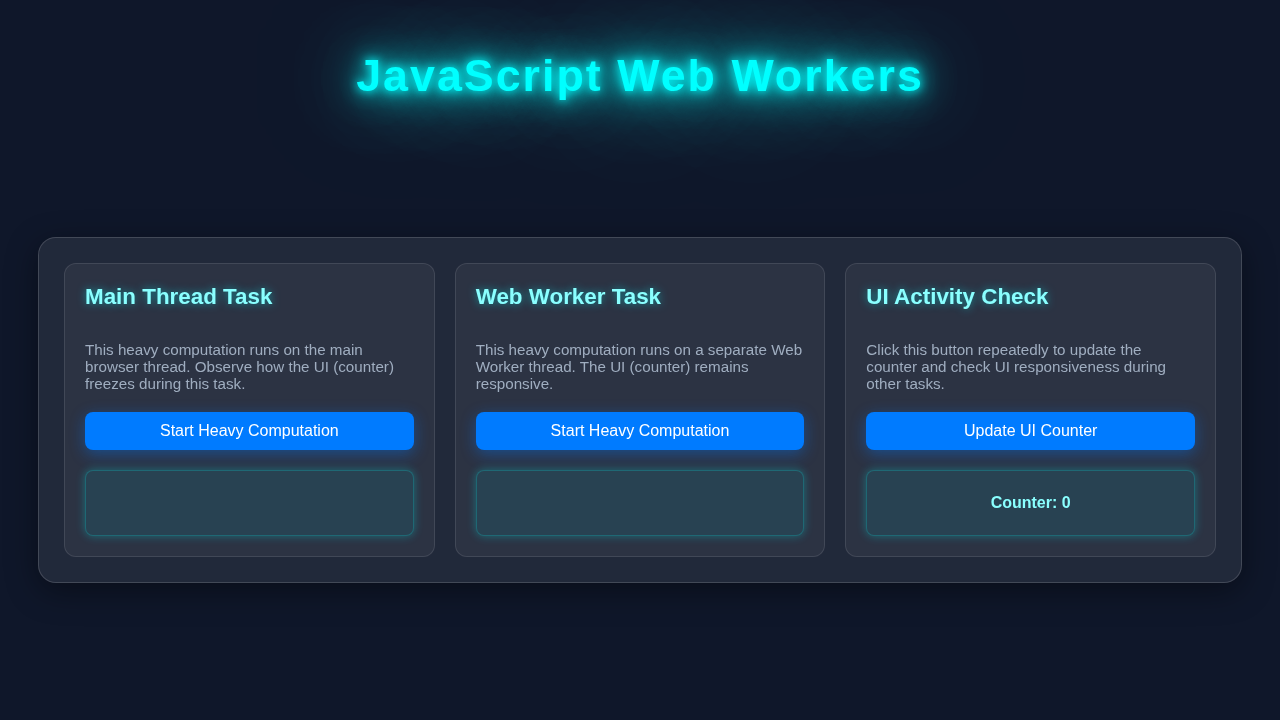
We are going to build a super clear demonstration today. It will highlight a very common web development problem. Then, we will fix it together! Imagine a simple web page with two distinct buttons. One button will kick off a really long, CPU-intensive calculation. This task is specifically designed to block the main browser thread. It simulates a heavy process, like complex data filtering or image manipulation. The second button will simply change the page’s background color. This button is our responsiveness test. Without JavaScript Web Workers, clicking that heavy calculation button will cause everything to freeze. You won’t be able to click the color button at all! It will feel unresponsive and frustrating. Then, we’ll introduce our hero: the Web Worker. This magical tool will move the heavy calculation to a separate thread. Your background color button will work perfectly. You can change the background even while the numbers are crunching away! It’s a fantastic way to boost your application’s feel. This approach radically improves user experience.
HTML Structure: Setting Up Our Buttons and Display
First things first, we need some solid HTML to interact with. Our structure will be quite minimal. However, it will be perfectly functional. We will need a few key elements. There will be distinct buttons for triggering our tasks. We also need a clear display area. This area will show the results of our calculations. Furthermore, a status indicator will keep you informed. Don’t worry, it’s all super straightforward HTML. This basic setup allows us to focus on the JavaScript. We’ll see how Web Workers really shine! Here’s what your index.html file should look like:
index.html
<!DOCTYPE html>
<html lang="en">
<head>
    <meta charset="UTF-8">
    <meta name="viewport" content="width=device-width, initial-scale=1.0">
    <title>JavaScript Web Workers Demo</title>
    <link rel="stylesheet" href="styles.css">
</head>
<body>
    <header>
        <h1>JavaScript Web Workers Demo</h1>
        <p>Experience the difference between main thread and worker thread computations.</p>
    </header>

    <main class="container">
        <section class="card main-thread-section">
            <h2>Main Thread Task</h2>
            <p>This task runs on the main browser thread. It will block the UI during computation.</p>
            <button id="mainThreadBtn">Start Heavy Computation</button>
            <div class="result" id="mainThreadResult"></div>
        </section>

        <section class="card worker-thread-section">
            <h2>Web Worker Task</h2>
            <p>This task runs on a separate Web Worker thread. The UI remains responsive.</p>
            <button id="workerThreadBtn">Start Heavy Computation</button>
            <div class="result" id="workerThreadResult"></div>
        </section>

        <section class="card ui-activity-section">
            <h2>UI Activity Check</h2>
            <p>Click this button to update the UI counter. Observe its responsiveness during other tasks.</p>
            <button id="uiCounterBtn">Update UI Counter</button>
            <div class="counter" id="uiCounter">Counter: 0</div>
        </section>
    </main>

    <script src="script.js"></script>
</body>
</html>
This HTML creates the foundation. It provides the UI elements. We will hook these up with JavaScript very soon.
CSS Styling: Making It Look Good (and Easy to Understand!)
Now, let’s add some essential styling. This will make our demo easy to follow. We want the buttons to be clear and inviting. The result area needs to stand out visually. We also need to style our responsiveness indicator. This will give instant feedback. Our CSS will ensure a clean, functional layout. It will improve readability for you. Furthermore, it adds a touch of modern design. This is important even for a simple demo. Here’s the small but mighty bit of CSS we need to add to your style.css file:
styles.css
body {
    font-family: Arial, Helvetica, sans-serif;
    margin: 0;
    padding: 0;
    background-color: #f4f7f6;
    color: #333;
    line-height: 1.6;
    box-sizing: border-box; /* Ensure padding and border are included in the element's total width and height */
    overflow-x: hidden; /* Prevent horizontal scrollbar */
}

/* Basic container styling */
.container {
    max-width: 100%; /* Ensure container is responsive */
    width: 1100px;
    margin: 40px auto;
    padding: 20px;
    display: flex;
    flex-wrap: wrap; /* Allow cards to wrap on smaller screens */
    gap: 25px;
    justify-content: center;
}

header {
    background-color: #007bff;
    color: white;
    padding: 20px 0;
    text-align: center;
    box-shadow: 0 2px 5px rgba(0, 0, 0, 0.1);
}

header h1 {
    margin: 0;
    font-size: 2.2em;
}

header p {
    margin-top: 5px;
    font-size: 1.1em;
    opacity: 0.9;
}

.card {
    background-color: white;
    border: 1px solid #e0e0e0;
    border-radius: 8px;
    box-shadow: 0 4px 10px rgba(0, 0, 0, 0.08);
    padding: 25px;
    flex: 1; /* Allow cards to grow and shrink */
    min-width: 300px; /* Minimum width before wrapping */
    max-width: calc(33.333% - 25px); /* Three cards per row with gap */
    display: flex;
    flex-direction: column;
    justify-content: space-between;
    overflow: hidden; /* Important for clean edges if content overflows */
}

.card h2 {
    color: #007bff;
    margin-top: 0;
    margin-bottom: 15px;
    font-size: 1.5em;
}

.card p {
    font-size: 0.95em;
    color: #555;
    margin-bottom: 20px;
    flex-grow: 1; /* Allow paragraph to take available space */
}

button {
    background-color: #007bff;
    color: white;
    padding: 12px 20px;
    border: none;
    border-radius: 5px;
    font-size: 1em;
    cursor: pointer;
    transition: background-color 0.3s ease;
    margin-top: auto; /* Push button to the bottom of the card */
    flex-shrink: 0; /* Prevent button from shrinking */
}

button:hover {
    background-color: #0056b3;
}

button:disabled {
    background-color: #cccccc;
    cursor: not-allowed;
}

.result, .counter {
    margin-top: 20px;
    padding: 15px;
    background-color: #e9f7ff;
    border: 1px solid #cceeff;
    border-radius: 5px;
    color: #0056b3;
    font-weight: bold;
    min-height: 40px; /* Ensure consistent height */
    display: flex;
    align-items: center;
    justify-content: center;
    text-align: center;
}

.result.processing {
    background-color: #fff3cd;
    border-color: #ffeeba;
    color: #856404;
}

/* Responsive adjustments */
@media (max-width: 992px) {
    .card {
        max-width: calc(50% - 25px); /* Two cards per row */
    }
}

@media (max-width: 768px) {
    .container {
        margin: 20px auto;
        padding: 15px;
    }
    .card {
        max-width: 100%; /* One card per row */
    }
    header h1 {
        font-size: 1.8em;
    }
}
This styling gives our page a nice look. It also makes our interactive elements clear. Good design always helps understanding.
JavaScript: The Core Logic and Integrating JavaScript Web Workers
This is where the real fun begins, pro coders! We will set up our main JavaScript file, script.js. This script will manage all our buttons. It will trigger our calculations. Crucially, it will also create and communicate with our Web Worker. This communication is key. It ensures the main thread stays free. We will connect the dots between our UI and the background tasks. Let’s dive into script.js first. Pay close attention to how we handle events and results:
script.js
// script.js - Main thread script

// DOM Elements
const mainThreadBtn = document.getElementById('mainThreadBtn');
const mainThreadResult = document.getElementById('mainThreadResult');
const workerThreadBtn = document.getElementById('workerThreadBtn');
const workerThreadResult = document.getElementById('workerThreadResult');
const uiCounterBtn = document.getElementById('uiCounterBtn');
const uiCounterDisplay = document.getElementById('uiCounter');

let uiCounter = 0;

// --- UI Counter Functionality ---
uiCounterBtn.addEventListener('click', () => {
    uiCounter++;
    uiCounterDisplay.textContent = `Counter: ${uiCounter}`;
    console.log('UI Counter updated:', uiCounter);
});

// --- Main Thread Heavy Task ---
/**
 * Checks if a number is prime.
 * @param {number} num The number to check.
 * @returns {boolean} True if the number is prime, false otherwise.
 */
function isPrimeMainThread(num) {
    if (num <= 1) return false;
    if (num <= 3) return true;
    if (num % 2 === 0 || num % 3 === 0) return false;
    for (let i = 5; i * i <= num; i = i + 6) {
        if (num % i === 0 || num % (i + 2) === 0) return false;
    }
    return true;
}

/**
 * Finds prime numbers up to a given limit on the main thread.
 * This is a CPU-intensive task designed to demonstrate UI blocking.
 * @param {number} limit The upper limit to find prime numbers.
 * @returns {number[]} An array of prime numbers found.
 */
function findPrimesMainThread(limit) {
    const primes = [];
    for (let i = 2; i <= limit; i++) {
        if (isPrimeMainThread(i)) {
            primes.push(i);
        }
    }
    return primes;
}

mainThreadBtn.addEventListener('click', () => {
    const limit = 50000; // Adjust this limit to control computation time
    mainThreadBtn.disabled = true;
    // Optionally disable other UI elements to visually emphasize the freeze
    uiCounterBtn.disabled = true;
    mainThreadResult.textContent = `Calculating primes up to ${limit}... (UI will freeze)`;
    mainThreadResult.classList.add('processing');
    console.log('Main Thread: Starting heavy computation.');

    // Using setTimeout(0) allows the UI to update the 'processing' message
    // before the blocking computation starts.
    setTimeout(() => {
        const startTime = performance.now();
        const result = findPrimesMainThread(limit); // This blocks the main thread
        const endTime = performance.now();
        const duration = (endTime - startTime).toFixed(2);

        mainThreadResult.textContent = `Found ${result.length} primes up to ${limit} in ${duration} ms.`;
        mainThreadResult.classList.remove('processing');
        mainThreadBtn.disabled = false;
        uiCounterBtn.disabled = false; // Re-enable UI activity
        console.log('Main Thread: Computation complete.');
    }, 0);
});


// --- Web Worker Thread Heavy Task ---
let myWorker; // Declare worker variable outside to manage its lifecycle

workerThreadBtn.addEventListener('click', () => {
    const limit = 50000; // Same limit for comparison
    workerThreadBtn.disabled = true;
    workerThreadResult.textContent = `Calculating primes up to ${limit}... (UI remains responsive)`;
    workerThreadResult.classList.add('processing');
    console.log('Main Thread: Starting Web Worker computation.');

    // Check if Web Workers are supported by the browser
    if (window.Worker) {
        // Create a new worker instance if one doesn't exist
        if (!myWorker) {
            myWorker = new Worker('worker.js'); // Path to your worker script
            console.log('Main Thread: New Web Worker created.');

            // Listen for messages from the worker thread
            myWorker.onmessage = function(event) {
                const { type, data } = event.data;

                if (type === 'computationComplete') {
                    workerThreadResult.textContent = `Worker found ${data.primeCount} primes up to ${data.limit} in ${data.duration} ms.`;
                    workerThreadResult.classList.remove('processing');
                    workerThreadBtn.disabled = false;
                    console.log('Main Thread: Web Worker computation complete.');
                    // If the worker task is one-off, it's good practice to terminate the worker
                    // to free up resources. For a demo, we might keep it alive for multiple runs.
                    // myWorker.terminate();
                    // myWorker = null;
                }
            };

            // Handle errors originating from the worker script
            myWorker.onerror = function(error) {
                workerThreadResult.textContent = 'Worker Error: ' + error.message;
                workerThreadResult.classList.remove('processing');
                workerThreadBtn.disabled = false;
                console.error('Web Worker Error:', error);
                // myWorker.terminate();
                // myWorker = null;
            };
        }

        // Send a message to the worker to start the computation
        myWorker.postMessage({ type: 'startComputation', payload: { limit: limit } });

    } else {
        // Fallback for browsers that do not support Web Workers
        workerThreadResult.textContent = 'Web Workers are not supported in this browser.';
        workerThreadResult.classList.remove('processing');
        workerThreadBtn.disabled = false;
        console.warn('Web Workers are not supported.');
    }
});

console.log('Main script loaded.');
worker.js
// worker.js - This script runs in a separate thread, off the main browser UI thread.

/**
 * Checks if a number is prime.
 * This is a helper function for findPrimes.
 * @param {number} num The number to check.
 * @returns {boolean} True if the number is prime, false otherwise.
 */
function isPrime(num) {
    if (num <= 1) return false;
    if (num <= 3) return true;
    if (num % 2 === 0 || num % 3 === 0) return false;
    for (let i = 5; i * i <= num; i = i + 6) {
        if (num % i === 0 || num % (i + 2) === 0) return false;
    }
    return true;
}

/**
 * Finds prime numbers up to a given limit.
 * This is a CPU-intensive task designed to demonstrate Web Worker benefits
 * by running it off the main thread.
 * @param {number} limit The upper limit to find prime numbers.
 * @returns {number[]} An array of prime numbers found.
 */
function findPrimes(limit) {
    const primes = [];
    for (let i = 2; i <= limit; i++) {
        if (isPrime(i)) {
            primes.push(i);
        }
    }
    return primes;
}

// Listen for messages sent from the main thread
// `self` refers to the global scope of the Web Worker itself.
self.onmessage = function(event) {
    const { type, payload } = event.data; // Destructure the message data

    if (type === 'startComputation') {
        console.log('Worker: Starting heavy computation with limit:', payload.limit);
        const startTime = performance.now();
        const result = findPrimes(payload.limit); // Perform the heavy computation
        const endTime = performance.now();
        const duration = (endTime - startTime).toFixed(2); // Calculate duration

        // Post the result back to the main thread
        // The main thread's `worker.onmessage` event listener will receive this.
        self.postMessage({
            type: 'computationComplete',
            data: {
                primeCount: result.length,
                duration: duration,
                limit: payload.limit
            }
        });
    }
};

console.log('Web Worker script loaded.');
Now, we need a separate file for our Web Worker. Let’s call this file worker.js. This special file contains the actual background task code. It operates completely independently. We will explore how script.js talks to worker.js very soon. This separation is the heart of Web Workers.
How JavaScript Web Workers Work Together: Understanding the Magic
The Problem: A Frozen UI (Before Web Workers)
Imagine you have a complex, time-consuming task. Perhaps it’s processing a massive list of data. Maybe it’s generating an intricate fractal image. When JavaScript runs in your browser, it typically works on a single “thread.” Think of this as a single lane on a busy highway. All tasks must use that one lane. If a heavy calculation starts, it completely blocks the lane. No other tasks can pass through. This means your user interface freezes. You cannot click buttons. Animations stop completely. Any user interaction is impossible. It creates a frustrating, unresponsive experience. This happens because JavaScript is single-threaded by default, relying on the Event Loop to manage tasks. We will first build our app without Web Workers for a moment. This will clearly show you this common problem in action. It helps appreciate the solution!
Enter JavaScript Web Workers: Unblocking the UI
Here’s the cool part, and why we’re all here! JavaScript Web Workers are an amazing solution to this problem. They allow you to run scripts in the background. This happens entirely independently of the main browser thread. Think of it as adding new, dedicated lanes to our highway. Now, heavy calculations can run in their own separate lane. This leaves the main UI thread completely free. It can continue to handle user clicks, animations, and updates. Your website feels snappy and alive. We will use them to keep our UI super responsive. This ensures a fantastic user experience. Furthermore, it makes your applications feel professional.
Pro Tip: Web Workers can’t directly access the DOM (Document Object Model). This means they cannot manipulate HTML elements like
document.getElementById(). Instead, they communicate with the main thread by sending and receiving messages. This clear separation maintains stability and prevents conflicts. For more details on Web Workers, check out the MDN Web Workers documentation!
Our Worker Script: The Background Brain
A Web Worker lives in its own separate JavaScript file. This file contains the complete code for the background task. Our worker.js script will listen for messages from the main page. When it gets a “start calculation” message, it will begin its heavy work. This heavy work involves a simple loop for our demo. After the calculation finishes, the worker sends a message back. This message contains the final result. It’s a simple, powerful communication method between threads. Remember, the worker runs completely separately. This independence is its super power! For more on JavaScript fundamentals, check out our guide on JavaScript Closures Explained. They are another foundational concept for deeper JavaScript understanding!
// worker.js
self.onmessage = function(e) {
    if (e.data.command === 'start') {
        let result = 0;
        for (let i = 0; i < e.data.iterations; i++) {
            result += Math.sqrt(i) * Math.sin(i);
        }
        self.postMessage({ result: result, from: 'worker' });
    }
};
This is the simple code for our worker.js file. You can see it uses self.onmessage and self.postMessage.
Connecting Main Thread and Worker: The Communication Bridge
On the main page (script.js), we create an instance of our Worker. This links to our worker.js script file. We do this with new Worker('worker.js'). This instantly spins up the background thread. We then send messages to the worker using worker.postMessage(). These messages can include data or commands. For example, we send the number of iterations for our calculation. We also set up an event listener to get messages from the worker. This uses worker.onmessage. When the main thread receives the result, it updates the UI. This could be showing the result or enabling a button. This setup lets your main page stay incredibly responsive. You can do things like smoothly update a React Live Search Component while data loads in the background!
Seeing It In Action: The Responsive Difference
First, try the "blocking" calculation. Click the "Start Blocking Calculation" button. Then, immediately click the "Change Background Color" button. You will quickly see it does not respond! The entire page freezes. This demonstrates the problem clearly. Now, refresh your page. Try the "Start Web Worker Calculation" button. While it's running, click the "Change Background Color" button again. This time, you will see the background color change instantly! Even while the heavy calculation is running in the background. This is the magic of JavaScript Web Workers in action. You have successfully prevented a frozen UI. It's a huge step in building professional web applications. Your users will truly appreciate this performance boost.
Tips to Customise It: Extend Your Web Worker Skills!
You've built a fantastic demo! Now, let's think about how you can extend this knowledge. Here are a few exciting ideas to customise and expand your project:
- Image Processing: Use a Web Worker to apply filters, resize, or compress images. Do this entirely in the background. Your UI will never freeze!
- Large Data Filtering & Sorting: If you have a massive dataset, offload its filtering or sorting to a worker. Then, display the refined results quickly. This is perfect for dynamic tables.
- Real-time Chart Data Aggregation: Perform complex data aggregations for charts in a worker. Send the updated data to the main thread for smooth rendering.
- Game Logic: Move non-visual game logic, like AI computations or complex physics simulations, to a worker. This keeps the game animations smooth and enjoyable.
- Offline Data Sync: Sync large amounts of data with a server or local storage. Do this in the background using a worker. You could even use this with a React Dark Mode implementation to store user preferences.
Conclusion: You're a UI Responsiveness Pro!
Fantastic job, future pro coder! You just learned about and successfully implemented JavaScript Web Workers. You now understand how to prevent a frozen user interface. This makes your web applications much more user-friendly and efficient. Your users will absolutely love the responsiveness! So, go ahead and share what you built with others. Try to incorporate workers into your next big project idea. This powerful skill will definitely set you apart from the crowd. Keep building amazing things, keep learning, and keep coding!
Keep Learning: The world of web development is always evolving. Never stop exploring new tools and techniques. Your continuous learning makes you a valuable developer!