Hey there, future web wizard! Ever felt like your Python scripts are just talking to themselves? You want them to reach out and grab information from the internet. Maybe you want to send data to a website. But how do you even begin that conversation?
If you are brand new to this topic, don’t worry. Many beginners find web communication a bit daunting at first. It feels like magic. You just need the right tool. This is where the amazing Python Requests Library Explained comes into play. It makes talking to websites super easy. We’ll explore how it actually works, going far beyond just a simple GET request.
What You Need to Know First: Talking to the Internet
Think about how you use a library. You ask for a book. The librarian finds it. Then they give it to you. That’s a lot like how your computer talks to a website.
Your computer is the ‘client’. It sends a ‘request’. The website’s computer is the ‘server’. It sends back a ‘response’. This whole conversation follows rules. These rules are called HTTP, which stands for Hypertext Transfer Protocol. It’s the language of the web.
There are different ways to ask for things. These are called HTTP methods. You have probably heard of GET. A GET request is like asking, "Give me this page." But there are others too. POST is like saying, "Here’s some data, please save it." PUT is like saying, "Update this thing with my new data." DELETE is exactly what it sounds like: "Remove this." Each method has a specific purpose. Understanding these methods is your first step to mastering web interaction. This foundation helps you see why the Python Requests Library is so powerful.
Python Requests Library Explained: The Basics Unpacked
The Python Requests Library simplifies all this HTTP talk. You do not need to worry about the nitty-gritty details. Requests handles them for you. It’s like having a skilled translator.
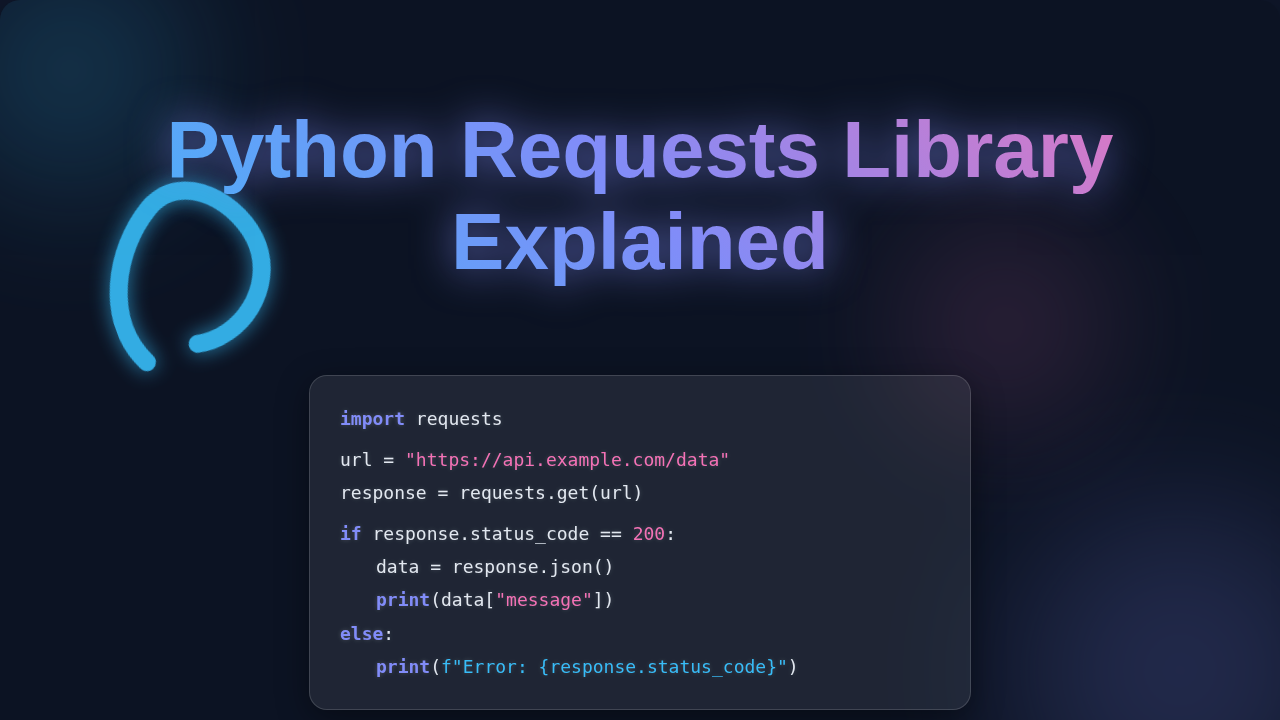
When you perform a GET request, you are essentially asking a website for some information. Imagine you are at a grand archive. You simply state the document you want. Requests sends that request for you. Then it waits for the server to reply. The server then sends back its ‘response’. This response contains the data you asked for. It also includes a ‘status code’. A status code tells you if your request was successful. A "200 OK" means everything went perfectly! A "404 Not Found" means the document was missing. This is often like receiving an empty hand if the librarian could not find your book. The library makes these responses easy to understand.
A POST request is different. Instead of just asking, you are submitting something. Imagine filling out a form to request a special item from the archive. You give the form to Requests. It then packages your data carefully. It sends it off to the server. The server processes your submission. It might save your data. Then it sends back a response. This response confirms if your submission was successful. It might even include new information. You see how simple Requests makes it? It handles the complex packaging and delivery.
Beyond the Basics: Powering Up Your Requests
The Python Requests Library goes far beyond simple GETs and POSTs. You can add extra instructions to your requests. These are called ‘headers’. Headers are like special notes attached to your request. They might tell the server what type of content you prefer. Or they might say what kind of browser you are using. This helps the server send back the best possible response for you.
Sometimes you need to send specific search terms. You might want to filter results. These are handled with ‘parameters’. Parameters are extra bits of information. You attach them to the request’s address. They are like saying, "Give me books, but only the ones about space." Requests automatically formats these parameters for you.
When you send data with a POST request, there are different ways to package it. You might send ‘form data’. This is like filling out a traditional paper form. Or you might send ‘JSON data’. JSON is a popular way to structure data. It’s like sending a neatly organized list of instructions. Requests handles both methods smoothly.
What about logging in? That’s ‘authentication’. You need to prove who you are. Requests can send your username and password securely. This is like showing your library card. Then you can access special resources. Once you are authenticated, you often establish a ‘session’. A session is like keeping an ongoing conversation. The server remembers who you are. This is very useful when building web applications with frameworks like Flask. It means you do not have to log in again with every single request. Requests manages these sessions for you, making web interactions much more seamless.
Pro Tip: Always check the ‘status code’ in the response! A 200 means success. Other codes tell you if something went wrong. Understanding them saves you huge headaches.
Advanced Concepts: Mastering the Python Requests Library Explained
Sometimes websites are slow. Or they might not respond at all. That’s why ‘timeouts’ are so important. A timeout tells Requests how long to wait for a reply. If the server does not respond in time, Requests will stop waiting. It raises an error. This prevents your program from freezing forever. You get to decide how patient your script should be.
What if a request fails the first time? Maybe it was just a temporary network glitch. You can tell Requests to ‘retry’ the request. It will try again a few times. This makes your scripts more robust. It’s like giving the librarian a second chance to find that book.
Sometimes you need to hide your real location. Or access content from a specific region. You can use ‘proxies’. A proxy server acts as an intermediary. Your request goes to the proxy first. Then the proxy sends it to the website. This helps you manage your identity. This is particularly useful for advanced web scraping techniques where you might want to rotate IP addresses.
Security is paramount online. ‘SSL verification’ ensures you are talking to the real website. It checks the website’s security certificate. This prevents you from sending sensitive data to a fake site. Requests verifies SSL certificates by default. This is a crucial security feature. Always make sure it’s enabled. You want to know you are talking to the official website, not an imposter.
Remember: Handling network errors gracefully is a mark of a skilled developer. Use timeouts and consider retries for resilient applications.
What to Learn Next: Your Journey Continues!
You have now grasped the core concepts of the Python Requests Library. But your learning journey is far from over! Here are some exciting next steps for you:
- Error Handling: Learn to catch and manage potential issues. Use
tryandexceptblocks effectively. - Working with APIs: Dive deeper into specific web APIs. Many services offer APIs for developers. You can interact with Twitter, GitHub, or weather services.
- Asynchronous Requests: Explore libraries like
httpxoraiohttp. They let your program make many requests at the same time. This is faster for certain tasks. - Building a Web App: Use a web framework like Flask or Django. You can build your own web services. Then other people can talk to your API! This knowledge is essential for understanding how AI agents often communicate with services.
Resources to Keep You Learning
Here are some places to continue your exploration:
- Requests Official Documentation: The best place for in-depth details. Search for "Requests: HTTP for Humans™".
- MDN Web Docs – HTTP: For a deep dive into HTTP itself. Understand the underlying protocol even better.
- MDN Web Docs – Web Security: Learn more about web security principles, including SSL and certificate verification.
You have taken a huge leap today! Understanding how the Python Requests Library works opens up a world of possibilities. You can now build powerful applications. You can gather data. You can automate tasks. Keep experimenting, keep building, and remember that every line you write makes you a better developer. You’ve got this!