React Task Manager with Local Storage – JSX & Hooks Tutorial
Hey there, pro-coder! If you’ve wanted to build a React Task Manager but weren’t sure where to start, you’re absolutely in the right place. Today, we’re going to create a fully functional task manager. It will use React Hooks for state management. Moreover, we’ll make sure your tasks stick around. This is thanks to the magic of Local Storage! Get ready to build something awesome and super practical.
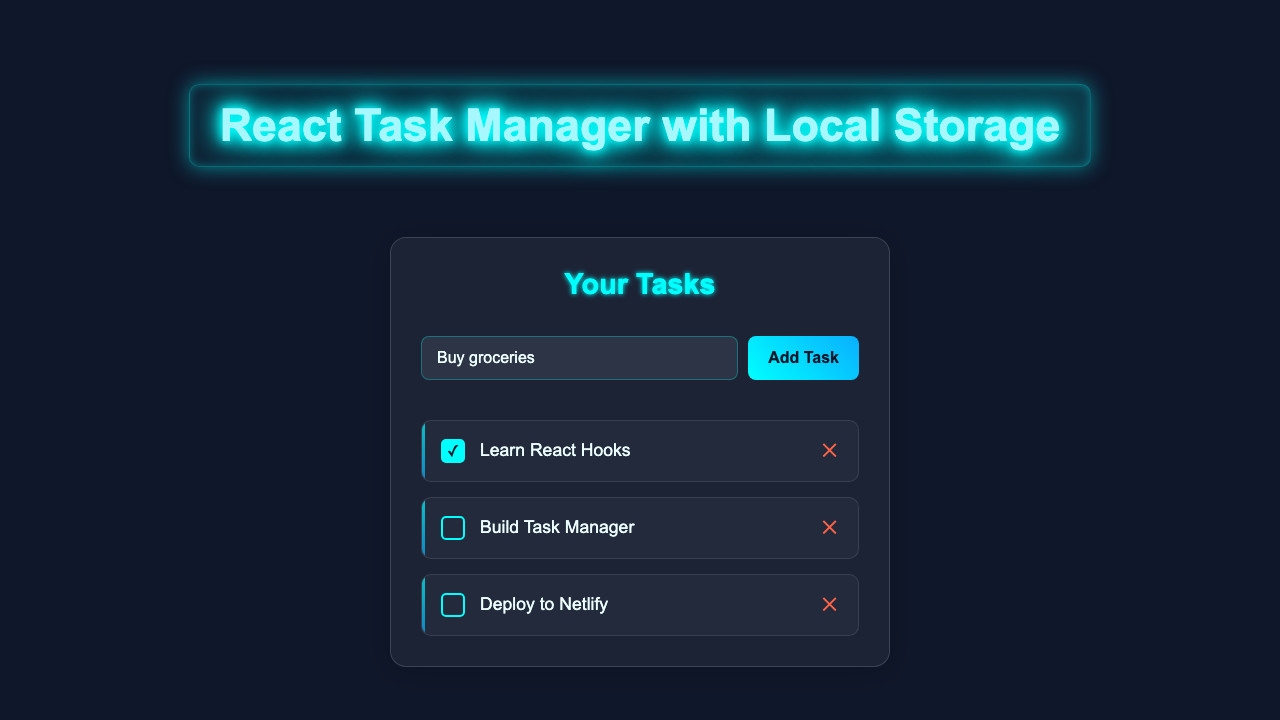
What We Are Building: Your Very Own React Task Manager
Imagine having a clean, simple web app. This app will help you keep track of all your to-dos. That’s exactly what we’re building! Our React Task Manager will let you add new tasks easily. You can also mark tasks as completed with a single click. Furthermore, you’ll be able to delete tasks once they’re done. The best part? Your tasks will be saved right in your browser. So, they will still be there even after you close and reopen the tab. This project is useful for everyone. It’s a fantastic way to learn about React’s power and browser APIs.
HTML Structure: The Foundation of Our App
Our React application will render dynamically. Therefore, the core HTML structure is quite simple. We’ll have a main div element. This is where our entire React app will ‘mount’ itself. Think of it as the canvas for our artwork.
public/index.html
<!DOCTYPE html>
<html lang="en">
  <head>
    <meta charset="utf-8" />
    <link rel="icon" href="%PUBLIC_URL%/favicon.ico" />
    <meta name="viewport" content="width=device-width, initial-scale=1" />
    <meta name="theme-color" content="#000000" />
    <meta
      name="description"
      content="React Task Manager with Local Storage"
    />
    <link rel="apple-touch-icon" href="%PUBLIC_URL%/logo192.png" />
    <link rel="manifest" href="%PUBLIC_URL%/manifest.json" />
    <title>React Task Manager</title>
  </head>
  <body>
    <noscript>You need to enable JavaScript to run this app.</noscript>
    <div id="root"></div>
  </body>
</html>
CSS Styling: Making It Look Good
No app is complete without a bit of style! We want our task manager to be clean and easy to use. So, we’ll use some modern CSS. This includes Flexbox for easy layout management. Also, we’ll add some smooth transitions. This makes the user experience more enjoyable. Don’t worry if CSS isn’t your strongest suit. We’ll keep it straightforward and explain key parts.
src/App.css
/* Styling for the main App component container */
.app-container {
  background-color: #ffffff;
  padding: 30px;
  border-radius: 12px;
  box-shadow: 0 4px 15px rgba(0, 0, 0, 0.1);
  width: 100%;
  max-width: 600px; /* Limit max width for readability */
  box-sizing: border-box;
  margin-top: 50px; /* Space from top */
  overflow: hidden; /* Ensure content stays within bounds */
}

.app-container h1 {
  text-align: center;
  color: #2c3e50;
  margin-bottom: 30px;
  font-size: 2.2em;
}
src/index.css
/* Global styles */
body {
  margin: 0;
  font-family: Arial, Helvetica, sans-serif; /* Safe font */
  -webkit-font-smoothing: antialiased;
  -moz-osx-font-smoothing: grayscale;
  background-color: #f0f2f5; /* Light background for the tutorial code */
  color: #333;
  box-sizing: border-box;
  overflow-x: hidden; /* Prevent horizontal scroll */
}

#root {
  display: flex;
  justify-content: center;
  align-items: flex-start; /* Align to top, not center vertically */
  min-height: 100vh;
  padding: 20px;
  box-sizing: border-box;
  max-width: 100vw;
}

code {
  font-family: source-code-pro, Menlo, Monaco, Consolas, 'Courier New',
    monospace;
}
src/components/TaskForm.css
/* Styling for the TaskForm component */
.task-form {
  display: flex;
  gap: 10px;
  margin-bottom: 25px;
  max-width: 100%;
  box-sizing: border-box;
}

.task-input {
  flex-grow: 1;
  padding: 12px 15px;
  border: 1px solid #ccc;
  border-radius: 8px;
  font-size: 1em;
  outline: none;
  transition: border-color 0.2s ease, box-shadow 0.2s ease;
  box-sizing: border-box;
  max-width: calc(100% - 10px - 100px); /* Adjust for button width */
}

.task-input:focus {
  border-color: #007bff;
  box-shadow: 0 0 0 3px rgba(0, 123, 255, 0.25);
}

.add-button {
  padding: 12px 20px;
  background-color: #007bff;
  color: white;
  border: none;
  border-radius: 8px;
  font-size: 1em;
  cursor: pointer;
  transition: background-color 0.2s ease, transform 0.2s ease;
  box-sizing: border-box;
  flex-shrink: 0; /* Prevent button from shrinking */
  width: 100px; /* Fixed width for consistency */
}

.add-button:hover {
  background-color: #0056b3;
  transform: translateY(-1px);
}
src/components/TaskList.css
/* Styling for the TaskList component */
.task-list {
  list-style: none; /* Remove default list bullets */
  padding: 0;
  margin: 0;
  max-width: 100%;
  box-sizing: border-box;
}

.no-tasks-message {
  text-align: center;
  color: #777;
  font-style: italic;
  padding: 20px;
  background-color: #f8f9fa;
  border-radius: 8px;
  margin-top: 20px;
  max-width: 100%;
  box-sizing: border-box;
}
src/components/TaskItem.css
/* Styling for the TaskItem component */
.task-item {
  display: flex;
  align-items: center;
  background-color: #f9f9f9;
  padding: 15px 20px;
  border-radius: 8px;
  margin-bottom: 10px; /* Space between items */
  border: 1px solid #eee;
  transition: background-color 0.2s ease, border-color 0.2s ease;
  max-width: 100%;
  box-sizing: border-box;
  overflow: hidden; /* Ensure content stays within bounds */
}

.task-item.completed {
  background-color: #e6ffe6; /* Light green for completed tasks */
  border-color: #d4edda;
  opacity: 0.8;
}

.task-item.completed .task-text {
  text-decoration: line-through;
  color: #777;
}

.task-checkbox {
  margin-right: 15px;
  width: 20px;
  height: 20px;
  cursor: pointer;
  accent-color: #28a745; /* Green checkbox */
  flex-shrink: 0; /* Prevent checkbox from shrinking */
}

.task-text {
  flex-grow: 1; /* Allows text to take up available space */
  font-size: 1.1em;
  color: #333;
  word-break: break-word; /* Prevents long words from overflowing */
}

.delete-button {
  background: none;
  border: none;
  color: #dc3545; /* Red delete button */
  font-size: 1.3em;
  cursor: pointer;
  margin-left: 15px;
  transition: color 0.2s ease, transform 0.2s ease;
  flex-shrink: 0; /* Prevent button from shrinking */
  padding: 0; /* Remove default button padding */
  width: 25px; /* Fixed width for consistency */
  height: 25px; /* Fixed height for consistency */
  display: flex;
  justify-content: center;
  align-items: center;
}

.delete-button:hover {
  color: #c82333;
  transform: scale(1.1);
}
JavaScript: The Brains Behind Our React Task Manager
Now, for the most exciting part: the JavaScript! This is where React Hooks truly shine. We’ll use useState to manage our task list. We’ll also employ useEffect for handling side effects. This includes interacting with Local Storage. These Hooks make our component logic clear and concise. They help us build robust applications with less code. Let’s dive into the core component that brings everything to life.
src/index.js
import React from 'react';
import ReactDOM from 'react-dom/client';
import './index.css'; // Global styles
import App from './App'; // Main App component

const root = ReactDOM.createRoot(document.getElementById('root'));
root.render(
  <React.StrictMode>
    <App />
  </React.StrictMode>
);
src/App.js
import React, { useState, useEffect, useCallback } from 'react';
import './App.css';
import TaskForm from './components/TaskForm';
import TaskList from './components/TaskList';

/**
 * Main application component for the React Task Manager.
 * Manages tasks state and interactions with local storage.
 */
function App() {
  // State to hold the list of tasks
  const [tasks, setTasks] = useState(() => {
    // Initialize tasks from local storage or an empty array
    const savedTasks = localStorage.getItem('react-task-manager-tasks');
    return savedTasks ? JSON.parse(savedTasks) : [];
  });

  // Effect to save tasks to local storage whenever the 'tasks' state changes
  useEffect(() => {
    localStorage.setItem('react-task-manager-tasks', JSON.stringify(tasks));
  }, [tasks]);

  /**
   * Adds a new task to the list.
   * @param {string} taskText - The text content of the new task.
   */
  const addTask = useCallback((taskText) => {
    if (taskText.trim() === '') return; // Prevent adding empty tasks

    const newId = Date.now().toString(); // Simple unique ID
    const newTask = { id: newId, text: taskText, completed: false };
    setTasks((prevTasks) => [...prevTasks, newTask]);
  }, []);

  /**
   * Toggles the completion status of a task.
   * @param {string} id - The ID of the task to toggle.
   */
  const toggleTaskComplete = useCallback((id) => {
    setTasks((prevTasks) =>
      prevTasks.map((task) =>
        task.id === id ? { ...task, completed: !task.completed } : task
      )
    );
  }, []);

  /**
   * Deletes a task from the list.
   * @param {string} id - The ID of the task to delete.
   */
  const deleteTask = useCallback((id) => {
    setTasks((prevTasks) => prevTasks.filter((task) => task.id !== id));
  }, []);

  return (
    <div className="app-container">
      <h1>React Task Manager</h1>
      <TaskForm onAddTask={addTask} />
      <TaskList
        tasks={tasks}
        onToggleComplete={toggleTaskComplete}
        onDeleteTask={deleteTask}
      />
    </div>
  );
}

export default App;
src/components/TaskForm.js
import React, { useState } from 'react';
import './TaskForm.css';

/**
 * TaskForm component for adding new tasks.
 * @param {object} props - Component props.
 * @param {function} props.onAddTask - Function to call when a new task is added.
 */
function TaskForm({ onAddTask }) {
  const [taskText, setTaskText] = useState('');

  /**
   * Handles form submission.
   * Prevents default form behavior and calls onAddTask with the current task text.
   * Clears the input field after submission.
   * @param {Event} e - The form submission event.
   */
  const handleSubmit = (e) => {
    e.preventDefault();
    if (taskText.trim()) {
      onAddTask(taskText.trim());
      setTaskText(''); // Clear input after adding
    }
  };

  return (
    <form className="task-form" onSubmit={handleSubmit}>
      <input
        type="text"
        className="task-input"
        placeholder="What needs to be done?"
        value={taskText}
        onChange={(e) => setTaskText(e.target.value)}
        aria-label="New task description"
      />
      <button type="submit" className="add-button">
        Add Task
      </button>
    </form>
  );
}

export default TaskForm;
src/components/TaskList.js
import React from 'react';
import TaskItem from './TaskItem';
import './TaskList.css'; // Import TaskList specific styles

/**
 * TaskList component for displaying a list of tasks.
 * @param {object} props - Component props.
 * @param {Array<object>} props.tasks - An array of task objects.
 * @param {function} props.onToggleComplete - Function to toggle a task's completion status.
 * @param {function} props.onDeleteTask - Function to delete a task.
 */
function TaskList({ tasks, onToggleComplete, onDeleteTask }) {
  if (tasks.length === 0) {
    return (
      <p className="no-tasks-message">No tasks yet! Add one above.</p>
    );
  }

  return (
    <ul className="task-list">
      {tasks.map((task) => (
        <TaskItem
          key={task.id}
          task={task}
          onToggleComplete={onToggleComplete}
          onDeleteTask={onDeleteTask}
        />
      ))}
    </ul>
  );
}

export default TaskList;
src/components/TaskItem.js
import React from 'react';
import './TaskItem.css'; // Import TaskItem specific styles

/**
 * TaskItem component for displaying a single task.
 * @param {object} props - Component props.
 * @param {object} props.task - The task object { id, text, completed }.
 * @param {function} props.onToggleComplete - Function to toggle task completion.
 * @param {function} props.onDeleteTask - Function to delete the task.
 */
function TaskItem({ task, onToggleComplete, onDeleteTask }) {
  return (
    <li className={`task-item ${task.completed ? 'completed' : ''}`}>
      <input
        type="checkbox"
        className="task-checkbox"
        checked={task.completed}
        onChange={() => onToggleComplete(task.id)}
        aria-label={`Mark task "${task.text}" as ${task.completed ? 'incomplete' : 'complete'}`}
      />
      <span className="task-text">{task.text}</span>
      <button
        className="delete-button"
        onClick={() => onDeleteTask(task.id)}
        aria-label={`Delete task "${task.text}"`}
      >
        ✕
      </button>
    </li>
  );
}

export default TaskItem;
How It All Works Together: A Step-by-Step Breakdown
Let’s peel back the layers and understand the magic. Our React app uses components. It manages its state. And it persists data in the browser. This combines modern web development best practices.
Setting Up Our React Component
Our main component, often named App or TaskManager, is a functional component. We start by importing React. Then, we bring in useState and useEffect. These are the two primary Hooks we’ll be using. The component function will return JSX. This JSX describes what our task manager looks like. Think of it as a blueprint for the UI. It will contain input fields, buttons, and a list of our tasks. All interactions happen within this component. This keeps our code organised and easy to follow.
Managing Tasks with useState
The useState Hook is fundamental for managing our application’s state. We’ll declare a state variable called tasks. It will hold an array of task objects. Each task object will have properties like id, text, and isCompleted. When we want to change this list of tasks, we use the setTasks function. This function ensures React knows the state has changed. Consequently, React will re-render our component to show the updated task list. It’s a clean way to handle data that changes over time.
Persisting Data with useEffect and Local Storage
Here’s the cool part: making our tasks permanent! The useEffect Hook lets us perform side effects. These include data fetching and direct DOM updates. In our case, it’s perfect for interacting with the browser’s Local Storage API. We use useEffect in two main ways. First, we load tasks from Local Storage when the component first mounts. This fetches any previously saved tasks. Second, we save the current tasks array to Local Storage whenever it changes. This is achieved by listing tasks in the dependency array of useEffect. We convert our tasks array to a JSON string before saving it. Then, we parse it back into an array when loading. This keeps our data safe and sound.
Pro Tip: Be mindful of your
useEffectdependency array! An empty array[]means it runs once on mount. Including dependencies like[tasks]means it runs whenever those values change. This is crucial for performance and correctness.
Adding and Deleting Tasks
Adding a new task involves a simple form. When the form is submitted, we create a new task object. This object gets a unique ID and the text from the input. We then use setTasks to add this new task to our existing list. Remember, we always create a *new* array with the new task. We never directly modify the old state array. Similarly, deleting a task is straightforward. We use the filter array method. This method creates a new array. It includes all tasks *except* the one we want to delete. Again, setTasks updates our component, showing the updated list. This process highlights React’s immutable state pattern.
Toggling Task Completion
Marking a task as complete is a core feature. Each task item will have a checkbox or a button. When clicked, we need to update that specific task’s isCompleted property. We achieve this by mapping over our tasks array. When we find the matching task by its ID, we create a *new* task object. This new object has its isCompleted property toggled. All other tasks remain unchanged. Finally, we call setTasks with this brand-new array. This makes the UI reflect the completion status. It provides clear visual feedback to the user.
Tips to Customise It: Make It Your Own!
You’ve built a solid foundation! Now, how about making this React Task Manager truly unique? Here are some ideas:
- Add Categories: Allow users to assign categories to tasks (e.g., “Work”, “Personal”, “Urgent”). Then, you can add filtering options.
- Edit Task Text: Implement an edit button for each task. This lets users modify task descriptions after creation.
- Priorities: Include a priority level (Low, Medium, High). This helps users sort their tasks more effectively.
- Due Dates: Add a date picker for setting due dates. You could even display upcoming tasks more prominently.
- Animations: Introduce some subtle CSS transitions or animations. For instance, tasks could fade in or out when added or deleted.
Feeling inspired? You could even explore a more complex UI. Take a look at our Kanban Board UI Design: HTML, CSS & JavaScript tutorial for ideas on project management layouts. Furthermore, understanding patterns like DI JavaScript: Dependency Injection Pattern Tutorial can make your larger React apps more maintainable. For those interested in how React updates the UI efficiently, check out our guide on Virtual DOM: JS Implementation Guide (Web Component)!
Conclusion: You Did It!
Wow, you just built a complete React Task Manager! You mastered using React Hooks like useState and useEffect. Moreover, you integrated Local Storage for data persistence. This is a huge accomplishment! You now have a practical app. It demonstrates key concepts in modern React development. Keep experimenting with the customisation ideas. Share your creations with the community. You’re well on your way to becoming a React pro. Happy coding!