Flask HTMX Live Search: Real-time UI with Python & HTMX
Hey there, fellow coders! Ever wanted to add a super snappy search bar to your web app? One that gives instant results as you type? Today, we are building a fantastic Flask HTMX Live Search feature! You’ll absolutely love this approach. It makes your web applications feel incredibly responsive. And the best part? It uses very little JavaScript, which is awesome. Get ready to impress yourself and your users!
What We Are Building
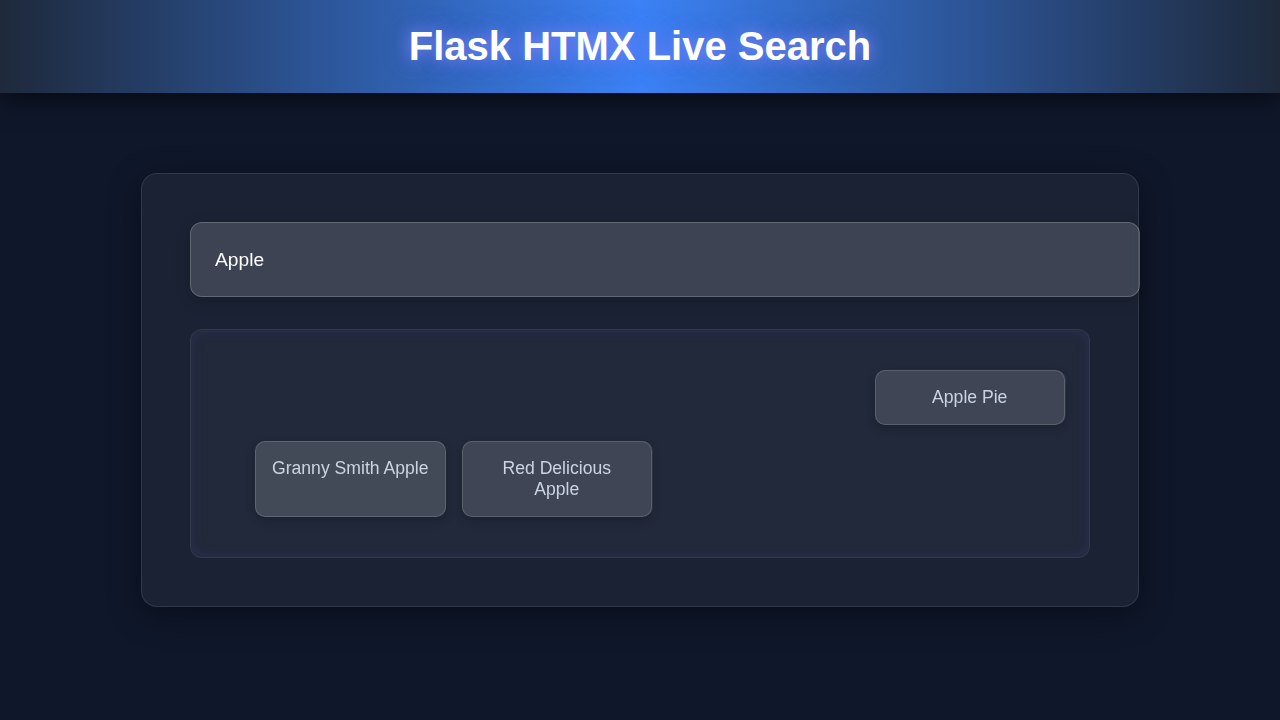
We are going to create a simple product catalog application. It will display a list of items, like products in an online store. Most importantly, it will feature a live search bar right at the top. As you type into this bar, the product list updates instantly. There are no full page reloads needed. This provides a wonderfully smooth and interactive user experience. We will use Flask for our reliable backend logic. HTMX handles all the amazing frontend magic. It makes dynamic updates feel incredibly simple to achieve. Imagine using this for an e-commerce site, a user directory, or even a blog search! It’s a truly versatile pattern.
HTML Structure
First things first, we need a solid basic HTML page. This page will host our interactive search input field. It also needs a dedicated container for our product list to live in. The index.html file sets up this essential foundation. Crucially, it includes the HTMX library. This small library is the absolute key to our dynamic updates. Here’s a glimpse of what our main HTML page structure will look like. It’s clean and purposeful.
templates/index.html
<!DOCTYPE html>
<html lang="en">
<head>
    <meta charset="UTF-8">
    <meta name="viewport" content="width=device-width, initial-scale=1.0">
    <title>Flask HTMX Live Search</title>
    <link rel="stylesheet" href="{{ url_for('static', filename='styles.css') }}">
    <!-- HTMX library for dynamic content loading -->
    <script src="https://unpkg.com/htmx.org@1.9.10" integrity="sha384-D1Kt99CQGjMqcCT1HT1hgy6hrfGE9KEzJslG3HpQzGKmfoxNTZMUtBZXlRSTtNtm" crossorigin="anonymous"></script>
</head>
<body class="dark-mode">
    <div class="container">
        <h1>Live Search with Flask & HTMX</h1>

        <div class="search-box glassmorphism">
            <input
                type="search"
                name="query"
                placeholder="Search items..."
                hx-post="/search"                  <!-- Target Flask /search route -->
                hx-trigger="keyup changed delay:300ms, search" <!-- Trigger on keyup, with a delay -->
                hx-target="#search-results"        <!-- Update the element with id="search-results" -->
                hx-swap="outerHTML"                <!-- Replace the entire target element -->
                class="search-input"
                aria-label="Search items"
            >
        </div>

        <div id="search-results" class="results-container">
            <!-- Initial items loaded directly by Flask -->
            {% include 'search_results.html' %}
        </div>
    </div>
</body>
</html>
templates/search_results.html
<!-- This partial is rendered by Flask and swapped by HTMX -->
{% if items %}
    <ul class="item-list">
        {% for item in items %}
            <li class="item-card glassmorphism-result">{{ item }}</li>
        {% endfor %}
    </ul>
{% else %}
    <p class="no-results">No items found matching your search.</p>
{% endif %}
CSS Styling
We definitely want our live search application to look appealing and user-friendly. So, applying just a little CSS goes a very long way! These specific styles make our product list quite readable. They also give the search bar a clean, professional appearance. Don’t worry about overly complex design elements right now. Our primary focus is on functionality and clarity. If you ever need to brush up on fundamental CSS properties, MDN Web Docs is an excellent resource. Here is some straightforward CSS. It truly makes everything appear neat and easy to understand.
static/styles.css
/* Basic Reset & Box Sizing */
*, *::before, *::after {
    box-sizing: border-box;
    margin: 0;
    padding: 0;
}

/* Body and General Layout */
body {
    font-family: Arial, Helvetica, sans-serif; /* Safe fonts */
    background-color: #0f172a; /* Dark mode background */
    color: #e2e8f0; /* Light text color */
    display: flex;
    justify-content: center;
    align-items: flex-start; /* Align to top, not center vertically */
    min-height: 100vh;
    padding: 2rem;
    overflow-x: hidden; /* Prevent horizontal scroll */
}

.container {
    max-width: 100%; /* Ensure container respects width */
    width: 800px;
    background: rgba(15, 23, 42, 0.6); /* Slightly darker transparent background for container */
    border-radius: 12px;
    padding: 2.5rem;
    box-shadow: 0 4px 30px rgba(0, 0, 0, 0.1);
    backdrop-filter: blur(8px);
    -webkit-backdrop-filter: blur(8px);
    border: 1px solid rgba(255, 255, 255, 0.1);
    display: flex;
    flex-direction: column;
    gap: 1.5rem;
}

h1 {
    text-align: center;
    color: #cbd5e1;
    font-size: 2.5rem;
    margin-bottom: 1rem;
    text-shadow: 0 0 10px rgba(129, 140, 248, 0.7); /* Subtle glow */
}

/* Glassmorphism Effect */
.glassmorphism {
    background: rgba(255, 255, 255, 0.08); /* Lighter transparent white */
    border-radius: 10px;
    border: 1px solid rgba(255, 255, 255, 0.18);
    box-shadow: 0 8px 32px 0 rgba(0, 0, 0, 0.37);
    backdrop-filter: blur(4px);
    -webkit-backdrop-filter: blur(4px);
    overflow: hidden; /* Important for clean edges */
}

/* Search Input */
.search-box {
    padding: 0.75rem 1.25rem;
    display: flex;
    align-items: center;
    width: 100%;
}

.search-input {
    width: 100%;
    padding: 0.75rem 0.5rem;
    border: none;
    background: transparent;
    color: #e2e8f0;
    font-size: 1.1rem;
    outline: none;
}

.search-input::placeholder {
    color: #94a3b8;
}

.search-input:focus {
    border-bottom: 2px solid #6366f1; /* Neon border on focus */
}

/* Results Container */
.results-container {
    max-height: 500px; /* Limit height for scrolling */
    overflow-y: auto; /* Enable scrolling if content overflows */
    background: rgba(15, 23, 42, 0.4); /* Slightly darker background for results */
    border-radius: 10px;
    padding: 1rem;
    border: 1px solid rgba(255, 255, 255, 0.05);
}

.item-list {
    list-style: none;
    display: grid;
    grid-template-columns: repeat(auto-fill, minmax(180px, 1fr));
    gap: 1rem;
}

.item-card {
    padding: 1rem;
    border-radius: 8px;
    text-align: center;
    font-size: 1.05rem;
    transition: transform 0.2s ease-in-out, box-shadow 0.2s ease-in-out;
    cursor: default;
}

.item-card:hover {
    transform: translateY(-3px) scale(1.02);
    box-shadow: 0 0 20px rgba(99, 102, 241, 0.6); /* Neon glow on hover */
}

.glassmorphism-result { /* Specific glassmorphism for result cards */
    background: rgba(255, 255, 255, 0.05);
    border: 1px solid rgba(255, 255, 255, 0.1);
    box-shadow: 0 4px 10px rgba(0, 0, 0, 0.2);
    backdrop-filter: blur(2px);
    -webkit-backdrop-filter: blur(2px);
}

.no-results {
    text-align: center;
    font-style: italic;
    color: #94a3b8;
    padding: 2rem;
}

/* Scrollbar Styling for Webkit browsers */
.results-container::-webkit-scrollbar {
    width: 8px;
}

.results-container::-webkit-scrollbar-track {
    background: rgba(255, 255, 255, 0.05);
    border-radius: 10px;
}

.results-container::-webkit-scrollbar-thumb {
    background-color: rgba(99, 102, 241, 0.7); /* Neon thumb */
    border-radius: 10px;
    border: 2px solid rgba(15, 23, 42, 0.2);
}

.results-container::-webkit-scrollbar-thumb:hover {
    background-color: #6366f1;
}
JavaScript (The HTMX Difference)
You might be thinking, “Where’s the big JavaScript file?”. That’s the sheer beauty and power of HTMX! For our Flask HTMX Live Search, we need almost no traditional, custom JavaScript. The core of our dynamic behavior comes directly from HTMX itself. You simply include its small script tag in your HTML. This library then expertly handles all the heavy lifting for you. It intelligently sends requests to your Flask backend. It then seamlessly swaps the HTML content on the page. You get to write mostly Python on the backend and structured HTML on the frontend. This innovative approach makes frontend development incredibly efficient. If you want to dive deeper into how HTMX handles its requests, check out the HTMX documentation on requests. It’s truly eye-opening!
app.py
from flask import Flask, render_template, request, jsonify

app = Flask(__name__)

# --- Simulated Data ---
# In a real application, this would come from a database, API, or web scraping.
# For this tutorial, we use a simple list of items.
ALL_ITEMS = [
    "Apple", "Banana", "Cherry", "Date", "Elderberry", "Fig", "Grape",
    "Honeydew", "Imbe", "Jackfruit", "Kiwi", "Lemon", "Mango", "Nectarine",
    "Orange", "Papaya", "Quince", "Raspberry", "Strawberry", "Tangerine",
    "Ugli fruit", "Vanilla bean", "Watermelon", "Xigua", "Yellow passionfruit",
    "Zucchini", "Artichoke", "Broccoli", "Carrot", "Daikon", "Eggplant",
    "Fennel", "Garlic", "Horseradish", "Iceberg lettuce", "Jalapeno",
    "Kale", "Leek", "Mushroom", "Napa cabbage", "Okra", "Potato", "Red onion",
    "Spinach", "Tomato", "Ulluco", "Vivian", "Wakame", "Xanthia", "Yam",
    "Zedoary"
]

@app.route('/')
def index():
    """
    Renders the main page with the search input.
    Initially, it shows all items.
    """
    # Pass all items to initially display them
    return render_template('index.html', items=ALL_ITEMS)

@app.route('/search', methods=['POST'])
def search():
    """
    Handles the live search requests from HTMX.
    Filters ALL_ITEMS based on the search query.
    Returns an HTML partial with the filtered results.
    """
    query = request.form.get('query', '').lower()
    print(f"Received search query: '{query}'") # For debugging

    if not query:
        # If query is empty, return all items
        filtered_items = ALL_ITEMS
    else:
        filtered_items = [
            item for item in ALL_ITEMS if query in item.lower()
        ]

    print(f"Filtered {len(filtered_items)} items.") # For debugging

    # Render only the results partial, HTMX will swap this into the DOM
    return render_template('search_results.html', items=filtered_items)

if __name__ == '__main__':
    # Run Flask app in debug mode for development
    app.run(debug=True)
How It All Works Together: Building Your Flask HTMX Live Search
Now for the truly exciting part! Let’s connect all these pieces together. We will set up our Flask application. It will expertly serve our main HTML page. It will also gracefully handle all the incoming search requests from the browser. This is where the magic really happens!
Flask Application Setup
First, we need a robust Flask application. We will start by creating a data.py file. This simple file will hold our sample product data. It’s just a Python list of dictionaries. Next, we create app.py. This is our main Flask file. It imports Flask itself. It also imports our handy product data. The render_template function is incredibly useful here. It skillfully sends our HTML files to the user’s browser. You will see how simply we set up our application routes. It is a very clean structure.
The Initial Page Load
When a user first visits our application’s homepage, Flask serves the index.html file. This page proudly contains our search input field. It also displays either an empty div or a default list of all products. This initial page load provides the complete user interface. It makes sure everything is perfectly ready for interaction. The powerful HTMX library also loads at this very moment. It diligently prepares itself to intercept our future requests.
HTMX in Action (The Search Input)
Here’s the truly cool part about our search input field in index.html! It boasts special hx- attributes. The hx-get attribute tells HTMX exactly where to send the request. We use hx-get="/search" to direct our search query to Flask. The hx-trigger="keyup changed delay:300ms" is absolutely fantastic. It means HTMX sends a request whenever you type a key. The changed part ensures it only triggers if the input value actually changes. The delay:300ms intelligently stops it from flooding our server. It waits a brief moment after you stop typing. This makes the search incredibly efficient.
The hx-target="#product-list" attribute is also incredibly crucial. It clearly tells HTMX where on the page to put the response. It will dynamically update the div element with the ID product-list. All of this happens instantly, without a full page refresh! It is wonderfully smooth.
“Leveraging
hx-triggerwithdelayis a pro move! It prevents unnecessary server calls and makes your UI feel snappier without overwhelming your backend.”
Flask Responds with Partial HTML
When HTMX sends its request to /search, our Flask application takes over. Our defined search route springs into action. It efficiently grabs your search query from the URL parameters. It then carefully filters our products list based on this query. Finally, Flask renders a new, smaller HTML file. This file is often named product_list.html. It contains only the div with the newly filtered products. Flask does not send the entire web page again. This saves valuable bandwidth. It also makes responses significantly faster. It is the perfect approach for dynamic, real-time updates.
HTMX Swaps the Content
The very moment Flask sends back product_list.html, HTMX immediately goes to work. It receives this partial HTML snippet. It then intelligently takes this new content. It replaces the old content directly inside the #product-list element. This update is truly instant and seamless. The user sees the filtered list appear immediately before their eyes! They might not even notice a network request occurred. This incredibly smooth user experience is precisely why Flask HTMX Live Search is so exceptionally powerful.
“Remember, Flask is excellent for handling server-side logic and rendering partial templates. If you’re building more complex API interactions for your web apps, explore the Python Requests Library – Master HTTP in Python to confidently interact with other services!”
Tips to Customise It
You have built a truly great foundation for a live search! Here are some exciting ideas to make it even better and more robust.
- Add More Data Fields: Include additional product attributes like categories, brands, or prices. Then, extend your Python search logic to filter by these new fields. This adds much more power to your search.
- Advanced Debounce and Throttling: You already have
delay:300ms. Explore other HTMX trigger modifiers likethrottleoronce. These can further optimize performance for very fast typers. - Implement Loading Indicators: Add a small, elegant spinning icon or a progress bar. This can show up while the search request is pending. HTMX has a built-in
hx-indicatorattribute for this exact purpose! It vastly improves user feedback. - Backend Optimizations for Scale: For very large datasets, do not filter in Python memory directly. Instead, connect to a database like SQLite or PostgreSQL! Learn about efficient querying methods for databases. For very large-scale Python applications, understanding core concepts like the Python GIL Explained: Concurrency & Performance can become crucial for optimization.
- Build a Conversational Search: Instead of just a simple text input, imagine a friendly chatbot that helps users find products! You could even integrate what you’ve learned here into building a sophisticated Python Chatbot with Automation! The possibilities are endless.
Conclusion
Wow, you absolutely crushed it! You just successfully built a fantastic Flask HTMX Live Search feature. You expertly harnessed the combined power of Python Flask and HTMX. You created a dynamic, responsive user interface. This truly shows how modern web development can be incredibly efficient and genuinely fun. You completely bypassed the need for complex, heavy JavaScript frameworks. You delivered a smooth, real-time experience to your users. Now, go ahead and share your amazing creation with friends! Keep experimenting with HTMX and Flask. You have taken a massive step forward in your web development journey. Happy coding, pro coder!