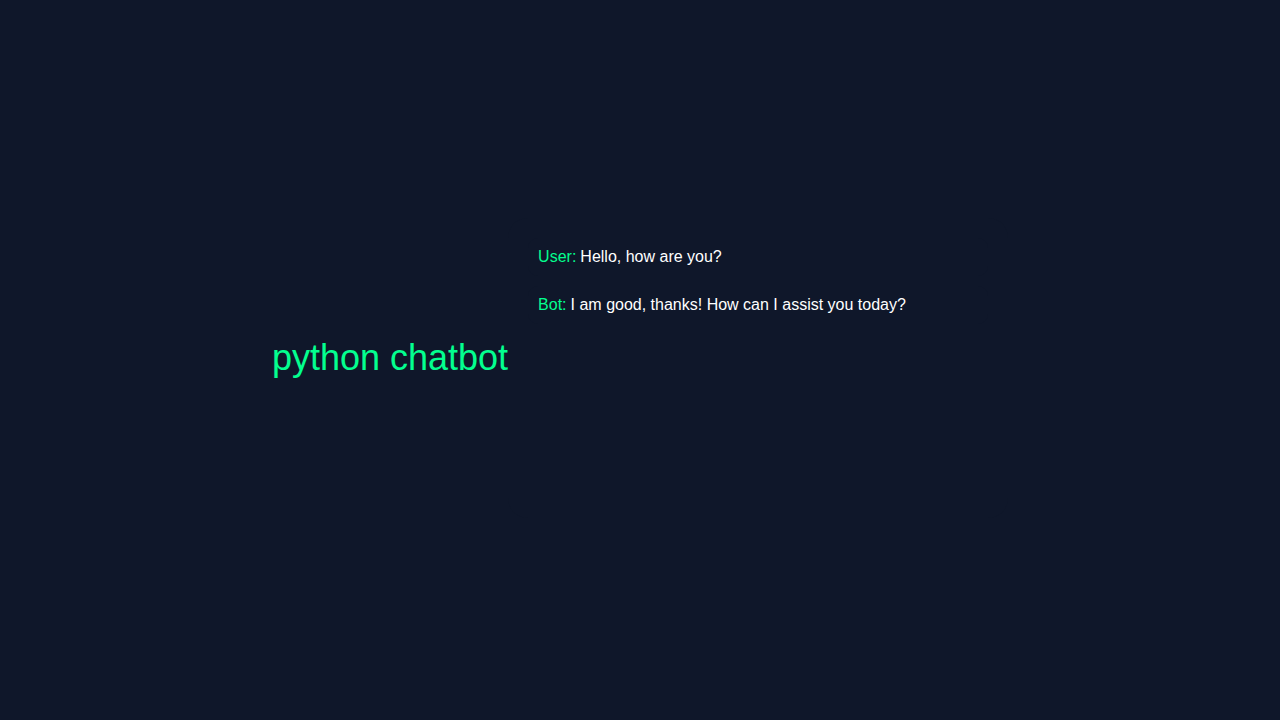
Python Chatbot with Automation
Hey there, fellow coders! Ever wanted to build a simple but smart tool? Today, we will create an amazing **python chatbot**. It will talk back to you! This project is super cool. You will learn so much. It connects front-end and back-end skills. Let’s get started on this exciting journey!
What We Are Building: Your First Python Chatbot
We are going to build a simple web-based chatbot. You will type a message into a text box. Then you will hit send. Our Python Flask backend will process your input. It will then generate a clever reply. Finally, the chatbot will display its response. This is like having a tiny, helpful assistant! Imagine automating simple Q&A. This project uses Python, Flask, HTML, CSS, and JavaScript. It brings together many web development concepts. Consequently, you will see how everything works in harmony. It’s a fantastic way to solidify your skills.
Setting Up Your Project
Before coding, we need to set up our environment. First, create a project folder. Inside, set up a virtual environment. This keeps your project dependencies tidy. Then, activate your virtual environment. Install Flask using pip. Next, create an app.py file. This will hold our Python code. Also, make a templates folder. Inside templates, add index.html. Furthermore, create a static folder. Inside static, we will have style.css and script.js. This structure is very common in Flask applications.
Pro Tip: Always use a virtual environment! It prevents conflicts between different Python projects. This practice is super important for clean development.
HTML Structure: The Chat Interface
Our HTML file, index.html, will define the visual layout. It provides the essential structure for our chat window. We will have a container for all the messages. There will also be an input field for you to type. Finally, a button will send your message. It is the skeleton of our chatbot. Moreover, it links to our CSS and JavaScript files. This connects all the pieces. Take a look:
CSS Styling: Making Your Chatbot Look Good
Now, let’s make our chatbot visually appealing. The style.css file will handle all the styling. We want a clean, modern look. This includes setting fonts, colors, and layout. A pleasant user experience is absolutely key. Therefore, we will add some basic styling for the chat bubbles and input area. This makes your chatbot feel professional. Learn more about flexible box layout at CSS-Tricks Flexbox Guide. Here’s how we style it:
JavaScript: Bringing Interactivity
The script.js file adds dynamic behavior. It listens for your input. When you send a message, JavaScript captures it. Then it sends your message to our Python backend. It also displays the chatbot’s replies. So, it’s the brain of our front-end. We will use the powerful Fetch API for communication. This ensures smooth, asynchronous interactions. Here’s the cool part:
chatbot.py
import random
from datetime import datetime

class ChatBot:
    def __init__(self, name):
        self.name = name
        self.greetings = ['Hello, how are you?', 'Hi, what's up?', 'Hey, how's it going?']
        self.farewells = ['See you later!', 'Goodbye!', 'Have a great day!']
        self.responses = {'hello': 'Hi, how are you?', 'how are you': 'I am good, thanks!', 'what is your name': 'My name is ' + self.name}

    def greet(self):
        return random.choice(self.greetings)

    def farewell(self):
        return random.choice(self.farewells)

    def respond(self, message):
        message = message.lower()
        if message in self.responses:
            return self.responses[message]
        else:
            return 'Sorry, I did not understand that.

# Create a new chatbot
bot = ChatBot('PyBot')
print(bot.greet())
while True:
    message = input('> ')
    if message.lower() == 'quit':
        print(bot.farewell())
        break
    print(bot.respond(message))
How It All Works Together: The Python Flask Backend
This is where the magic truly happens! Our app.py file, powered by Flask, is the core. It receives messages from the JavaScript. It processes them using Python logic. Then, it sends responses back to the front-end. This creates the conversational flow. It’s an exciting bridge between client and server. This is where your Flask REST API Tutorial: Build a Python Web Service skills come in handy! Let’s explore the backend step by step.
Setting Up Flask
First, we import the necessary Flask components. We create an instance of our Flask application. Then, we define a route for the main page. This route simply renders our index.html template. Flask automatically looks for templates in the templates folder. It also serves static files from the static folder. This setup provides the foundation for our web application. Consequently, you can access your chatbot from your browser. It really is that straightforward.
Handling Chat Messages
Next, we create a specific route for handling chat interactions. This route will only accept POST requests. Our JavaScript sends your messages to this endpoint. The Python code then extracts your message from the request. We will implement simple if/else statements. These will determine the chatbot’s response. For instance, if you say ‘hello’, it might say ‘Hi there!’. Finally, we return the chatbot’s reply as JSON. This is your Python Requests Library: Simplified HTTP & API Guide in action! This allows the JavaScript to easily update the chat.
Running Your Chatbot
To start your Flask application, we use a conditional block. This ensures the server runs only when the script is executed directly. We tell Flask to run in debug mode. This is great for development. It provides helpful error messages. Simply navigate to your project directory in the terminal. Then, run python app.py. Open your web browser. Go to http://127.0.0.1:5000/. Your amazing chatbot will be waiting for you!
Did You Know? The
debug=Truesetting automatically reloads the server on code changes. This saves you a lot of time during development. Just be sure to turn it off in production!
Tips to Customise Your Python Chatbot
You’ve built a functional chatbot! But the fun doesn’t stop here. There are many ways to make your **python chatbot** even better. Here are some ideas:
- Add More Complex Logic: Expand the if/else statements. Make your chatbot respond to more phrases. You could even use regular expressions for pattern matching.
- Integrate NLP: Use libraries like NLTK or spaCy. These can help your bot understand natural language better. This will make conversations much more fluid.
- Connect to External APIs: Make your bot pull real-time data. Imagine it telling you the weather. It could also fetch news headlines. Your Flask TODO API Tutorial: Build a Python Backend for Tasks could inspire task management features.
- Store Chat History: Use a database like SQLite or PostgreSQL. This will keep a record of conversations. You could even add user accounts.
- Improve the UI: Experiment with different CSS frameworks. Bootstrap or Tailwind CSS can make it look even more polished.
Conclusion: You Built a Python Chatbot!
Wow! You just built your very own interactive **python chatbot**. That’s a huge achievement! You’ve combined front-end and back-end skills. You learned about Flask routing, handling requests, and dynamic web content. This project showcases your growing web development abilities. We are incredibly proud of your hard work. Now, share your creation with friends! Tweak it, expand it, and make it your own. Keep coding, keep learning, and never stop building amazing things!
chatbot.py
import random
from datetime import datetime

class ChatBot:
    def __init__(self, name):
        self.name = name
        self.greetings = ['Hello, how are you?', 'Hi, what's up?', 'Hey, how's it going?']
        self.farewells = ['See you later!', 'Goodbye!', 'Have a great day!']
        self.responses = {'hello': 'Hi, how are you?', 'how are you': 'I am good, thanks!', 'what is your name': 'My name is ' + self.name}

    def greet(self):
        return random.choice(self.greetings)

    def farewell(self):
        return random.choice(self.farewells)

    def respond(self, message):
        message = message.lower()
        if message in self.responses:
            return self.responses[message]
        else:
            return 'Sorry, I did not understand that.

# Create a new chatbot
bot = ChatBot('PyBot')
print(bot.greet())
while True:
    message = input('> ')
    if message.lower() == 'quit':
        print(bot.farewell())
        break
    print(bot.respond(message))