Hey there, fellow coder! If you’ve wanted to build a real-world application but weren’t sure where to start, you are in the perfect spot. Today, we’re diving deep into creating a fantastic Weather App JavaScript project from scratch. It’s truly amazing what you can build with just HTML, CSS, and a sprinkle of JavaScript. We’ll fetch live weather data and display it beautifully on your screen. This project is a super exciting way to practice your web development skills!
What We Are Building: Your Personal Weather Dashboard!
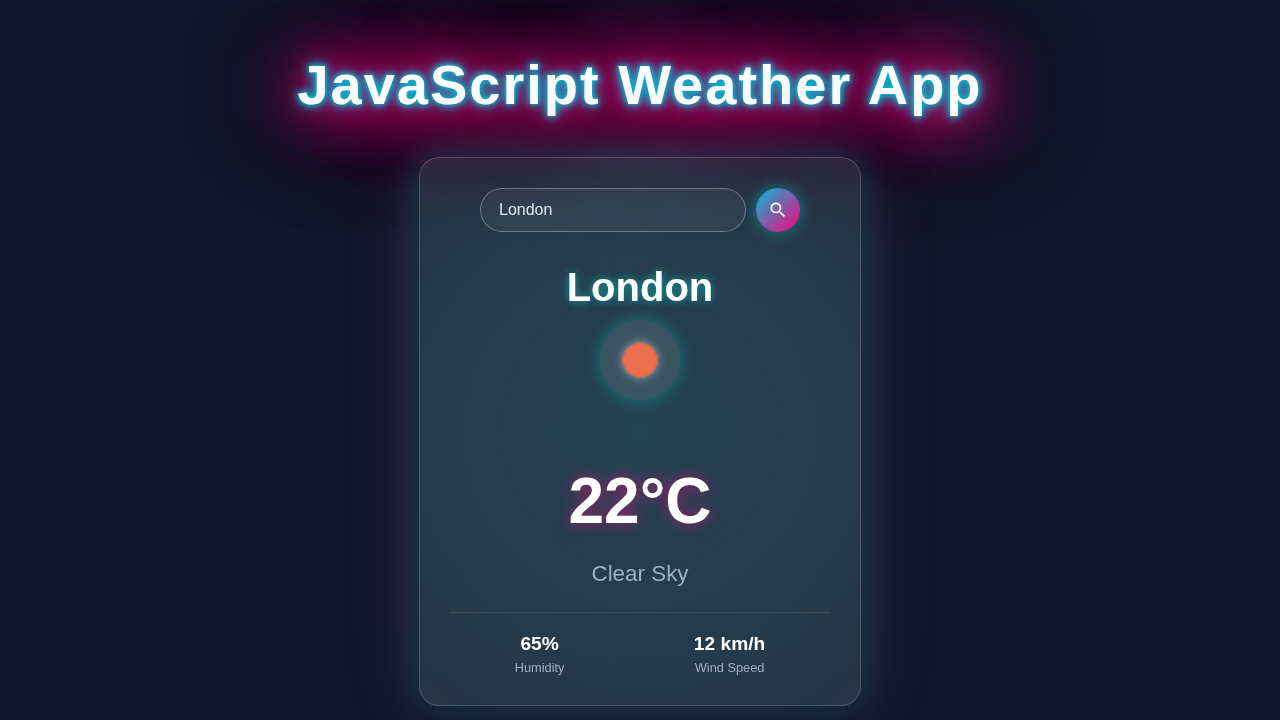
Imagine knowing the weather instantly, right from your own custom-built page. That’s exactly what we’re making! Our app will let you type in any city name. Then, it will fetch the current temperature, humidity, wind speed, and a cool weather icon for that location. This isn’t just a static display. It’s dynamic, interactive, and super useful! We will learn how to connect to external services. Moreover, we will see how to update our web page in real-time. This project is a cornerstone for understanding modern web development.
HTML Structure: The Bones of Our Weather App JavaScript
First things first, we need a solid foundation. Our HTML will provide the basic layout and elements for our weather app. It’s like sketching out the blueprint for your house. We’ll have a main container, an input field for cities, a search button, and dedicated spots to display all our weather information. It’s clean, semantic, and ready for styling!
index.html
<!DOCTYPE html>
<html lang="en">
<head>
    <meta charset="UTF-8">
    <meta name="viewport" content="width=device-width, initial-scale=1.0">
    <title>Vanilla JS Weather App</title>
    <link rel="stylesheet" href="styles.css">
    <!-- Favicon: A simple weather icon (e.g., cloud) could be displayed here if you have one. -->
    <!-- For simplicity, this tutorial does not include specific favicon files. -->
</head>
<body>
    <div class="weather-app">
        <div class="search-box">
            <input type="text" id="city-input" placeholder="Enter city name..." spellcheck="false" autocomplete="off">
            <button id="search-btn" aria-label="Search weather for city">
                <!-- Search icon (magnifying glass) -->
                <svg viewBox="0 0 24 24" xmlns="http://www.w3.org/2000/svg">
                    <path fill="currentColor" d="M15.5 14h-.79l-.28-.27A6.471 6.471 0 0 0 16 9.5 6.5 6.5 0 1 0 9.5 16c1.61 0 3.09-.59 4.23-1.57l.27.28v.79l5 4.99L20.49 19l-4.99-5zm-6 0C7.01 14 5 11.99 5 9.5S7.01 5 9.5 5 14 7.01 14 9.5 11.99 14 9.5 14z"/>
                </svg>
            </button>
        </div>

        <div class="weather-display hidden">
            <img src="" alt="Weather Icon" class="weather-icon">
            <h1 class="temp">--°C</h1>
            <h2 class="city">City Name</h2>
            <p class="description">Weather Description</p>
            <div class="details">
                <div class="col">
                    <!-- Humidity icon (Material Symbols Outline: water_drop) -->
                    <svg xmlns="http://www.w3.org/2000/svg" height="24" viewBox="0 -960 960 960" width="24"><path fill="currentColor" d="M480-120q-106 0-183-77T220-400q0-88 77-183t183-183q106 0 183 77t77 183q0 88-77 183t-183 183Zm0-320q-66 0-113-47t-47-113q0-66 47-113t113-47q66 0 113 47t47 113q0 66-47 113t-113 47Zm0-120q-25 0-42.5-17.5T420-680q0-25 17.5-42.5T480-740q25 0 42.5 17.5T540-680q0 25-17.5 42.5T480-620Zm0 460q75 0 127.5-52.5T660-400q0-54-47.5-108T480-680q-54 72-101.5 126T300-400q0 75 52.5 127.5T480-260Z"/></svg>
                    <div>
                        <p class="humidity">--%</p>
                        <p>Humidity</p>
                    </div>
                </div>
                <div class="col">
                    <!-- Wind icon (Material Symbols Outline: airspeed) -->
                    <svg xmlns="http://www.w3.org/2000/svg" height="24" viewBox="0 -960 960 960" width="24"><path fill="currentColor" d="M480-160q-100 0-183.5-56T152-360H120v-80h40q-2-12-2-20.5T158-480q0-83 58.5-141.5T318-680h30l-16-16 56-56 120 120-120 120-56-56 16-16h-30q-49 0-83.5 34.5T200-480q0 5 0 8.5t-1 8.5h40q2-11 2-20.5T238-520q0-33 19.5-57T318-600h312q75 0 127.5 52.5T780-420q0 75-52.5 127.5T600-240H480Zm0-80h120q41 0 70.5-29.5T670-420q0-41-29.5-70.5T600-520H480v-80q-66 0-113-47t-47-113q0-66 47-113t113-47q66 0 113 47t47 113H700q0-100-70-170t-170-70q-100 0-170 70t-70 170q0 78 52 131t128 79v480Z"/></svg>
                    <div>
                        <p class="wind">-- km/h</p>
                        <p>Wind Speed</p>
                    </div>
                </div>
            </div>
        </div>
        <div class="error-message hidden">
            <p>Invalid city name or unable to fetch weather data. Please try again.</p>
        </div>
    </div>

    <script src="script.js"></script>
</body>
</html>
CSS Styling: Making Our Weather App JavaScript Look Amazing
Now for the fun part: making it pretty! Our CSS will transform those plain HTML elements into an attractive, user-friendly interface. We’ll add backgrounds, style the input and button, and make sure our weather data is easy to read. You’ll be surprised how much a little CSS can do! We will use modern flexbox techniques to arrange our elements neatly. Get ready for some visual magic!
styles.css
/* Universal Styles */
body {
    margin: 0;
    padding: 0;
    font-family: Arial, Helvetica, sans-serif;
    background: linear-gradient(135deg, #0f172a, #1a202c); /* Dark background gradient */
    color: #e2e8f0;
    display: flex;
    justify-content: center;
    align-items: center;
    min-height: 100vh;
    overflow: hidden; /* Prevent body scrollbars */
    box-sizing: border-box;
}

.weather-app {
    background: rgba(255, 255, 255, 0.1); /* Glassmorphism effect */
    backdrop-filter: blur(10px);
    border: 1px solid rgba(255, 255, 255, 0.2);
    border-radius: 20px;
    padding: 40px;
    width: 90%;
    max-width: 450px; /* Max width for responsiveness */
    text-align: center;
    box-shadow: 0 8px 32px 0 rgba(0, 0, 0, 0.37); /* Base shadow */
    position: relative;
    overflow: hidden; /* Contain inner elements */
    box-sizing: border-box;
}

/* Optional: Add subtle glow effect for aesthetic */
.weather-app::before {
    content: '';
    position: absolute;
    top: -50%;
    left: -50%;
    width: 200%;
    height: 200%;
    background: radial-gradient(circle at center, rgba(0, 255, 255, 0.05) 0%, transparent 70%);
    animation: rotate-glow 15s linear infinite;
    z-index: -1;
}

@keyframes rotate-glow {
    0% { transform: rotate(0deg); }
    100% { transform: rotate(360deg); }
}

/* Search Box Styles */
.search-box {
    display: flex;
    align-items: center;
    justify-content: space-between;
    margin-bottom: 30px;
}

.search-box input {
    flex: 1; /* Takes available space */
    padding: 12px 20px;
    border: 1px solid rgba(255, 255, 255, 0.3);
    background: rgba(255, 255, 255, 0.05);
    border-radius: 25px;
    outline: none;
    color: #e2e8f0;
    font-size: 1.1em;
    margin-right: 15px;
    box-sizing: border-box; /* Include padding and border in the element's total width and height */
    transition: border-color 0.3s ease, box-shadow 0.3s ease;
}

.search-box input::placeholder {
    color: #a0aec0;
}

.search-box input:focus {
    border-color: #00bcd4; /* Accent color */
    box-shadow: 0 0 10px rgba(0, 255, 255, 0.4);
}

.search-box button {
    background: linear-gradient(135deg, #00bcd4, #ff007f); /* Neon gradient for button */
    border: none;
    border-radius: 50%;
    width: 50px;
    height: 50px;
    cursor: pointer;
    display: flex;
    justify-content: center;
    align-items: center;
    transition: transform 0.3s ease, box-shadow 0.3s ease;
    box-shadow: 0 0 15px rgba(0, 255, 255, 0.3);
}

.search-box button:hover {
    transform: scale(1.05);
    box-shadow: 0 0 20px rgba(0, 255, 255, 0.5);
}

.search-box button svg {
    fill: #ffffff; /* White icon */
    width: 24px;
    height: 24px;
}

/* Weather Display Styles */
.weather-display {
    text-align: center;
}

.weather-display .weather-icon {
    width: 100px;
    height: 100px;
    margin: 0 auto 15px;
    filter: drop-shadow(0 0 10px rgba(255, 255, 255, 0.5)); /* Icon glow */
}

.weather-display .temp {
    font-size: 4em;
    font-weight: bold;
    margin-bottom: 5px;
    color: #ffffff;
    text-shadow: 0 0 15px rgba(255, 0, 127, 0.6); /* Temperature glow */
}

.weather-display .city {
    font-size: 2.2em;
    margin-bottom: 10px;
    color: #ffffff;
    text-shadow: 0 0 8px rgba(0, 255, 255, 0.4); /* City glow */
}

.weather-display .description {
    font-size: 1.2em;
    color: #a0aec0;
    margin-bottom: 30px;
    text-transform: capitalize;
}

/* Details Section Styles */
.details {
    display: flex;
    justify-content: space-around;
    align-items: center;
    margin-top: 30px;
    padding-top: 25px;
    border-top: 1px solid rgba(255, 255, 255, 0.15);
}

.details .col {
    display: flex;
    align-items: center;
    text-align: left;
    margin: 0 15px;
}

.details .col svg {
    width: 35px;
    height: 35px;
    margin-right: 15px;
    filter: drop-shadow(0 0 8px rgba(255, 255, 255, 0.4)); /* Icon glow */
}

.details .col div p {
    margin: 0;
    font-size: 1.3em;
    font-weight: bold;
    color: #ffffff;
}

.details .col div p:last-child {
    font-size: 0.9em;
    color: #a0aec0;
    font-weight: normal;
}

/* Hidden Utility Class */
.hidden {
    display: none;
}

/* Error Message Styles */
.error-message {
    background: rgba(255, 0, 0, 0.15);
    border: 1px solid rgba(255, 0, 0, 0.4);
    border-radius: 10px;
    padding: 15px;
    margin-top: 20px;
    color: #ffcccc;
    font-size: 1.1em;
    box-shadow: 0 0 15px rgba(255, 0, 0, 0.3);
}

/* Responsive adjustments */
@media (max-width: 500px) {
    .weather-app {
        padding: 25px;
    }
    .search-box input {
        font-size: 1em;
        padding: 10px 15px;
    }
    .search-box button {
        width: 45px;
        height: 45px;
    }
    .weather-display .temp {
        font-size: 3.5em;
    }
    .weather-display .city {
        font-size: 1.8em;
    }
    .weather-display .description {
        font-size: 1.1em;
    }
    .details .col {
        margin: 0 10px;
    }
    .details .col svg {
        width: 30px;
        height: 30px;
        margin-right: 10px;
    }
    .details .col div p {
        font-size: 1.1em;
    }
    .details .col div p:last-child {
        font-size: 0.8em;
    }
}
JavaScript Magic Behind Our Weather App JavaScript
Here’s the cool part: the JavaScript! This is where our app truly comes alive. We will use JavaScript to listen for user input. Then, we will fetch data from a weather API. Finally, we will update our HTML with the retrieved information. This section teaches you about asynchronous operations and powerful DOM manipulation. It’s the brain of our entire application, connecting everything together seamlessly!
script.js
// weather_api_key: Replace with your actual OpenWeatherMap API key
// You can get one for free at https://openweathermap.org/api
const API_KEY = "YOUR_API_KEY";
const API_URL = "https://api.openweathermap.org/data/2.5/weather?units=metric&q=";

// Get DOM elements
const cityInput = document.getElementById("city-input");
const searchBtn = document.getElementById("search-btn");
const weatherDisplay = document.querySelector(".weather-display");
const weatherIcon = document.querySelector(".weather-icon");
const temperature = document.querySelector(".temp");
const cityElement = document.querySelector(".city");
const descriptionElement = document.querySelector(".description");
const humidityElement = document.querySelector(".humidity");
const windSpeedElement = document.querySelector(".wind");
const errorMessage = document.querySelector(".error-message");

/**
 * Fetches weather data for a given city and updates the UI.
 * @param {string} city - The name of the city to fetch weather for.
 */
async function checkWeather(city) {
    try {
        // Fetch weather data from OpenWeatherMap API
        const response = await fetch(API_URL + city + `&appid=${API_KEY}`);

        // Check if the response was successful (status code 200-299)
        if (!response.ok) {
            // Handle non-2xx responses (e.g., 404 Not Found, 401 Unauthorized)
            if (response.status === 404) {
                showError("City not found. Please check the spelling.");
            } else if (response.status === 401) {
                showError("Invalid API Key. Please ensure your API_KEY in script.js is correct.");
            } else {
                showError(`Error: ${response.status} - Could not fetch weather data. Please try again later.`);
            }
            hideWeatherDisplay(); // Hide weather display on error
            return; // Exit function if there's an error
        }

        // Parse the JSON response
        const data = await response.json();

        // Update DOM elements with the fetched weather data
        temperature.innerHTML = Math.round(data.main.temp) + "°C";
        cityElement.innerHTML = data.name;
        descriptionElement.innerHTML = data.weather[0].description;
        humidityElement.innerHTML = data.main.humidity + "%";
        // Convert wind speed from m/s (API default) to km/h
        windSpeedElement.innerHTML = Math.round(data.wind.speed * 3.6) + " km/h";

        // Update weather icon based on the weather condition
        // OpenWeatherMap provides specific icon codes. Here we map main conditions for common icons.
        // For a full list, refer to: https://openweathermap.org/weather-conditions
        const weatherCondition = data.weather[0].main;
        if (weatherCondition === "Clouds") {
            weatherIcon.src = "https://openweathermap.org/img/wn/03d.png";
        } else if (weatherCondition === "Clear") {
            weatherIcon.src = "https://openweathermap.org/img/wn/01d.png";
        } else if (weatherCondition === "Rain") {
            weatherIcon.src = "https://openweathermap.org/img/wn/09d.png";
        } else if (weatherCondition === "Drizzle") {
            weatherIcon.src = "https://openweathermap.org/img/wn/10d.png";
        } else if (weatherCondition === "Mist" || weatherCondition === "Fog" || weatherCondition === "Haze") {
            weatherIcon.src = "https://openweathermap.org/img/wn/50d.png";
        } else if (weatherCondition === "Snow") {
            weatherIcon.src = "https://openweathermap.org/img/wn/13d.png";
        } else if (weatherCondition === "Thunderstorm") {
            weatherIcon.src = "https://openweathermap.org/img/wn/11d.png";
        }
        // Fallback: Use the exact icon provided by the API for other conditions
        else {
            weatherIcon.src = `https://openweathermap.org/img/wn/${data.weather[0].icon}.png`;
        }

        hideError();          // Hide any previous error messages
        showWeatherDisplay(); // Show the weather display section
    } catch (error) {
        // Catch network errors or issues with JSON parsing
        console.error("Error fetching weather:", error); // Log detailed error to console
        showError("An unexpected error occurred. Please check your internet connection or API key.");
        hideWeatherDisplay(); // Hide weather display on critical error
    }
}

/**
 * Displays the weather information section by removing the 'hidden' class.
 */
function showWeatherDisplay() {
    weatherDisplay.classList.remove("hidden");
}

/**
 * Hides the weather information section by adding the 'hidden' class.
 */
function hideWeatherDisplay() {
    weatherDisplay.classList.add("hidden");
}

/**
 * Displays an error message to the user.
 * @param {string} message - The error message to display.
 */
function showError(message) {
    errorMessage.innerHTML = `<p>${message}</p>`;
    errorMessage.classList.remove("hidden");
}

/**
 * Hides the error message.
 */
function hideError() {
    errorMessage.classList.add("hidden");
}

// Event Listener for the search button click
searchBtn.addEventListener("click", () => {
    const city = cityInput.value.trim(); // Get city name and remove leading/trailing whitespace
    if (city) {
        checkWeather(city); // Fetch weather if city name is provided
    } else {
        showError("Please enter a city name."); // Show error if input is empty
        hideWeatherDisplay(); // Hide weather display if no city entered
    }
});

// Event Listener for 'Enter' key press in the city input field
cityInput.addEventListener("keydown", (event) => {
    if (event.key === "Enter") {
        event.preventDefault(); // Prevent default form submission behavior
        searchBtn.click();      // Programmatically click the search button
    }
});

// Initial load: Fetch weather for a default city (e.g., London)
// This provides a pleasant user experience when the page first loads.
window.addEventListener("load", () => {
    // Only attempt to fetch on load if API_KEY is set and not the placeholder
    if (API_KEY && API_KEY !== "YOUR_API_KEY") {
        checkWeather("London"); // Default city to display
    } else {
        showError("Please replace 'YOUR_API_KEY' in script.js with your OpenWeatherMap API key to fetch data.");
        hideWeatherDisplay(); // Keep weather display hidden until API key is set
    }
});
How It All Works Together: Unraveling the Logic
You’ve got the HTML, CSS, and JavaScript. Now let’s connect the dots! Our Weather App JavaScript relies on a few core concepts. We interact with an external data source, specifically the OpenWeatherMap API. Then, we dynamically update our webpage. This process involves the Fetch API and skillful DOM manipulation. Let’s break down each step.
Setting Up Your API Key
To get real weather data, we need permission. This comes in the form of an API key. You will get this from OpenWeatherMap. Head over to their website and sign up for a free account. They provide a ‘current weather data’ API. Once registered, navigate to the ‘API keys’ section. Copy your unique key. This key will be part of the URL we use to fetch data. Don’t worry, it’s a straightforward process. It makes our app functional!
Fetching Weather Data with the Fetch API
This is where the magic truly begins! Our JavaScript uses the Fetch API. This powerful tool lets us make network requests. Think of it like sending a request to a server and getting data back. We send our city name and API key to OpenWeatherMap. The API responds with weather information in JSON format. For example, if you wanted to upload a file, a similar fetching process would happen, just like in a React File Uploader. This asynchronous operation means your browser won’t freeze while waiting for data. Instead, it continues running other tasks. When the data arrives, we process it!
Pro Tip: The Fetch API returns a Promise. This is a JavaScript object representing the eventual completion (or failure) of an asynchronous operation. You use
.then()to handle successful responses and.catch()for errors. It’s essential for modern web development!
Parsing the Data and Handling Responses
Once we get the weather data back, it’s typically in JSON format. This is a common way for web services to send structured data. Our JavaScript will parse this JSON. It turns the raw text into a usable JavaScript object. We can then easily access properties like temperature, humidity, and weather descriptions. Sometimes, an API call might fail. Perhaps the city name was misspelled. Therefore, we also include error handling. This ensures our app remains robust and user-friendly. We will show an alert if something goes wrong. This guides the user to try again.
Updating the DOM: Displaying the Weather
With our weather data in hand, it’s time to show it off! DOM manipulation is how we do this. DOM stands for Document Object Model. It’s a programming interface for web documents. It represents the page structure. We use JavaScript to select specific HTML elements. For instance, we target the element meant for temperature. Then, we update its textContent property. Similarly, we change the src attribute of an <img> tag to display the correct weather icon. We even dynamically change the background image based on the weather condition! This makes the user interface feel truly alive. If you’ve ever built something like a JavaScript Drag Drop List, you’ve already worked with similar DOM updates.
Friendly Advice: Always check if the API returned valid data before trying to update the DOM. This prevents errors and improves your app’s reliability. Good error handling is key for a smooth user experience.
Putting it All Together: The Event Listener
Finally, we need to tie everything to a user action. Our search button gets an event listener. When you click it, our JavaScript function springs into action. It grabs the city name from the input field. Then, it calls our weather fetching function. This function performs the API request. After receiving data, it updates the DOM. All these pieces work together seamlessly. It delivers a fast and responsive user experience. If you’re familiar with React’s useEffect hook, you’ll recognize the concept of reacting to changes and performing side effects here, albeit with plain JavaScript.
Tips to Customise It: Make It Your Own!
Now that you’ve built the core Weather App JavaScript, it’s time to get creative! Here are some ideas to extend your project:
- Add a forecast: Instead of just current weather, display a 3-day or 5-day forecast. The OpenWeatherMap API often provides this too!
- Geolocation: Use the browser’s geolocation API to automatically detect the user’s location and show their local weather. This would be a fantastic feature!
- Unit Conversion: Implement a toggle to switch between Celsius and Fahrenheit. This adds more user control.
- Animations: Animate the weather icons or background changes for a smoother, more engaging user interface. Use CSS animations for a professional touch.
- Save Recent Searches: Store previous city searches in local storage. This way, users can quickly revisit locations.
Conclusion: You Did It! Your Own Weather App JavaScript!
Wow! You’ve just built a fully functional, dynamic Weather App JavaScript. You’ve mastered connecting to external APIs. Moreover, you learned how to manipulate the DOM to display live data. This is a huge accomplishment! These are fundamental skills for any web developer. You now understand how to make your websites interactive and data-driven. Share your creation with friends and family! Experiment with the customization tips. Keep building, keep learning, and keep creating amazing things!