Flask OpenAI Chatbot: Python API Tutorial with Flask
Hey there, fellow coders! If you have wanted to build a real AI application but had no idea where to start, you are in the right place. Today, we are going to dive into creating your very own Flask OpenAI Chatbot. We will use Python, Flask, and the awesome OpenAI API to make a cool web app. It will respond to your questions just like magic. Get ready to impress your friends with your AI skills!
What We Are Building: Your First Flask OpenAI Chatbot
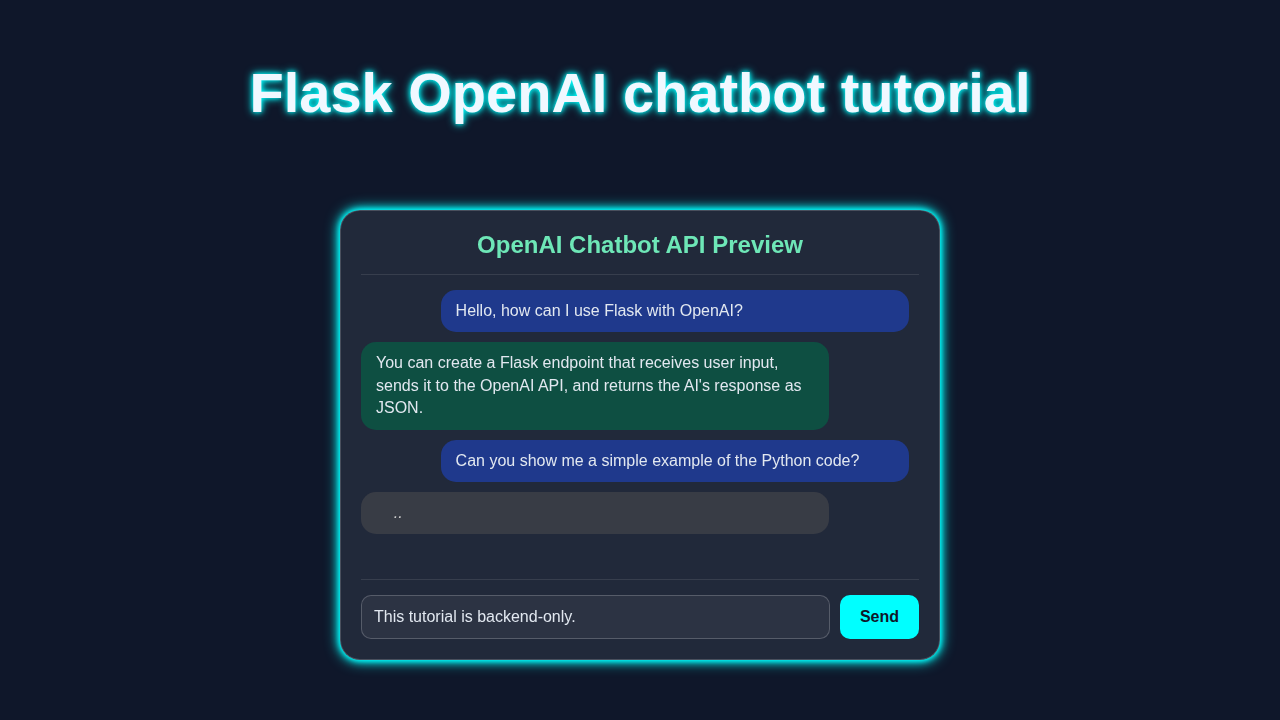
We are going to build a simple yet powerful web application. This chatbot will have a clean user interface. You can type in your messages. Then, our Flask backend will send them to the OpenAI API. The AI will process your input. It will send back a thoughtful, intelligent response. Imagine asking your app anything and getting an instant answer! This project will show you the power of AI in web development. It’s also a fantastic way to understand API interactions.
HTML Structure: Setting the Stage
First, we need a solid foundation for our chatbot interface. This HTML file provides the visual elements. It includes the chat display area and the input field. It also has a button for sending messages. It’s clean and easy to understand. Here’s the cool part:
CSS Styling: Making It Pretty
Next, let’s add some style to our chatbot. The CSS makes our app look modern and inviting. We will use a clean design, good spacing, and friendly colors. This makes the user experience much better. Don’t worry about complex layouts; we keep it simple yet effective. Take a look:
JavaScript: Bringing Your Chatbot to Life
Now for the interactive part! JavaScript handles all the dynamic actions. It sends your messages to the Flask server. Then it displays the AI’s responses back in the chat. It creates a smooth, real-time conversation flow. This script truly connects your user interface with the powerful AI backend. Let me explain what’s happening here:
app.py
import os
from flask import Flask, request, jsonify
from openai import OpenAI
from dotenv import load_dotenv # Used for loading environment variables from a .env file

# --- 1. Load Environment Variables ---
# This line loads environment variables from a '.env' file into the script's environment.
# In a production environment, you would typically set these variables directly
# in your server's environment or using a secret management service.
load_dotenv()

# --- 2. Configuration ---
# Retrieve your OpenAI API key from the environment variables.
# It's critical for security to never hardcode API keys directly in your code.
OPENAI_API_KEY = os.getenv("OPENAI_API_KEY")

# Ensure the API key is set; raise an error if it's missing.
if not OPENAI_API_KEY:
    raise ValueError(
        "OPENAI_API_KEY environment variable not set. "
        "Please create a .env file in the same directory as app.py with content like: "
        "OPENAI_API_KEY="sk-your_key_here" "
        "or set the environment variable directly."
    )

# Initialize the OpenAI client with your API key.
# This client will be used to make requests to the OpenAI API.
client = OpenAI(api_key=OPENAI_API_KEY)

# Initialize the Flask application.
# This object will handle incoming HTTP requests and define API routes.
app = Flask(__name__)

# --- 3. Chatbot Logic: API Endpoint ---
@app.route('/chat', methods=['POST'])
def chat():
    """
    API endpoint for handling chat messages.

    This function expects a POST request with a JSON payload containing a 'message' field.
    It forwards the user's message to the OpenAI Chat Completions API and returns
    the AI's response as a JSON object.

    Example usage with curl:
    curl -X POST -H "Content-Type: application/json" \
         -d '{"message": "What is the capital of France?"}' \
         http://127.0.0.1:5000/chat
    """
    # Get the JSON data from the request body.
    data = request.get_json()

    # Validate that the 'message' field is present in the request data.
    if not data or 'message' not in data:
        # Return an error response if the message is missing.
        return jsonify({"error": "Missing 'message' in request body"}), 400

    user_message = data['message']
    print(f"[User Message]: {user_message}") # Log the incoming message for debugging.

    try:
        # Call the OpenAI Chat Completions API.
        # The 'model' parameter specifies which AI model to use (e.g., gpt-3.5-turbo, gpt-4o).
        # The 'messages' list defines the conversation context. 'system' message sets the AI's persona.
        completion = client.chat.completions.create(
            model="gpt-3.5-turbo",  # You can switch to "gpt-4o", "gpt-4", etc., if you have access.
            messages=[
                {"role": "system", "content": "You are a helpful and friendly assistant."}, # AI's persona
                {"role": "user", "content": user_message} # User's current message
            ]
        )

        # Extract the assistant's reply from the API response.
        # The response structure typically has choices[0].message.content.
        assistant_reply = completion.choices[0].message.content
        print(f"[Assistant Reply]: {assistant_reply}") # Log the AI's response.

        # Return the AI's reply as a JSON object.
        return jsonify({"reply": assistant_reply})

    except Exception as e:
        # Catch any exceptions that occur during the API call or processing.
        print(f"[ERROR] Failed to get response from OpenAI: {e}")
        # Return an error response with details.
        return jsonify({"error": f"Failed to get response from OpenAI: {str(e)}"}), 500

# --- 4. Running the Flask App ---
if __name__ == '__main__':
    # Instructions for running the application:
    print("--------------------------------------------------")
    print("Flask OpenAI Chatbot API is running!")
    print("To start, ensure you have set your OPENAI_API_KEY.")
    print("Install dependencies: pip install Flask openai python-dotenv")
    print("--------------------------------------------------")
    print("Send POST requests to: http://127.0.0.1:5000/chat")
    print("With JSON body: {\"message\": \"Your query here\"}")
    print("--------------------------------------------------")

    # Run the Flask development server.
    # host='0.0.0.0' makes the server accessible from any network interface (useful for Docker/VMs).
    # port=5000 is the default Flask port.
    # For development, you might use app.run(debug=True) for automatic reloading and detailed errors.
    # For production, use a WSGI server like Gunicorn or uWSGI.
    app.run(host='0.0.0.0', port=5000)
How Your Flask OpenAI Chatbot Works Together
Now that we have the frontend and backend components, let’s see how they communicate. This is where the real magic happens. We will connect our HTML, CSS, and JavaScript with our Flask Python code. This creates a fully functional AI chatbot. It’s a clever dance between client and server. Therefore, understanding this flow is key to web development.
Setting Up Your Flask App Environment
Firstly, we need to get our Flask environment ready. We will create a Python virtual environment. This keeps project dependencies isolated. It’s a best practice for any Python project. Open your terminal and navigate to your project folder. Type python3 -m venv venv. This command creates a new virtual environment. Then, activate it with source venv/bin/activate (macOS/Linux) or venv\Scripts\activate (Windows). Great job!
Next, install Flask and the OpenAI Python library. Use pip install Flask openai python-dotenv. python-dotenv helps us manage environment variables. We’ll use it for our OpenAI API key. This is a secure way to handle sensitive information. Create an app.py file. This will hold all our Flask logic. Also, make a templates folder for your HTML file. This structure keeps things organized. Consequently, your project will be easy to manage.
Pro Tip: Always use a virtual environment! It prevents conflicts between different project dependencies. It keeps your global Python installation clean. Furthermore, it simplifies sharing your project with others.
Handling OpenAI API Keys Securely
Our chatbot needs to talk to OpenAI. So, we need an API key. This key authenticates your requests. It also links them to your OpenAI account. Therefore, we must keep it secret. Never hardcode your API key directly into your code! This is a major security risk. Instead, we use environment variables. Create a file named .env in your project root. Inside, add OPENAI_API_KEY='your_openai_api_key_here'. Replace the placeholder with your actual key.
In your app.py, you’ll load this key. The python-dotenv library makes this simple. Add from dotenv import load_dotenv; load_dotenv(). Then, import os; openai_api_key = os.getenv('OPENAI_API_KEY'). This loads the key before your app starts. This method keeps your sensitive key out of version control. It also makes it easy to switch keys for different environments. Learn more about managing HTTP requests and API calls in this Python Requests Library Tutorial – Master HTTP Requests. It will boost your understanding of backend communication.
The Chatbot Logic: Flask Routes and OpenAI API Interaction
Now, let’s get into the Python backend! We’ll set up a Flask route to handle chat messages. When a user sends a message, our JavaScript makes an AJAX request. This request hits our Flask endpoint. Our Flask app then takes the user’s message. It sends it to the OpenAI API. We use the openai library for this. It simplifies interaction with the API. The API processes the request. It then sends back a generated response.
Here’s a simplified look at the core logic:
from flask import Flask, render_template, request, jsonify
from openai import OpenAI
from dotenv import load_dotenv
import os

load_dotenv() # Load environment variables

app = Flask(__name__)
client = OpenAI(api_key=os.getenv("OPENAI_API_KEY"))

@app.route('/')
def index():
    return render_template('index.html')

@app.route('/chat', methods=['POST'])
def chat():
    user_message = request.json.get('message')
    if not user_message:
        return jsonify({"error": "No message provided"}), 400

    try:
        completion = client.chat.completions.create(
            model="gpt-3.5-turbo", # You can try 'gpt-4' if you have access
            messages=[
                {"role": "system", "content": "You are a helpful assistant."},
                {"role": "user", "content": user_message}
            ]
        )
        ai_response = completion.choices[0].message.content
        return jsonify({"response": ai_response})
    except Exception as e:
        print(f"Error calling OpenAI API: {e}")
        return jsonify({"error": "Failed to get response from AI"}), 500

if __name__ == '__main__':
    app.run(debug=True)
The @app.route('/chat', methods=['POST']) decorator defines our API endpoint. We grab the user’s message from the incoming JSON data. We then construct a request for the OpenAI API. The client.chat.completions.create method is the key. It sends our message to the specified AI model. Finally, we extract the AI’s answer. We send it back as JSON to our frontend. This creates a powerful, dynamic interaction. You are making your Flask OpenAI Chatbot talk!
Heads Up: The OpenAI API offers various models.
gpt-3.5-turbois a great starting point for beginners. Check the OpenAI documentation for more model options. You might also encounter rate limits, especially on free tiers.
Connecting Frontend and Backend with JavaScript (AJAX)
Our JavaScript plays a crucial role. It bridges the gap between the user interface and our Flask backend. When a user types a message and clicks ‘Send’, JavaScript springs into action. It captures the message from the input field. Then, it uses the fetch API to send this message to our /chat Flask endpoint. This is an asynchronous operation. It means the page doesn’t reload. It keeps the user experience smooth. You can learn more about the Fetch API on MDN Web Docs. This process repeats for every new message. It creates a seamless conversation. You can learn more about similar web scraping concepts in our Flask Web Scraper: Build a Python Scraper with Flask tutorial. Building a Flask OpenAI Chatbot truly combines many web development skills.
Tips to Customise Your Flask OpenAI Chatbot
You’ve built an amazing foundation! But why stop there? Here are some ideas to make your chatbot even cooler:
- Add Chat History: Implement a database (like SQLite with SQLAlchemy) to store past conversations. This lets users pick up where they left off. It also provides a better user experience.
- User Authentication: Integrate user login/registration. This allows personalized experiences. You could even store specific user preferences for the AI. Learn more about optimizing database queries in Django, which can be applied to Flask as well, with our guide on Optimize Django: Fix N+1 Queries & Boost Performance.
- Different AI Models: Experiment with other OpenAI models or even open-source alternatives. See how their responses differ. This helps you find the best fit for your specific needs.
- Voice Input/Output: Explore browser APIs for speech recognition and synthesis. Imagine talking to your chatbot and hearing its responses! That would be truly futuristic.
Conclusion: You Did It!
Wow, you just built your very first Flask OpenAI Chatbot! That’s a huge accomplishment. You have connected a frontend with a powerful AI backend using Flask and the OpenAI API. You’ve also learned about secure API key handling. You’ve mastered asynchronous JavaScript communication. These are essential skills for any modern web developer. You should be incredibly proud of your work. Share your awesome creation with friends and fellow developers. Keep experimenting, keep building, and keep learning. The world of AI and web development is vast and exciting!
app.py
import os
from flask import Flask, request, jsonify
from openai import OpenAI
from dotenv import load_dotenv # Used for loading environment variables from a .env file

# --- 1. Load Environment Variables ---
# This line loads environment variables from a '.env' file into the script's environment.
# In a production environment, you would typically set these variables directly
# in your server's environment or using a secret management service.
load_dotenv()

# --- 2. Configuration ---
# Retrieve your OpenAI API key from the environment variables.
# It's critical for security to never hardcode API keys directly in your code.
OPENAI_API_KEY = os.getenv("OPENAI_API_KEY")

# Ensure the API key is set; raise an error if it's missing.
if not OPENAI_API_KEY:
    raise ValueError(
        "OPENAI_API_KEY environment variable not set. "
        "Please create a .env file in the same directory as app.py with content like: "
        "OPENAI_API_KEY="sk-your_key_here" "
        "or set the environment variable directly."
    )

# Initialize the OpenAI client with your API key.
# This client will be used to make requests to the OpenAI API.
client = OpenAI(api_key=OPENAI_API_KEY)

# Initialize the Flask application.
# This object will handle incoming HTTP requests and define API routes.
app = Flask(__name__)

# --- 3. Chatbot Logic: API Endpoint ---
@app.route('/chat', methods=['POST'])
def chat():
    """
    API endpoint for handling chat messages.

    This function expects a POST request with a JSON payload containing a 'message' field.
    It forwards the user's message to the OpenAI Chat Completions API and returns
    the AI's response as a JSON object.

    Example usage with curl:
    curl -X POST -H "Content-Type: application/json" \
         -d '{"message": "What is the capital of France?"}' \
         http://127.0.0.1:5000/chat
    """
    # Get the JSON data from the request body.
    data = request.get_json()

    # Validate that the 'message' field is present in the request data.
    if not data or 'message' not in data:
        # Return an error response if the message is missing.
        return jsonify({"error": "Missing 'message' in request body"}), 400

    user_message = data['message']
    print(f"[User Message]: {user_message}") # Log the incoming message for debugging.

    try:
        # Call the OpenAI Chat Completions API.
        # The 'model' parameter specifies which AI model to use (e.g., gpt-3.5-turbo, gpt-4o).
        # The 'messages' list defines the conversation context. 'system' message sets the AI's persona.
        completion = client.chat.completions.create(
            model="gpt-3.5-turbo",  # You can switch to "gpt-4o", "gpt-4", etc., if you have access.
            messages=[
                {"role": "system", "content": "You are a helpful and friendly assistant."}, # AI's persona
                {"role": "user", "content": user_message} # User's current message
            ]
        )

        # Extract the assistant's reply from the API response.
        # The response structure typically has choices[0].message.content.
        assistant_reply = completion.choices[0].message.content
        print(f"[Assistant Reply]: {assistant_reply}") # Log the AI's response.

        # Return the AI's reply as a JSON object.
        return jsonify({"reply": assistant_reply})

    except Exception as e:
        # Catch any exceptions that occur during the API call or processing.
        print(f"[ERROR] Failed to get response from OpenAI: {e}")
        # Return an error response with details.
        return jsonify({"error": f"Failed to get response from OpenAI: {str(e)}"}), 500

# --- 4. Running the Flask App ---
if __name__ == '__main__':
    # Instructions for running the application:
    print("--------------------------------------------------")
    print("Flask OpenAI Chatbot API is running!")
    print("To start, ensure you have set your OPENAI_API_KEY.")
    print("Install dependencies: pip install Flask openai python-dotenv")
    print("--------------------------------------------------")
    print("Send POST requests to: http://127.0.0.1:5000/chat")
    print("With JSON body: {\"message\": \"Your query here\"}")
    print("--------------------------------------------------")

    # Run the Flask development server.
    # host='0.0.0.0' makes the server accessible from any network interface (useful for Docker/VMs).
    # port=5000 is the default Flask port.
    # For development, you might use app.run(debug=True) for automatic reloading and detailed errors.
    # For production, use a WSGI server like Gunicorn or uWSGI.
    app.run(host='0.0.0.0', port=5000)