CORS Errors Explained: Visualizing Web Network Security
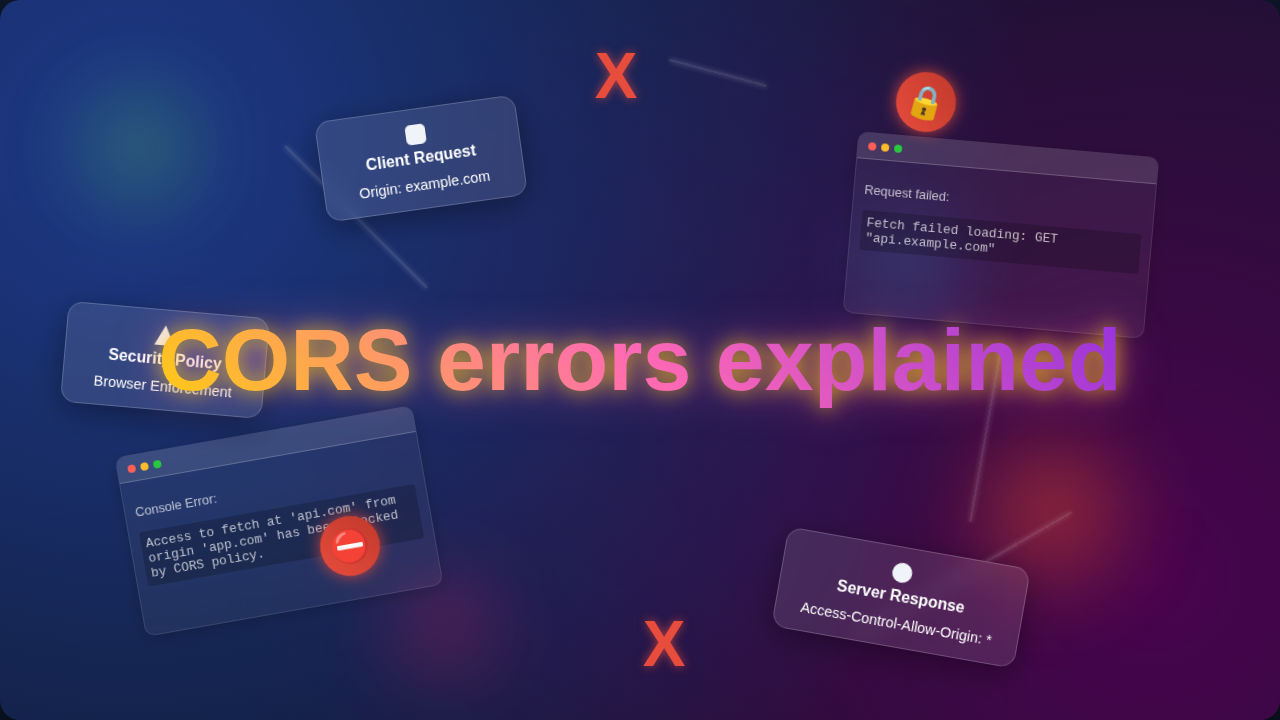
Okay, real talk — have you ever built a cool web app? You try to fetch some data from another server. Then BAM! A cryptic error message pops up in your console. It usually starts with ‘CORS’.
If that sounds familiar, you’ve met a CORS error. It’s like your browser playing a very strict security guard. This guard prevents your website from asking for data from a different website without explicit permission. Essentially, CORS errors explained mean your browser is blocking a request for security reasons.
Why does this matter to you, a budding web developer? Well, imagine you’re building a sleek frontend with React or Vue. You want to display weather data from a public API. Or maybe you’re building a backend with Flask and need to serve it to a different frontend domain. Without understanding CORS, your applications simply won’t talk to each other. You’ll hit a wall of blocked requests and pure frustration. This isn’t just a minor annoyance; it’s a fundamental part of web security that you need to grasp.
How Your Browser Enforces Web Security (The Nitty-Gritty)
So, how does this browser security guard actually work? It’s all about something called the Same-Origin Policy. Crucially, this policy is a core security feature. It’s built into all modern web browsers. It dictates that a web page can only request resources from the same origin it came from. An origin is defined by three things: the protocol (like http or https), the domain (like procoder09.com), and the port (like 80 or 443). If any of these three are different, it’s considered a different origin.
For example, your frontend application might be running on http://localhost:3000. It then tries to get data from an API at https://api.example.com. That’s a different origin. Your browser sees this and thinks, ‘Hold on, this looks suspicious!’ It then steps in and blocks the request by default. This is where CORS comes into play. CORS stands for Cross-Origin Resource Sharing. It’s a mechanism that allows servers to explicitly permit cross-origin requests.
Here’s the cool part: when your browser makes a cross-origin request, it often sends a special ‘preflight’ request first. This is an OPTIONS HTTP request. It’s like your browser asking the API server, ‘Hey, can my website from http://localhost:3000 even talk to you?’ The API server then responds with specific HTTP headers. These headers tell the browser whether the request is allowed. If the server says ‘yes’ with the right headers, your browser then proceeds with the actual data request. If not, you get that infamous CORS error. Make sense so far?
This is crucial for preventing malicious websites from reading your private data on other sites. Without it, a rogue site could potentially make requests to your banking website, for example. It could then read your account details. Pretty scary, right? So, while annoying, CORS is absolutely vital for your safety online. If you’re building a backend with something like Flask for Beginners: Build Your First Web App, setting up these headers is something you’ll definitely encounter.
Common Confusions Cleared
Many new developers find CORS tricky. It often feels like the browser is fighting against them. You might think, ‘But I’m just getting public data! Why block me?’ The browser doesn’t know your intentions. It just follows its security rules, plain and simple.
One common confusion is mixing up client-side and server-side issues. CORS is a browser-enforced security measure. Your server isn’t actively blocking the request itself. Instead, your browser is preventing your request from even reaching your client-side code successfully. The server just failed to send the correct ‘permission slip.’
Another thing to remember: If you make the same request using a tool like Postman, it might work. Why? Because Postman isn’t a browser. It doesn’t enforce the Same-Origin Policy or CORS rules in the same way. It’s important to understand this distinction. You might also wonder why some requests work and others don’t. Often, this depends on the HTTP method (GET, POST, PUT, DELETE) or specific headers you send. More complex requests often trigger those ‘preflight’ OPTIONS requests.
Pro-Tip: CORS errors always happen on the client-side (your browser’s console). The server might get the request and process it. However, your browser blocks the response from reaching your JavaScript unless the CORS headers are correct.
CORS Errors Explained: Common Fixes and What to Avoid
So, how do you fix these pesky errors? The solution almost always lies on the server-side. You need to configure the server that your frontend is trying to talk to. This is where the magic happens.
- Configure
Access-Control-Allow-Origin: This is the most common fix. The server needs to send anAccess-Control-Allow-Originheader in its response. This header tells your browser which origins are allowed to access its resources.- To allow any origin (useful for public APIs or development): Set the header to
*. - To allow specific origins (recommended for production): Set the header to the exact origin of your frontend, like
https://www.yourfrontend.com. You can specify multiple origins, often separated by commas.
Remember, this header needs to be on the server’s response. If you’re building an API with something like Node.js or Python, you’ll add this there.
- To allow any origin (useful for public APIs or development): Set the header to
- Allow Specific Headers and Methods: Sometimes, your request might involve custom headers or non-simple HTTP methods (like
PUTorDELETE). In these cases, the server also needs to respond withAccess-Control-Allow-HeadersandAccess-Control-Allow-Methodsheaders. These explicitly list which headers and methods your browser is allowed to use. - Handle Preflight Requests: If your browser sends an
OPTIONSpreflight request, your server must respond to it correctly. It needs to send the appropriateAccess-Control-*headers in thatOPTIONSresponse itself. If the server doesn’t handleOPTIONSrequests, your preflight will fail. Consequently, your actual request will also fail.
Caution: While setting
Access-Control-Allow-Origin: *is easy for development, it’s generally not recommended for production environments. It broadens security too much. Always be specific about your allowed origins when deploying a live application.
For deeper dives into setting these headers for different server technologies, MDN Web Docs has an excellent resource on Cross-Origin Resource Sharing that you should definitely bookmark. If you’re working with React and dealing with component side effects, understanding how data fetching works is key to preventing these errors. You might want to check out how to use the React useEffect Hook to Master Side Effects in Components for better data handling. Also, styling your app beautifully, maybe even with a Dark Mode with Tailwind CSS, won’t fix network issues, but it’ll make your working app look great!
Visualizing Web Network Security with CORS Errors Explained
Think of your website as a specific store in a giant shopping mall. The Same-Origin Policy is like the mall’s general rule: “Only store employees can directly access inventory from their own store’s backroom.” This makes sense, right? You wouldn’t want someone from a shoe store waltzing into a jewelry store’s backroom. That would be chaotic.
Now, CORS is like a special ‘vendor pass’ system. If the jewelry store wants to allow the watch repair shop to access specific watch parts (a resource), they can issue a pass. When the watch repair shop employee tries to enter the jewelry store’s backroom, the mall security (your browser) checks for this pass. If the pass (CORS headers) is valid and explicitly allows access from the watch repair shop (the requesting origin), then access is granted. If there’s no pass, or the pass is for a different shop, security blocks them. That’s exactly how your browser handles cross-origin requests. It’s a vital part of web network security.
So, when you see a CORS error, your browser is telling you, “Hey, this resource from a different ‘store’ didn’t provide the right ‘vendor pass’ for your ‘store’ to access it!” Your job is to make sure the server serving the resource issues that correct pass. Simple as that.
Your Path to CORS Clarity: Key Takeaways
Let’s quickly recap the main points for mastering CORS:
- CORS errors explained are browser-level security blocks. They prevent your website from requesting data from different origins without permission.
- The solution usually involves configuring the server that your browser is trying to talk to.
- Look for the
Access-Control-Allow-Originheader in the server’s response. This is your primary tool. - Understand
OPTIONSpreflight requests for complex scenarios. - Prioritize security: Use specific allowed origins in production, not
*. - Always check your browser’s developer console for detailed error messages. They often tell you exactly which header is missing or incorrect.
Ready for another useful resource? The Mozilla Developer Network (MDN) is always a fantastic place for reliable information on web technologies. Take a look at their article on Access-Control-Allow-Origin for specifics on this crucial header.
Running into CORS errors feels frustrating at first. Trust me, every single web developer has been there. But now you understand why they happen and how to approach fixing them. You’ve uncovered a key piece of web security. Don’t be discouraged by these challenges; see them as opportunities to learn and grow. You’re building robust, secure web applications, one header at a time. Keep learning, keep building, and you’ll master these concepts faster than you think!