HTML CSS Calculator UI Design: Visually Stunning Layout
Hey there, pro-coder! Have you ever wanted to build a cool project but weren’t sure where to start? You are in the perfect spot today! We are going to craft a sleek and fully functional Calculator UI. This project is a fantastic way to sharpen your HTML, CSS, and JavaScript skills. Get ready to build something awesome that you can actually use!
What We Are Building: Your Modern Calculator UI
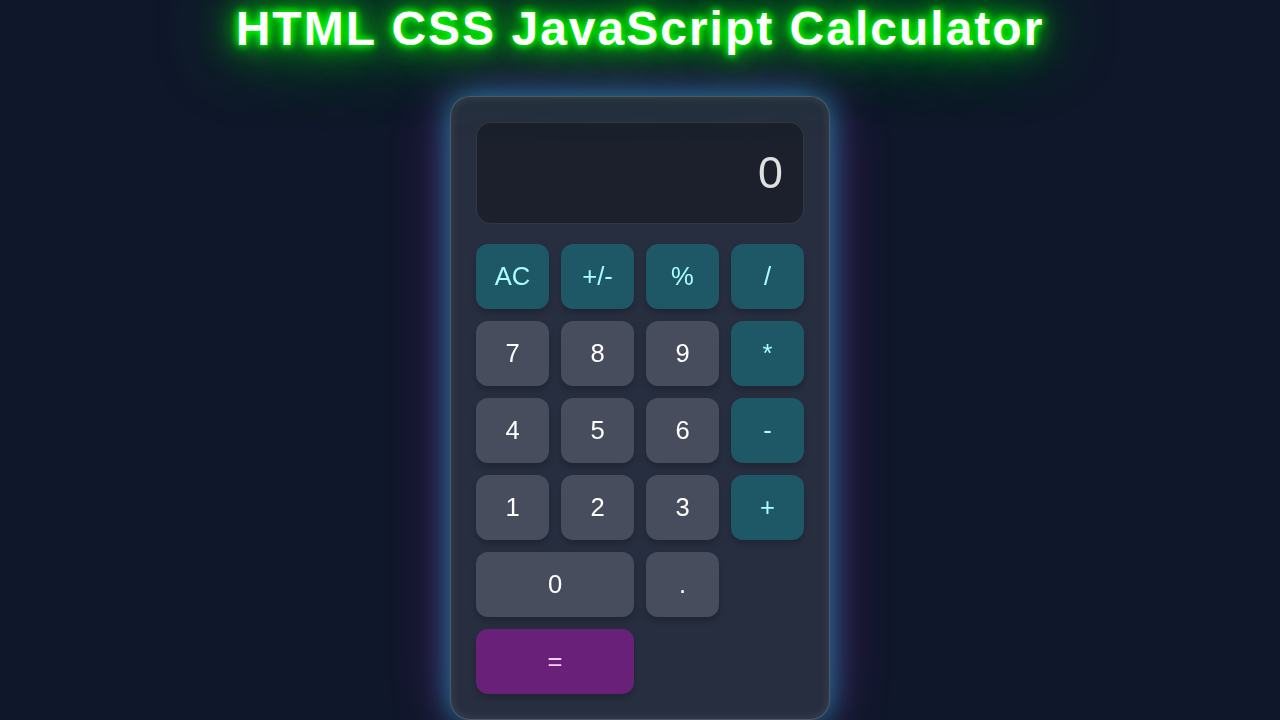
Today, we will design a visually stunning calculator. It will look amazing on any screen size. We are going for a clean, modern aesthetic. Think smooth buttons and a clear display area. This isn’t just about looks, though. We will also lay the essential groundwork for a truly functional device. You will learn to structure your HTML logically. You will then style it beautifully with CSS. Moreover, you will get ready to add real interaction later with JavaScript. This project is a complete package. It shows off your web development prowess. You’ll gain practical experience. This will directly apply to future projects. Therefore, pay close attention to each step. It’s a journey into interactive web design.
HTML Structure: Laying the Foundation for Your Calculator
First, we will set up the basic HTML for our calculator. This structure will hold all our calculator’s parts. Think of it as the foundational skeleton for your project. We will use simple div elements for the main container and the display area. This keeps our layout flexible. Then, we will create individual buttons for numbers and mathematical operations. Each button will have a clear purpose. This approach keeps things organised and readable. It also makes styling with CSS much easier later on. A well-structured HTML document is incredibly important. It impacts both accessibility and maintainability. Therefore, let’s get our HTML just right.
index.html
<!DOCTYPE html>
<html lang="en">
<head>
    <meta charset="UTF-8">
    <meta name="viewport" content="width=device-width, initial-scale=1.0">
    <title>HTML CSS Calculator UI</title>
    <!-- Link to the external stylesheet for calculator UI -->
    <link rel="stylesheet" href="styles.css">
</head>
<body>
    <!--
        Disclaimer: This calculator is a purely visual representation (UI)
        built using HTML and CSS. It does not include any JavaScript
        functionality to perform calculations. Its purpose is to
        demonstrate modern UI design techniques like Glassmorphism
        and glowing effects with HTML and CSS only.
    -->
    <div class="calculator">
        <!-- Calculator display area. Displays '0' statically as no JS is used. -->
        <div class="display">0</div>

        <!-- Calculator buttons grid -->
        <div class="buttons">
            <!-- First row of buttons -->
            <button class="btn operator">AC</button>
            <button class="btn operator">+/-</button>
            <button class="btn operator">%</button>
            <button class="btn operator">/</button>

            <!-- Second row of buttons -->
            <button class="btn">7</button>
            <button class="btn">8</button>
            <button class="btn">9</button>
            <button class="btn operator">*</button>

            <!-- Third row of buttons -->
            <button class="btn">4</button>
            <button class="btn">5</button>
            <button class="btn">6</button>
            <button class="btn operator">-</button>

            <!-- Fourth row of buttons -->
            <button class="btn">1</button>
            <button class="btn">2</button>
            <button class="btn">3</button>
            <button class="btn operator">+</button>

            <!-- Fifth row of buttons (0 and = span two columns) -->
            <button class="btn zero">0</button>
            <button class="btn">.</button>
            <button class="btn equals">=</button>
        </div>
    </div>
</body>
</html>
CSS Styling: Bringing Your Calculator UI to Life
Now, let’s make our calculator truly shine! CSS is where the visual magic happens. We will apply professional styles. This makes the UI not just functional but also beautiful. We will use modern CSS properties. This includes Flexbox for flexible layouts and Grid for precise button placement. You can even check out our CSS Button Animations Tutorial: Enhance UI with HTML & CSS to add some cool flair to your buttons! We will focus on clear, readable typography for the display. Also, we will select a pleasing colour scheme. Your CSS clamp fluid typography tutorial with HTML & CSS skills could make the display text super responsive across devices. A robust Grid layout (MDN) for the numerical and operational buttons will be essential. This ensures perfect alignment. Consequently, your calculator will be both attractive and user-friendly. We’ll also add subtle shadows. These will give depth to your elements.
Pro Tip: Experiment with different colour palettes! Online tools like Coolors.co can help you find stunning combinations quickly. Personalise it to make it uniquely yours and reflect your personal brand!
styles.css
/*
    Production-ready styles for a Glassmorphism & Neon Calculator UI.
    This stylesheet designs a purely visual calculator interface
    using modern CSS features. No JavaScript is involved in this UI.
*/

/* Universal box-sizing for consistent layout across all elements */
*, *::before, *::after {
    box-sizing: border-box;
}

/* Body styles: Sets up full viewport, dark background, and centers content */
body {
    margin: 0;
    padding: 0;
    font-family: Arial, Helvetica, sans-serif; /* Safe, sans-serif font stack */
    background: #0f172a; /* Dark background ideal for neon effects */
    display: flex;
    justify-content: center;
    align-items: center;
    min-height: 100vh; /* Ensures full viewport height */
    overflow: hidden; /* Prevents scrollbars */
    -webkit-font-smoothing: antialiased; /* Enhances font rendering for WebKit browsers */
    -moz-osx-font-smoothing: grayscale; /* Enhances font rendering for Firefox */
}

/* Calculator container styles: Applies Glassmorphism and neon glow */
.calculator {
    background: rgba(255, 255, 255, 0.1); /* Semi-transparent white background for glass effect */
    backdrop-filter: blur(15px); /* Glassmorphism blur effect */
    -webkit-backdrop-filter: blur(15px); /* Safari support for backdrop-filter */
    border: 1px solid rgba(255, 255, 255, 0.2); /* Subtle border for defining the glass pane */
    border-radius: 20px; /* Rounded corners for the calculator body */
    padding: 25px;
    box-shadow:
        0 0 30px rgba(0, 255, 255, 0.5), /* Cyan neon glow */
        0 0 60px rgba(255, 0, 255, 0.3), /* Magenta neon glow */
        inset 0 0 10px rgba(255, 255, 255, 0.1); /* Inner light effect for depth */
    max-width: 380px; /* Constrains the maximum width of the calculator */
    width: 100%; /* Ensures responsiveness within the max-width */
}

/* Calculator display area styles */
.display {
    background: rgba(0, 0, 0, 0.3); /* Darker semi-transparent background for contrast */
    color: #e0e0e0; /* Light gray text for readability */
    padding: 20px;
    border-radius: 15px; /* Rounded corners for the display */
    margin-bottom: 20px;
    text-align: right;
    font-size: 2.8em; /* Large font size for prominent display */
    font-weight: lighter; /* Lighter font weight for a sleek look */
    overflow: hidden; /* Hides any text overflowing the display area */
    white-space: nowrap; /* Prevents numbers from wrapping to the next line */
    text-overflow: ellipsis; /* Displays an ellipsis (...) if numbers overflow */
    height: 60px; /* Fixed height for consistent display area */
    display: flex; /* Uses flexbox for content alignment */
    align-items: center; /* Vertically centers the text within the display */
    justify-content: flex-end; /* Aligns the text to the right side of the display */
    border: 1px solid rgba(255, 255, 255, 0.1); /* Subtle border for the display */
}

/* Button grid layout using CSS Grid */
.buttons {
    display: grid;
    grid-template-columns: repeat(4, 1fr); /* Creates 4 columns of equal width */
    gap: 12px; /* Space between grid items (buttons) */
}

/* General button styles for all calculator buttons */
.btn {
    background: rgba(255, 255, 255, 0.15); /* Semi-transparent button background */
    border: none;
    border-radius: 12px; /* Rounded button corners */
    color: #fff; /* White text color for numbers and symbols */
    font-size: 1.6em; /* Button text size */
    padding: 18px 0; /* Vertical padding, horizontal spacing handled by grid gap */
    cursor: pointer; /* Indicates an interactive element */
    transition: all 0.3s ease; /* Smooth transition for hover effects */
    outline: none; /* Removes the focus outline */
    box-shadow: 0 4px 6px rgba(0, 0, 0, 0.2); /* Subtle button shadow for depth */
    -webkit-tap-highlight-color: rgba(0,0,0,0); /* Removes tap highlight on mobile for cleaner interaction */
}

/* Button hover effects: Changes background and adds a glow */
.btn:hover {
    background: rgba(255, 255, 255, 0.25); /* Slightly lighter background on hover */
    box-shadow:
        0 0 15px rgba(0, 255, 255, 0.6), /* Cyan glow on hover */
        0 0 5px rgba(255, 255, 255, 0.5); /* Inner white glow */
    transform: translateY(-2px); /* Slight lift effect on hover */
}

/* Operator button specific styles */
.btn.operator {
    background: rgba(0, 255, 255, 0.2); /* Cyan-ish background for operator buttons */
    color: #aaffff; /* Lighter cyan text color */
}

/* Operator button hover effects */
.btn.operator:hover {
    background: rgba(0, 255, 255, 0.3); /* Darker cyan on hover */
    box-shadow:
        0 0 15px rgba(0, 255, 255, 0.8), /* Stronger cyan glow */
        0 0 5px rgba(255, 255, 255, 0.6);
}

/* Equals button specific styles */
.btn.equals {
    background: rgba(255, 0, 255, 0.3); /* Magenta background for the equals button */
    grid-column: span 2; /* Makes the equals button span two columns */
    color: #ffccff; /* Lighter magenta text color */
}

/* Equals button hover effects */
.btn.equals:hover {
    background: rgba(255, 0, 255, 0.4); /* Darker magenta on hover */
    box-shadow:
        0 0 15px rgba(255, 0, 255, 0.8),
        0 0 5px rgba(255, 255, 255, 0.6);
}

/* Zero button specific style to span two columns */
.btn.zero {
    grid-column: span 2;
}

/* Responsive adjustments for smaller screens */
@media (max-width: 480px) {
    .calculator {
        padding: 15px;
        border-radius: 15px;
        margin: 10px; /* Add some margin on very small screens to prevent edge-touching */
    }
    .display {
        font-size: 2.2em;
        padding: 15px;
        height: 50px;
        margin-bottom: 15px;
    }
    .btn {
        font-size: 1.4em;
        padding: 15px 0;
        border-radius: 10px;
        gap: 8px;
    }
}
JavaScript: Making Your Calculator Functional (UI Interaction)
Next, we will add the essential brain to our beautiful calculator. JavaScript is absolutely crucial for any interactivity. It will handle all the button clicks. It will manage calculation logic. Moreover, it will update the display in real-time. We will set up basic event listeners for each button. These will respond promptly when you press a number or an operation. Don’t worry if JavaScript feels a bit new to you. We’ll keep the explanations straightforward. This step truly brings your Calculator UI to life. It transforms it from a static image into an interactive tool. You’ll be performing calculations swiftly. This provides instant gratification. Let’s make it work!
How It All Works Together: From HTML to Interactive Magic
Let’s connect all the pieces. Your HTML, CSS, and JavaScript work in harmony. They create a seamless user experience. Here’s a quick breakdown of the process. Understanding this flow is crucial. It helps you build more complex applications later. We start with the basic structure. Then we add the visual appeal. Finally, we implement the interactive logic. This layered approach is standard practice. It makes development manageable.
The HTML Foundation: The Blueprint
Our HTML provides the basic canvas for the calculator. It defines the main container for the entire application. It also meticulously creates the crucial display area. Each button, whether a number or an operator, gets its own specific HTML element. We use clear and semantic class names. This immensely helps with both CSS styling and JavaScript selection. For instance, you will see a dedicated div container for all buttons. Inside it, individual buttons are clearly defined. This structured approach is very logical. It makes it incredibly easy to add new buttons or features later. A strong HTML foundation is always the first step. It supports everything else built upon it. Building a robust HTML framework is similar to creating a complex HTML Email Invoice: Responsive Design with Pure HTML & CSS; you absolutely need a solid, well-organised base!
Styling with CSS: The Visual Appeal
CSS transforms our raw HTML into a beautiful, functional interface. It makes it truly look like a professional calculator. We use global styles for the overall page layout. We also define specific styles for the calculator’s main container. This includes setting its width, height, and position on the screen. The display area receives special attention. This ensures numbers and results are large, clear, and easy to read. Button styling is also paramount for a great user experience. We define their size, background colour, text colour, and font. We also add subtle hover effects. These give vital visual feedback. They make the calculator feel responsive and engaging. We strategically use Flexbox (CSS-Tricks) for button rows and Grid for the main keypad. This keeps everything perfectly aligned and visually appealing. CSS makes your UI beautiful. It undeniably enhances user interaction.
Adding Interactivity with JavaScript: The Brains
JavaScript acts as the brain behind the operations. It actively listens for all user input. When you click a number button, JS immediately detects it. It then performs a specific action, adding that number to the display string. If you click an operator button, it stores that operation. It also prepares for the next number input. When you finally click the “equals” button, JavaScript processes the stored numbers and operator. It then calculates the correct result. After calculation, it dynamically updates the display. We use distinct functions to handle different mathematical operations. This keeps our code clean, modular, and easy to understand. Event listeners are absolutely vital here. They establish the crucial connection between your visual buttons and your functional code. This is the magical part. It truly makes your calculator UI work. It brings all the visual elements to life, allowing for real-time computations.
Remember: Break down complex problems. Each button click is a small, manageable task. Tackle them one by one!
Tips to Customise It: Make Your Calculator UI Uniquely Yours
You have built a fantastic foundation for your calculator. Now, let’s explore ways to make it even better! Customisation is truly part of the fun. Here are some exciting ideas. Try them out to further enhance your project. These will challenge your skills.
- Add More Operations: What about a square root button? Or perhaps a percentage function? Extend your JavaScript logic.
- Implement Keyboard Support: Allow users to type numbers. This makes the calculator more accessible. Listen for
keydownevents in JavaScript. - Change the Theme: Create a “dark mode” or “light mode” toggle switch. Use CSS variables for easy colour changes. Make it dynamic.
- Improve Responsiveness: Use more advanced CSS media queries. Optimise the layout for very small screens. Ensure it looks great everywhere.
- History Feature: Keep a running record of past calculations. Display them in a small sidebar. This adds significant utility.
Conclusion: You Just Built a Fantastic Calculator UI!
Wow, you did it! You just built your very own functional and stylish Calculator UI. You started with a blank page. Now you have a working web application. This project showcased your HTML skills. It highlighted your CSS styling abilities. You even dipped your toes into JavaScript interactivity. That’s a huge achievement! Remember to keep experimenting. Don’t be afraid to break things. That’s how we learn the most. Share your creation online. Show off your new skills. We can’t wait to see what you build next!