Chrome Extension JS Tutorial: Build with HTML, CSS, Vanilla JS
Hey there, future web wizard! If you’ve ever wanted to build a browser extension but had no idea where to start, you’re in the right place. Today, we’re diving into building your first Chrome Extension JS project. We’ll create a super handy text highlighter. Imagine clicking a button and instantly making important text pop! This project is a fantastic step. It shows you how easy it is to add custom features to your browser.
What We Are Building
We’re going to build a simple, yet powerful, text highlighter. This extension will live right in your browser toolbar. When you click its icon, a small popup appears. This popup will have buttons for different highlight colors. You can select text on any webpage. Then, click a color button. Boom! The selected text gets highlighted. It’s incredibly useful for studying. Or for quickly noting key information. This project is pure fun. It’s also a great way to learn a lot!
HTML Structure for Your Chrome Extension JS
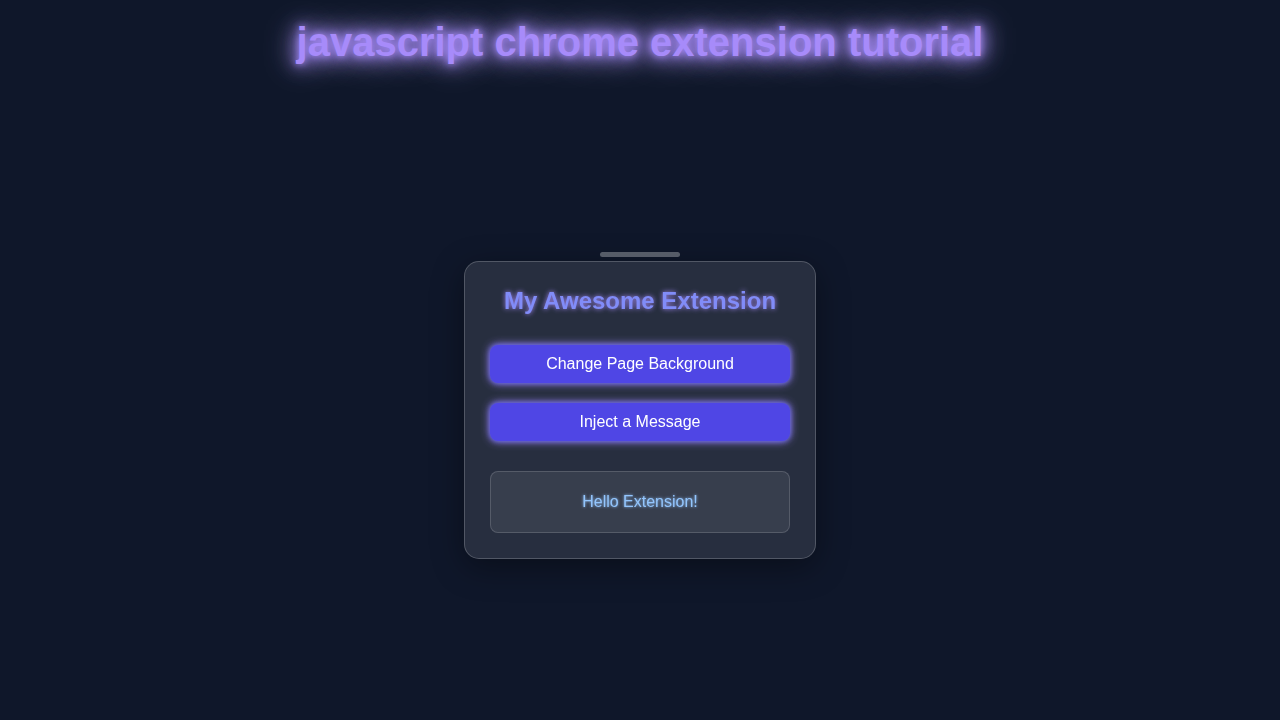
Every great project starts with solid HTML. Our extension will have a small popup. This popup needs a simple structure. It will hold our color buttons. We will also add a clear button. This makes removing highlights easy. Take a look at the HTML. It’s super straightforward.
popup.html
<!DOCTYPE html>
<html lang="en">
<head>
    <meta charset="UTF-8">
    <meta name="viewport" content="width=device-width, initial-scale=1.0">
    <title>My Extension Popup</title>
    <link rel="stylesheet" href="popup.css">
</head>
<body>
    <div class="container">
        <h1>Hello Extension!</h1>
        <p>This is your first Chrome Extension.</p>
        <button id="changeBgBtn">Change Page Background</button>
        <button id="injectTextBtn">Inject a Message</button>
        <p class="status-message" id="statusMessage"></p>
    </div>
    <script src="popup.js"></script>
</body>
</html>
CSS Styling: Making It Pretty
Now for the styling! We want our popup to look good. Good design makes our extension a joy to use. We’ll add some basic CSS. This will position our buttons nicely. It will also give them a friendly look. Don’t worry, it’s nothing too complex. Here’s the CSS magic:
popup.css
/* popup.css */

/* Basic Reset & Box Sizing */
html {
    box-sizing: border-box;
}
*, *::before, *::after {
    box-sizing: inherit;
}

body {
    font-family: Arial, Helvetica, sans-serif; /* Safe font stack for broad compatibility */
    margin: 0;
    padding: 0;
    width: 300px; /* Standard width for a compact extension popup */
    min-height: 150px; /* Minimum height for better layout control */
    background-color: #282c34; /* Dark background for a modern UI look */
    color: #f8f8f2; /* Light text color for contrast */
    overflow: hidden; /* Prevents scrollbars if content slightly exceeds bounds */
}

.container {
    padding: 15px;
    text-align: center;
    max-width: 100%; /* Ensures container respects the body's width */
}

h1 {
    font-size: 1.4em;
    color: #61dafb; /* A vibrant light blue for headings */
    margin-top: 0;
    margin-bottom: 10px;
}

p {
    font-size: 0.9em;
    margin-bottom: 15px;
    line-height: 1.4;
}

button {
    background-color: #4CAF50; /* A friendly green for actionable buttons */
    color: white;
    padding: 10px 15px;
    border: none;
    border-radius: 4px;
    cursor: pointer;
    font-size: 0.9em;
    margin: 5px 0;
    width: 100%; /* Buttons take full available width */
    transition: background-color 0.2s ease; /* Smooth transition for hover effects */
}

button:hover {
    background-color: #45a049; /* Slightly darker green on hover */
}

.status-message {
    margin-top: 15px;
    font-size: 0.85em;
    color: #e0f2fe; /* Light blue for status messages */
    min-height: 20px; /* Ensures space is always reserved for messages */
}
JavaScript Magic: Adding the Highlighter Logic
Here’s the cool part: the JavaScript! This is where all the action happens. Our JS will listen for clicks on our buttons. It will then apply the correct highlight color. It also handles clearing highlights. We’ll use vanilla JavaScript for everything. No fancy frameworks needed here! This makes it easy to understand. You can check out other vanilla JS projects too. Let’s dive into the code!
manifest.json
{
    "manifest_version": 3,
    "name": "My First Chrome Extension",
    "version": "1.0",
    "description": "A simple Chrome extension built with HTML, CSS, and Vanilla JavaScript. Learn to create a popup, interact with the current tab, and inject content.",
    "action": {
        "default_popup": "popup.html",
        "default_icon": {
            "16": "icons/icon16.png",
            "48": "icons/icon48.png",
            "128": "icons/icon128.png"
        }
    },
    "permissions": [
        "activeTab",
        "scripting",
        "storage"
    ],
    "host_permissions": [
        "<all_urls>"
    ],
    "icons": {
        "16": "icons/icon16.png",
        "48": "icons/icon48.png",
        "128": "icons/icon128.png"
    }
}
popup.js
// popup.js

// Ensure the DOM is fully loaded before attaching event listeners
document.addEventListener('DOMContentLoaded', () => {
    // Get references to the buttons and status message element
    const changeBgBtn = document.getElementById('changeBgBtn');
    const injectTextBtn = document.getElementById('injectTextBtn');
    const statusMessage = document.getElementById('statusMessage');

    /**
     * Updates the status message displayed in the popup.
     * @param {string} message - The text message to display.
     * @param {boolean} [isError=false] - True if the message is an error, changes color to red.
     */
    function updateStatus(message, isError = false) {
        statusMessage.textContent = message;
        statusMessage.style.color = isError ? '#ff6b6b' : '#e0f2fe'; // Red for error, light blue for normal
    }

    // Event listener for the "Change Page Background" button
    changeBgBtn.addEventListener('click', async () => {
        updateStatus('Attempting to change background...');

        try {
            // Query for the currently active tab in the current window
            // chrome.tabs.query returns an array, we destructure to get the first (active) tab
            const [tab] = await chrome.tabs.query({ active: true, currentWindow: true });

            if (tab) {
                // Execute the `setPageBackgroundColor` function in the context of the active tab
                // `scripting` permission is required for this.
                await chrome.scripting.executeScript({
                    target: { tabId: tab.id }, // Target the specific tab
                    function: setPageBackgroundColor, // The function to inject and run
                    args: ['#3498db'] // Arguments to pass to the injected function
                });
                updateStatus('Page background color changed successfully!');
            } else {
                updateStatus('No active tab found.', true);
            }
        } catch (error) {
            console.error('Failed to change background color:', error);
            updateStatus('Error changing background color. Check permissions.', true);
        }
    });

    /**
     * Injected function: Changes the background color of the document body.
     * This function runs directly within the context of the target web page.
     * @param {string} color - The CSS color string to set.
     */
    function setPageBackgroundColor(color) {
        document.body.style.backgroundColor = color;
        console.log(`Background color changed to ${color}`);
    }

    // Event listener for the "Inject a Message" button
    injectTextBtn.addEventListener('click', async () => {
        updateStatus('Attempting to inject message...');

        try {
            const [tab] = await chrome.tabs.query({ active: true, currentWindow: true });

            if (tab) {
                // Execute the `injectContentMessage` function in the context of the active tab
                await chrome.scripting.executeScript({
                    target: { tabId: tab.id },
                    function: injectContentMessage,
                    args: ['Hello from your Chrome Extension!']
                });
                updateStatus('Message injected successfully!');
            } else {
                updateStatus('No active tab found.', true);
            }
        } catch (error) {
            console.error('Failed to inject message:', error);
            updateStatus('Error injecting message. Check permissions.', true);
        }
    });

    /**
     * Injected function: Adds or updates a div with a message on the current page.
     * This function runs directly within the context of the target web page.
     * @param {string} message - The message text to inject.
     */
    function injectContentMessage(message) {
        let div = document.getElementById('extension-injected-message');
        if (div) {
            // If message div already exists, update its content
            div.textContent = message + ' (Updated)';
        } else {
            // Otherwise, create a new div and append it to the body
            div = document.createElement('div');
            div.id = 'extension-injected-message';
            div.style.cssText = `
                position: fixed;
                top: 10px;
                right: 10px;
                background-color: rgba(97, 218, 251, 0.9); /* A light blue with transparency */
                color: white;
                padding: 10px 15px;
                border-radius: 5px;
                font-family: Arial, sans-serif;
                font-size: 14px;
                z-index: 10000; /* Ensure it's on top of other elements */
                box-shadow: 0 2px 10px rgba(0,0,0,0.2);
            `;
            div.textContent = message;
            document.body.appendChild(div);
        }
        console.log(`Injected message: ${message}`);
    }
});
How It All Works Together
1. The Manifest File
Every Chrome Extension needs a manifest file. It’s called manifest.json. This file is like the extension’s ID card. It tells Chrome important details. It lists the extension’s name. It describes its version. It also specifies permissions. For our highlighter, we need activeTab permission. This lets our script access the current tab. We also need scripting to inject our highlight logic. Lastly, it defines our popup HTML. This connects popup.html to the extension icon. It’s crucial for everything to work. Without it, Chrome wouldn’t know what to do.
Pro Tip: Always start with your
manifest.json. It sets the foundation for your entire extension. Keep its permissions tight. Only ask for what your extension truly needs. This protects user privacy. It also improves security.
2. The Popup Interface
When you click our extension icon, the popup.html appears. This is what we designed earlier. It shows our color buttons. Each button has a unique ID. Our JavaScript will target these IDs. It listens for a ‘click’ event. When a button is clicked, our script springs to life. It sends a message to the active tab. This message tells the tab which color to use. Or to clear existing highlights. This separation is key. The popup is just a control panel. The real work happens elsewhere. It makes our extension efficient. It also keeps our code organized.
3. Highlighting Content
This is where the magic truly unfolds. When our popup script sends a message, it activates a content script. This script runs directly within the webpage. It gets the selected text. You can read more about window.getSelection() documentation to understand how it works. It then wraps this text in a <span> element. This <span> gets our chosen highlight color. We also add a special class. This helps us find and remove highlights later. To remove highlights, the script finds all spans with our class. Then it simply removes them. This makes our clear button super effective. Want to learn more about state management? Explore how React handles state. Our highlighter uses a simple state. It just checks what text is selected.
Friendly Reminder: Always test your extension on different websites. Some sites have complex structures. This might affect your highlighting. Debugging early saves time later! Don’t be afraid to inspect elements. It’s your best friend.
Tips to Customise It
You’ve built something awesome! But don’t stop here. Here are some ideas to make it even better:
- More Colors: Add a color picker! Let users choose any highlight color they want.
- Persistence: Make highlights stick. Save them in local storage. They should reappear when you revisit a page.
- Keyboard Shortcuts: Assign shortcuts for quick highlighting. Imagine highlighting without clicking!
- Context Menu: Integrate your highlighter into the right-click context menu. This offers another way to highlight selected text easily.
- Highlight Groups: Allow users to categorize highlights. For example, “important,” “todo,” or “research.”
- Export Highlights: Build a feature to export all highlights from a page. This could be to a text file. Or maybe even to a new document.
Conclusion
Wow! You just built your very own Chrome Extension! You learned about manifest.json. You saw how HTML creates the UI. You mastered CSS for styling. And you wielded JavaScript for core functionality. This is a huge achievement. You’re now a Chrome Extension JS developer! Keep exploring advanced JavaScript concepts. The possibilities are endless. Share your creation with friends. Tweak it. Make it uniquely yours. Keep coding, and happy highlighting!