Hey there, fellow coders! If you have wanted to build a React Todo Local Storage app but had no idea where to start, you are in the right place. We are going to build something truly useful today. You will learn how to make your to-do list remember tasks. Even after closing your browser!
This tutorial is perfect for self-taught beginners. We will use React’s Hooks and JSX. Get ready to build a fantastic project. It will be fun and super rewarding!
What We Are Building
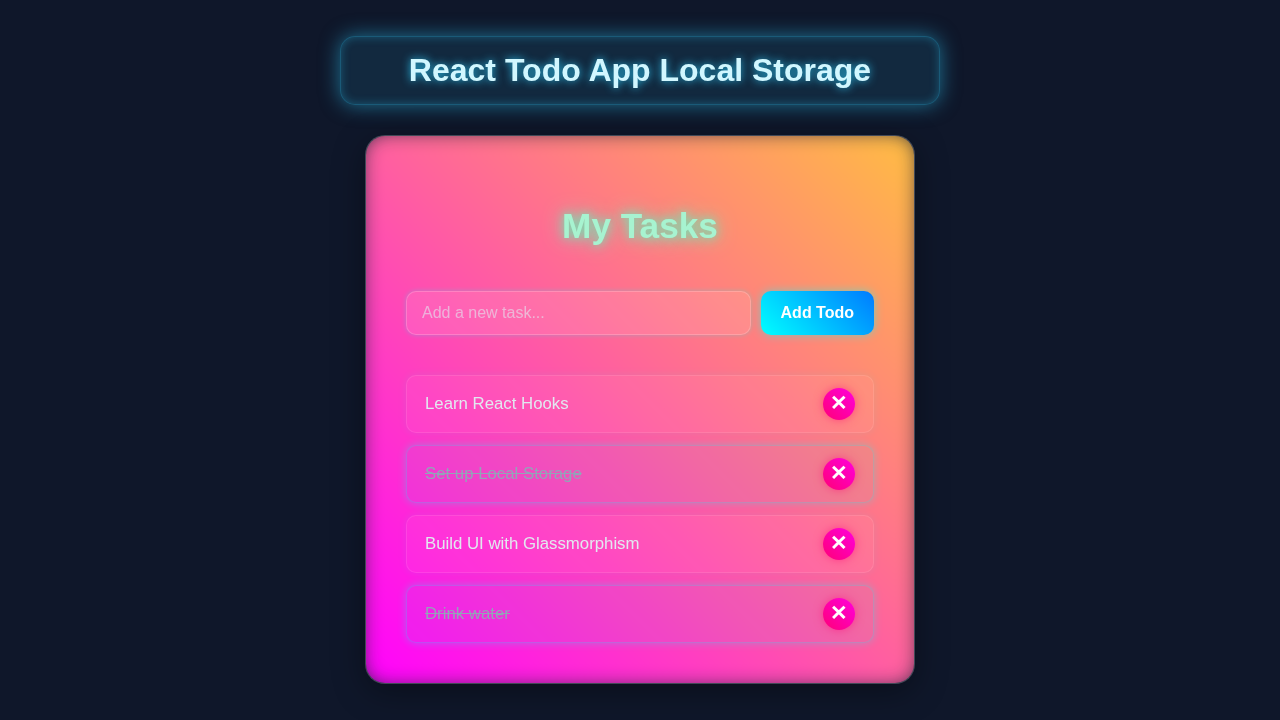
Imagine a to-do list that never forgets. That is exactly what we are building! This app will let you add new tasks easily. You can mark them as complete with a simple click. You can also delete them when they are no longer needed. The best part? Your tasks will stick around. Thanks to local storage, they persist. Therefore, your list is always ready for you.
This project is more than just a simple list. It shows off powerful React concepts. You will see how to manage state effectively. You will also learn about data persistence, a crucial skill for any web developer. Get ready to make your apps smarter and more user-friendly!
HTML Structure (It’s all about JSX!)
In React, we do not write traditional HTML files. Instead, we use JSX! JSX lets us write HTML-like code directly inside our JavaScript. It is incredibly powerful and intuitive. We will create a clean and semantic structure for our app. This includes an input form for adding new tasks and a list to display all of them.
Here is a simplified idea of what our main App component will render. Remember, it looks like HTML, but it is actually JavaScript expressions! Don’t worry, React handles all the complex parts for us. It cleverly turns this JSX into real DOM elements. You will see how it all fits together below.
index.html
<!DOCTYPE html>
<html lang="en">
<head>
    <meta charset="utf-8" />
    <link rel="icon" href="%PUBLIC_URL%/favicon.ico" />
    <meta name="viewport" content="width=device-width, initial-scale=1" />
    <meta name="theme-color" content="#000000" />
    <meta
        name="description"
        content="Web site created using create-react-app to demonstrate a Todo App with Local Storage"
    />
    <link rel="apple-touch-icon" href="%PUBLIC_URL%/logo192.png" />
    <link rel="manifest" href="%PUBLIC_URL%/manifest.json" />
    <title>React Todo App with Local Storage</title>
</head>
<body>
    <noscript>You need to enable JavaScript to run this app.</noscript>
    <div id="root"></div>
    <!--
        This HTML file is a template.
        If you open it directly in the browser, you will see an empty page.
        You can add webfonts, meta tags, or analytics to this file.
        The build step will place the bundled scripts into the <body>.

        To begin the development, run `npm start` or `yarn start`.
        To create a production bundle, use `npm run build` or `yarn build`.
    -->
</body>
</html>
CSS Styling: Making It Look Good
A functional app is fantastic. A functional and beautiful app is even better! We will add some simple CSS to our project. This will give our to-do list a clean, modern, and appealing look. We will use flexbox for easy layout. This keeps everything tidy and well-aligned. Also, we will style our individual task items nicely, making them easy to read.
Do not be intimidated by CSS. We will keep it minimal and highly effective for this tutorial. The primary goal is clarity and usability. You can always customize it later to match your personal style. Feel free to unleash your inner designer! This basic styling provides a solid and attractive foundation. Let’s make our app shine a little bit!
src/index.css
/* src/index.css */
/* Global styles and a basic reset for consistent rendering across browsers */

body {
  margin: 0; /* Remove default body margin */
  font-family: 'Arial', 'Helvetica', sans-serif; /* Safe font stack */
  -webkit-font-smoothing: antialiased; /* Enhance font rendering on macOS */
  -moz-osx-font-smoothing: grayscale; /* Enhance font rendering on macOS */
  background-color: #f4f7f6; /* Light background for the overall page */
  color: #333; /* Default text color */
  line-height: 1.6; /* Improve readability */
}

code {
  font-family: source-code-pro, Menlo, Monaco, Consolas, 'Courier New', /* Monospace font for code snippets */
    monospace;
}

/* Ensure the root element fills the viewport height and centers content horizontally */
#root {
  min-height: 100vh; /* Minimum height to fill the viewport */
  display: flex;
  justify-content: center; /* Center content horizontally */
  align-items: flex-start; /* Align content to the top vertically */
  padding: 20px; /* Add some padding around the main app container */
  box-sizing: border-box; /* Include padding in element's total width/height */
}
src/App.css
/* src/App.css */

/* Main container for the todo application */
.todo-app-container {
  background: #ffffff; /* White background */
  padding: 30px; /* Internal spacing */
  border-radius: 12px; /* Rounded corners */
  box-shadow: 0 4px 20px rgba(0, 0, 0, 0.1); /* Subtle shadow for depth */
  max-width: 500px; /* Maximum width for the app */
  width: 100%; /* Ensure it takes full width up to max-width */
  box-sizing: border-box; /* Include padding and border in the element's total width and height */
  margin-top: 50px; /* Space from the top of the viewport */
  overflow: hidden; /* Prevents child elements from overflowing */
}

/* App Title Styling */
.app-title {
  text-align: center;
  color: #2c3e50; /* Dark blue-grey color */
  margin-bottom: 25px;
  font-size: 2.2em; /* Larger font size */
  font-family: 'Arial Black', Gadget, sans-serif; /* A bold, widely available font */
}

/* Input Form Layout */
.todo-input-form {
  display: flex; /* Use flexbox for horizontal layout */
  gap: 10px; /* Space between the input and button */
  margin-bottom: 25px;
}

/* Input Field Styling */
.todo-input {
  flex-grow: 1; /* Allows the input to take up available space */
  padding: 12px 15px;
  border: 2px solid #ddd; /* Light grey border */
  border-radius: 8px;
  font-size: 1em;
  transition: border-color 0.3s ease, box-shadow 0.3s ease; /* Smooth transition for focus effects */
  box-sizing: border-box; /* Ensures padding doesn't increase element width */
}

.todo-input:focus {
  border-color: #007bff; /* Blue border on focus */
  box-shadow: 0 0 0 3px rgba(0, 123, 255, 0.25); /* Blue glow effect */
  outline: none; /* Remove default browser outline */
}

/* Add Todo Button Styling */
.add-todo-button {
  padding: 12px 20px;
  background-color: #007bff; /* Primary blue color */
  color: white;
  border: none;
  border-radius: 8px;
  cursor: pointer;
  font-size: 1em;
  font-weight: bold;
  transition: background-color 0.3s ease, transform 0.2s ease; /* Smooth hover and active effects */
  box-sizing: border-box;
}

.add-todo-button:hover {
  background-color: #0056b3; /* Darker blue on hover */
  transform: translateY(-1px); /* Slight lift effect */
}

.add-todo-button:active {
  transform: translateY(0); /* Reset on click */
}

/* Todo List Styling */
.todo-list {
  list-style: none; /* Remove default bullet points */
  padding: 0; /* Remove default padding */
  margin: 0; /* Remove default margin */
}

/* Individual Todo Item Styling */
.todo-item {
  display: flex;
  align-items: center; /* Vertically align text and button */
  justify-content: space-between; /* Space out text and button */
  background: #f9f9f9; /* Light grey background */
  border: 1px solid #eee; /* Subtle border */
  padding: 12px 15px;
  margin-bottom: 10px; /* Space between items */
  border-radius: 8px;
  transition: background-color 0.3s ease, box-shadow 0.3s ease;
}

.todo-item:last-child {
  margin-bottom: 0; /* No margin after the last item */
}

/* Styling for completed todo items */
.todo-item.completed {
  background: #e0f2f7; /* Lighter blue for completed tasks */
  color: #777;
  text-decoration: line-through; /* Strikethrough text */
}

/* Todo Text Styling */
.todo-text {
  flex-grow: 1; /* Allows text to take available space */
  cursor: pointer; /* Indicate it's clickable */
  font-size: 1.1em;
  word-break: break-word; /* Prevents long words from overflowing */
  line-height: 1.4;
}

.todo-item.completed .todo-text {
  color: #999; /* Muted color for completed text */
}

/* Delete Todo Button Styling */
.delete-todo-button {
  background-color: #dc3545; /* Red color for delete */
  color: white;
  border: none;
  border-radius: 50%; /* Make it round */
  width: 30px;
  height: 30px;
  min-width: 30px; /* Ensure it stays round on smaller content */
  min-height: 30px;
  display: flex;
  align-items: center;
  justify-content: center;
  font-size: 1.2em;
  line-height: 1; /* Center the 'X' */
  cursor: pointer;
  margin-left: 15px;
  transition: background-color 0.3s ease, transform 0.2s ease;
  box-sizing: border-box;
  font-family: Arial, sans-serif; /* Ensure 'X' is rendered consistently */
}

.delete-todo-button:hover {
  background-color: #c82333; /* Darker red on hover */
  transform: scale(1.05); /* Slight zoom effect */
}

.delete-todo-button:active {
  transform: scale(1); /* Reset on click */
}

/* Message for when there are no todos */
.no-todos-message {
  text-align: center;
  color: #777;
  font-style: italic;
  padding: 20px;
  border: 1px dashed #ddd;
  border-radius: 8px;
}
JavaScript: The Brains of Our React Todo Local Storage App
This is where the magic truly happens for our React Todo Local Storage app! We will use modern JavaScript and React functional components. React Hooks like useState and useEffect are our absolute best friends here. They help us manage dynamic data. They also handle side effects gracefully. These are key for interacting with the browser’s local storage.
The useState hook will manage our main list of to-dos. It holds the current state of all our tasks. Meanwhile, useEffect is perfect for saving and loading data. It triggers code based on state changes or component lifecycles. This is precisely how we achieve data persistence. Let’s dive into the code now. See how all these powerful pieces connect!
src/index.js
import React from 'react';
import ReactDOM from 'react-dom/client';
import './index.css'; // Import global base styles
import App from './App'; // Import the main App component

// Create a root to render the React application into the DOM
const root = ReactDOM.createRoot(document.getElementById('root'));

// Render the App component wrapped in React.StrictMode for development checks
root.render(
  <React.StrictMode>
    <App />
  </React.StrictMode>
);
src/App.js
import React, { useState, useEffect } from 'react';
import './App.css'; // Import component-specific styles

function App() {
  // State to hold the list of todos.
  // It's initialized using a function to lazily load from local storage only once.
  const [todos, setTodos] = useState(() => {
    // Attempt to retrieve saved todos from local storage.
    const savedTodos = localStorage.getItem('react-todo-app-todos');
    // If saved todos exist, parse and return them; otherwise, return an empty array.
    return savedTodos ? JSON.parse(savedTodos) : [];
  });

  // State to hold the current value of the new todo input field.
  const [newTodo, setNewTodo] = useState('');

  // useEffect hook to synchronize 'todos' state with local storage.
  // This effect runs every time the 'todos' array changes.
  useEffect(() => {
    // Save the current 'todos' array to local storage after converting it to a JSON string.
    localStorage.setItem('react-todo-app-todos', JSON.stringify(todos));
  }, [todos]); // Dependency array: the effect re-runs when 'todos' changes.

  // Event handler for changes in the input field.
  const handleInputChange = (e) => {
    setNewTodo(e.target.value); // Update the 'newTodo' state with the input's current value.
  };

  // Event handler for adding a new todo when the form is submitted.
  const handleAddTodo = (e) => {
    e.preventDefault(); // Prevent the default form submission behavior (page reload).

    // If the input field is empty or contains only whitespace, do nothing.
    if (newTodo.trim() === '') return;

    // Generate a simple unique ID for the new todo (timestamp based).
    const todoId = Date.now();
    const todoText = newTodo.trim(); // Trim whitespace from the todo text.

    // Add the new todo to the existing 'todos' array.
    setTodos([...todos, { id: todoId, text: todoText, completed: false }]);
    setNewTodo(''); // Clear the input field after adding the todo.
  };

  // Event handler for toggling a todo's completion status.
  const handleToggleTodo = (id) => {
    // Map over the 'todos' array to find the specific todo by ID.
    setTodos(
      todos.map((todo) =>
        // If the todo's ID matches, toggle its 'completed' status; otherwise, return the todo as is.
        todo.id === id ? { ...todo, completed: !todo.completed } : todo
      )
    );
  };

  // Event handler for deleting a todo.
  const handleDeleteTodo = (id) => {
    // Filter out the todo with the matching ID from the 'todos' array.
    setTodos(todos.filter((todo) => todo.id !== id));
  };

  return (
    <div className="todo-app-container">
      <h1 className="app-title">React Todo List</h1>

      <form onSubmit={handleAddTodo} className="todo-input-form">
        <input
          type="text"
          className="todo-input"
          value={newTodo}
          onChange={handleInputChange}
          placeholder="Add a new task..."
          aria-label="New todo task" // Accessibility label
          maxLength="100" // Limit input length for practicality
        />
        <button type="submit" className="add-todo-button">
          Add Todo
        </button>
      </form>

      {/* Conditionally render message if no todos, or the list if there are todos */}
      {todos.length === 0 ? (
        <p className="no-todos-message">No tasks yet! Add some above.</p>
      ) : (
        <ul className="todo-list">
          {todos.map((todo) => (
            <li key={todo.id} className={`todo-item ${todo.completed ? 'completed' : ''}`}>
              {/* Clickable text to toggle completion status */}
              <span onClick={() => handleToggleTodo(todo.id)} className="todo-text">
                {todo.text}
              </span>
              {/* Delete button for the todo */}
              <button onClick={() => handleDeleteTodo(todo.id)} className="delete-todo-button" aria-label={`Delete ${todo.text}`}>
                ✕ {/* Unicode 'X' mark for delete */}
              </button>
            </li>
          ))}
        </ul>
      )}
    </div>
  );
}

export default App;
How It All Works Together
Let’s break down the core logic piece by piece. You have seen the code in the previous sections. Now, let’s truly understand each part’s purpose. This section will explain every important step in detail. We will cover managing tasks, saving them, and updating them. This knowledge is absolutely essential for building interactive and robust React apps. It ties the JSX, CSS, and JavaScript together. Therefore, you will see the complete picture.
Initializing Your To-Dos
First, we need to load any previously saved tasks. When our app component first starts, the useEffect hook springs into action. It runs only once, right after the component mounts for the first time. This is because its dependency array is empty ([]). It safely checks local storage for an item named ‘todos’. If it finds one, it retrieves the stored string. Then, it uses JSON.parse() to convert it back into a usable JavaScript array. This array then becomes our initial todos state. If nothing is found in local storage, we simply start with an empty array. This thoughtful approach ensures your app always begins correctly. Therefore, your previous tasks magically reappear, offering a seamless user experience every time.
Pro-Tip: Local Storage only stores strings! Always remember to use
JSON.stringify()before saving objects or arrays, andJSON.parse()after retrieving them. Learn more about the Web Storage API on MDN.
Adding New Tasks
Adding a new task is quite straightforward. We have an input field where the user types their new to-do item. When the form is submitted (e.g., by pressing Enter or clicking a button), we first call event.preventDefault(). This crucial step stops the browser from performing its default refresh action. We then create a new task object. Each task object needs a unique ID, the task text, and a completed status, which is initially false. Next, we update our todos state. We do this by spreading the existing tasks (...prevTodos) and adding the new one. This tells React that the state has changed. React then efficiently re-renders our list to show the new task. Finally, the input field automatically clears itself. It becomes ready for your next brilliant idea!
Storing Tasks in Local Storage
Persistence is the main goal here, and we achieve it with another powerful useEffect hook. This particular useEffect has todos in its dependency array ([todos]). This means it will run every single time our todos array changes. Whenever todos changes, this effect takes our updated todos array. It converts this array to a JSON string using `JSON.stringify()`. This conversion is crucial because local storage can only store strings. Then, it saves this string to local storage under the key ‘todos’. Therefore, your tasks are always up-to-date in persistent storage. They are always ready for your next visit! Using localStorage.setItem() is how we store the data. This simple Web API makes it incredibly easy. Your valuable data will now survive browser closes. It is quite cool, isn’t it? This ensures a smooth and consistent experience for your users.
Marking Tasks as Complete
Users need a clear way to track their progress. So, we add a toggle feature to mark tasks complete or incomplete. Each task item in our list will have a mechanism for this, typically a checkbox or a designated button. When this mechanism is clicked, a handler function runs. This function safely maps over the `todos` array. It finds the specific task by its unique ID. Then, it simply flips the `completed` property for that task (from `true` to `false` or vice-versa). Finally, we update the `todos` state with this new array. React then detects this state change. It efficiently re-renders only the affected task. This makes your list interactive and very responsive. It provides instant visual feedback to the user, enhancing the overall feel of the app.
Deleting Tasks
Sometimes, tasks are finished. Other times, they are simply no longer relevant. We definitely need a clear way to remove them from our list. Each task will feature a delete button or icon. When this button is clicked, our handler function is triggered. We then use the powerful `filter` method on our `todos` array. This method creates a brand-new array. It includes every task *except* the one with the matching ID that we want to delete. Then, we update our `todos` state with this freshly filtered array. The task instantly vanishes from the displayed list. Crucially, because of our `useEffect` for saving, it also gets removed from local storage on the next state update. This approach is both clean and highly efficient. Your to-do list stays tidy!
Heads Up! Remember that React state updates are asynchronous. When you update state, the changes might not be immediately available in the very next line of code. Always rely on the `useEffect` dependency array to trigger actions when state truly changes. This ensures predictable behavior.
Tips to Customise It
You have built a solid foundation with this project! Now, how about making it uniquely yours? Here are some fantastic ideas. These can take your app to the next level. Customization is always part of the fun in coding!
- Task Editing: Add a feature to edit existing task text directly in the list. You could toggle between a simple
ptag and aninputfield when a task is clicked. - Filtering Options: Implement buttons to filter tasks. For example, allow users to show “All,” “Active,” or “Completed” tasks. This improves usability greatly. You might find this React Debounced Search Input with Hooks – JSX Tutorial useful for adding a search feature too!
- Due Dates: Add a date picker for each task. This lets users set deadlines for their to-dos. It adds more robust functionality to your app.
- Animations: Use CSS transitions or a library like
Framer Motion. Make tasks appear and disappear smoothly. Visual feedback is always a win for user experience. - Better UI/UX: Explore different styling options to enhance the look. Use a UI library like Material-UI or Chakra UI. This can make your app look much more professional. If you want to revisit the basics of React Todo App Tutorial: Build with Functional Components & Hooks, we’ve got you covered. Or perhaps explore more about React ToDo App Tutorial: useState & useEffect Example for deep diving into specific Hooks.
Conclusion
Wow, you did it! You just built a fully functional React Todo Local Storage app from scratch. This is a huge accomplishment, and you should be incredibly proud! You have mastered key concepts like state management and local storage persistence. These are critical skills for any modern web developer. You are now equipped to build even more complex and interactive applications.
Take pride in what you have created. Share it with your friends, family, or even on your portfolio! Experiment further with the customization tips we provided. The more you build, the more you learn and grow. Keep coding, keep exploring, and keep building amazing things. Your journey as a developer is truly just beginning. What incredible project will you build next?