Hey there, future React rockstar! If you’ve ever wanted to build a truly interactive application, you’re in the perfect spot. Today, we’re going to dive into creating a fantastic React ToDo App. This project is a cornerstone for understanding how React works its magic. We’ll learn about managing component state and handling side effects. Get ready to build something useful and impressive!
What We Are Building: Your Next React ToDo App!
We are going to construct a sleek, functional to-do list application. Imagine a place where you can add tasks, mark them as complete, and even remove them. This app will be responsive and dynamic. It will update in real-time as you interact with it. We will use two core React Hooks: useState and useEffect. They are super powerful. They let our components remember things and react to changes. Building this React Chat App with JSX will feel familiar if you’ve explored that. This project gives you practical experience. It helps solidify your React fundamentals.
The Core Structure: HTML
Even though we are building a React app, it still renders into HTML. This HTML acts as the main container for our React component. Don’t worry, React will manage most of the structure for us. We just need a root element. It’s where our entire app will live. Here’s a simple index.html file. It’s the entry point for our amazing application.
index.html
<!DOCTYPE html>
<html lang="en">
<head>
    <meta charset="UTF-8" />
    <meta name="viewport" content="width=device-width, initial-scale=1.0" />
    <title>React To-Do App</title>
</head>
<body>
    <noscript>You need to enable JavaScript to run this app.</noscript>
    <div id="root"></div>
    <script type="module" src="/src/index.jsx"></script>
</body>
</html>
Making It Pretty: CSS Styling
No one wants a bland-looking app, right? So, we’ll add some CSS to make our to-do list visually appealing. We’ll focus on readability and a clean layout. This styling will make your tasks easy to see. It will also make buttons intuitive to use. We aim for a simple yet elegant design. Therefore, your users will enjoy interacting with it.
src/styles.css
/* Basic Reset & Global Styles */
body {
    margin: 0;
    padding: 0;
    font-family: Arial, Helvetica, sans-serif;
    background-color: #0f172a; /* Dark background */
    color: #ecfeff; /* Light text color */
    display: flex;
    justify-content: center;
    align-items: center;
    min-height: 100vh;
    box-sizing: border-box;
    overflow: hidden; /* Prevent body scrollbars */
}

#root {
    display: flex;
    justify-content: center;
    align-items: center;
    width: 100%;
    min-height: 100vh;
}

/* App Container */
.todo-app-container {
    width: 90%;
    max-width: 500px;
    background: rgba(255, 255, 255, 0.1); /* Glassmorphism base */
    border-radius: 15px;
    padding: 30px;
    backdrop-filter: blur(15px);
    -webkit-backdrop-filter: blur(15px);
    border: 1px solid rgba(255, 255, 255, 0.2);
    box-shadow: 0 8px 32px 0 rgba(0, 0, 0, 0.37), 0 0 20px rgba(0, 255, 255, 0.4); /* Neon shadow */
    box-sizing: border-box;
}

h1 {
    text-align: center;
    color: #cffafe;
    text-shadow: 0 0 5px #00ffff;
    margin-bottom: 25px;
}

/* Input Group */
.input-group {
    display: flex;
    gap: 10px;
    margin-bottom: 25px;
}

.input-group input[type="text"] {
    flex-grow: 1;
    padding: 12px 15px;
    border: 1px solid rgba(0, 255, 255, 0.4);
    border-radius: 8px;
    background: rgba(255, 255, 255, 0.08);
    color: #ecfeff;
    font-size: 1em;
    outline: none;
    transition: all 0.3s ease;
    box-sizing: border-box;
}

.input-group input[type="text"]::placeholder {
    color: #a0aec0;
}

.input-group input[type="text"]:focus {
    border-color: #00ffff;
    box-shadow: 0 0 10px rgba(0, 255, 255, 0.6);
}

.input-group button {
    padding: 12px 20px;
    background: linear-gradient(135deg, #00ffff, #00c4cc);
    color: #0f172a;
    border: none;
    border-radius: 8px;
    cursor: pointer;
    font-size: 1em;
    font-weight: bold;
    transition: all 0.3s ease;
    box-shadow: 0 0 8px rgba(0, 255, 255, 0.5);
    box-sizing: border-box;
}

.input-group button:hover {
    background: linear-gradient(135deg, #00e0e0, #009ca3);
    box-shadow: 0 0 15px rgba(0, 255, 255, 0.8);
}

/* To-Do List */
.todo-list {
    list-style: none;
    padding: 0;
    margin: 0;
}

/* To-Do Item */
.todo-item {
    display: flex;
    align-items: center;
    justify-content: space-between;
    background: rgba(255, 255, 255, 0.05);
    border: 1px solid rgba(255, 255, 255, 0.1);
    border-radius: 8px;
    padding: 12px 15px;
    margin-bottom: 12px;
    backdrop-filter: blur(5px);
    -webkit-backdrop-filter: blur(5px);
    transition: all 0.3s ease;
    box-shadow: 0 4px 10px rgba(0, 0, 0, 0.2);
    box-sizing: border-box;
}

.todo-item.completed {
    background: rgba(0, 255, 255, 0.1);
    border-color: rgba(0, 255, 255, 0.3);
}

.todo-item-content {
    display: flex;
    align-items: center;
    flex-grow: 1;
    cursor: pointer; /* Indicate clickable area */
}

.todo-item-content input[type="checkbox"] {
    margin-right: 15px;
    width: 18px;
    height: 18px;
    accent-color: #00ffff; /* Neon checkbox */
    cursor: pointer;
}

.todo-item-content span {
    flex-grow: 1;
    color: #ecfeff;
    font-size: 1.1em;
    transition: all 0.3s ease;
    text-shadow: 0 0 2px #cffafe;
}

.todo-item.completed .todo-item-content span {
    text-decoration: line-through;
    color: #a0aec0;
    text-shadow: none;
}

.todo-item button {
    background: none;
    border: none;
    color: #ef4444; /* Red for delete */
    font-size: 1.2em;
    cursor: pointer;
    padding: 5px;
    margin-left: 10px;
    transition: color 0.3s ease, text-shadow 0.3s ease;
    box-sizing: border-box;
}

.todo-item button:hover {
    color: #fca5a5;
    text-shadow: 0 0 8px #ef4444;
}
Bringing It to Life: React JavaScript with Hooks
This is where the real magic happens! We’ll write our React component using modern JavaScript. We will specifically leverage useState for managing our list of tasks. Also, we will use useEffect to handle things like saving tasks to local storage. This ensures your tasks persist even after you close the browser. It’s a key feature for any useful to-do app. Let’s dive into the code that powers our React Server Components: UI/UX Blog Thumbnail Design, but for a ToDo App!
src/index.jsx
import React from 'react';
import { createRoot } from 'react-dom/client';
import App from './App'; // Import the main App component
import './styles.css'; // Import global styles

// Find the root DOM element where the React app will be mounted
const container = document.getElementById('root');

// Create a React root
const root = createRoot(container);

// Render the App component into the root
root.render(
  <React.StrictMode>
    <App />
  </React.StrictMode>
);
src/App.jsx
import React, { useState, useEffect } from 'react';
import TodoItem from './TodoItem';
/**
* App Component - The main To-Do application.
* Manages the list of to-do items, their creation, toggling, and deletion.
* Uses useState for state management and useEffect for local storage persistence.
*/
function App() {
// State to hold the list of to-do items
// Initialize from localStorage or with an empty array
const [todos, setTodos] = useState(() => {
const savedTodos = localStorage.getItem('react-todo-app-todos');
return savedTodos ? JSON.parse(savedTodos) : [];
});
// State to hold the value of the new todo input field
const [newTodo, setNewTodo] = useState('');
// useEffect hook to save todos to localStorage whenever the 'todos' state changes
useEffect(() => {
localStorage.setItem('react-todo-app-todos', JSON.stringify(todos));
}, [todos]); // Dependency array: run effect whenever 'todos' array changes
/**
* Handles adding a new to-do item.
* Validates input, creates a new todo object, updates state, and clears input.
*/
const addTodo = () => {
if (newTodo.trim() === '') return; // Prevent adding empty todos
const newTodoItem = {
id: Date.now(), // Unique ID based on timestamp
text: newTodo.trim(),
completed: false,
};
setTodos((prevTodos) => [...prevTodos, newTodoItem]); // Add new todo to the list
setNewTodo(''); // Clear the input field
};
/**
* Toggles the 'completed' status of a to-do item.
*
* @param {number} id - The ID of the to-do item to toggle.
*/
const toggleTodo = (id) => {
setTodos((prevTodos) =>
prevTodos.map((todo) =>
todo.id === id ? { ...todo, completed: !todo.completed } : todo
)
);
};
/**
* Deletes a to-do item from the list.
*
* @param {number} id - The ID of the to-do item to delete.
*/
const deleteTodo = (id) => {
setTodos((prevTodos) => prevTodos.filter((todo) => todo.id !== id));
};
// Render the To-Do app UI
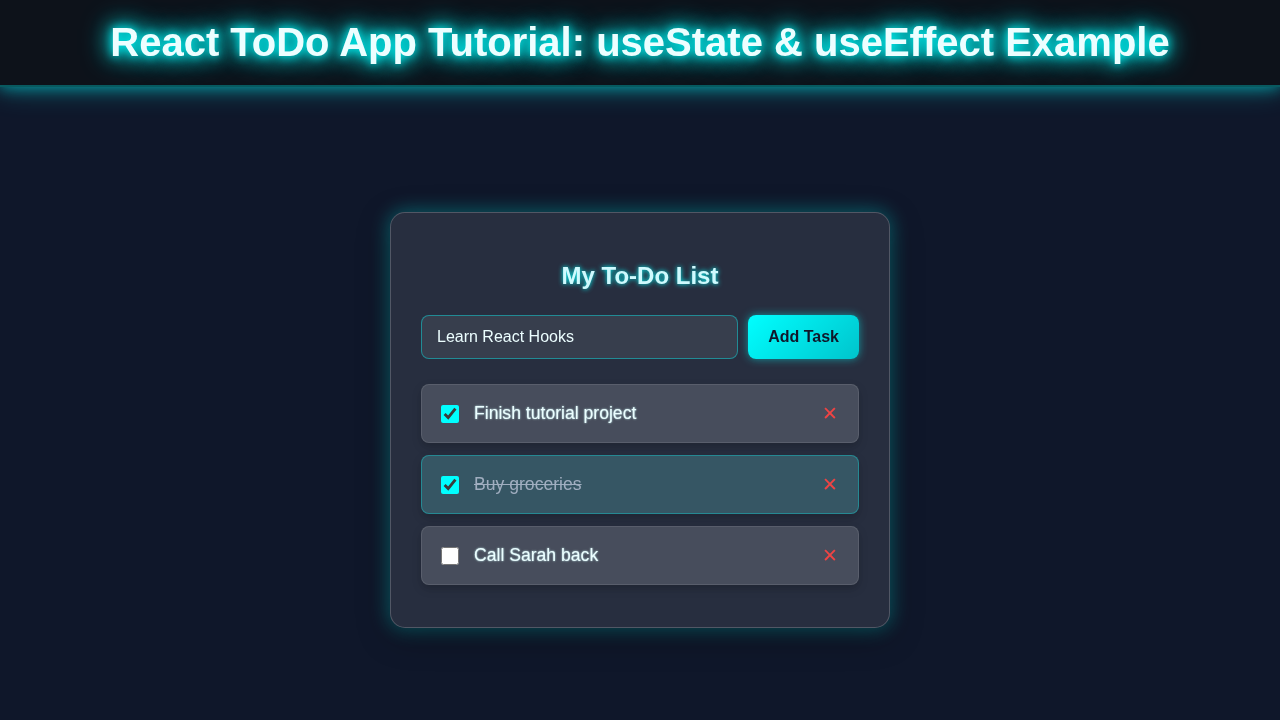
return (
<div className="todo-app-container">
<h1>My To-Do List</h1>
<div className="input-group">
<input
type="text"
placeholder="Add a new task..."
value={newTodo}
onChange={(e) => setNewTodo(e.target.value)}
onKeyPress={(e) => {
if (e.key === 'Enter') {
addTodo();
}
}}
/>
<button onClick={addTodo}>Add Task</button>
</div>
<ul className="todo-list">
{todos.map((todo) => (
<TodoItem
key={todo.id}
todo={todo}
onToggle={toggleTodo}
onDelete={deleteTodo}
/>
))}
</ul>
</div>
);
}
export default App;
src/TodoItem.jsx
import React from 'react';

/**
 * TodoItem Component
 * Renders a single to-do item with a checkbox, text, and delete button.
 * Applies styles based on completion status.
 *
 * @param {object} props - Component props
 * @param {object} props.todo - The to-do item object { id, text, completed }
 * @param {function} props.onToggle - Callback to toggle completion status
 * @param {function} props.onDelete - Callback to delete the to-do item
 */
function TodoItem({ todo, onToggle, onDelete }) {
  return (
    <li className={`todo-item ${todo.completed ? 'completed' : ''}`}>
      <div className="todo-item-content" onClick={() => onToggle(todo.id)}>
        <input
          type="checkbox"
          checked={todo.completed}
          onChange={() => onToggle(todo.id)} // Redundant but good for accessibility/direct click on checkbox
        />
        <span>{todo.text}</span>
      </div>
      <button onClick={() => onDelete(todo.id)}>✕</button>
    </li>
  );
}

export default TodoItem;
How Your React ToDo App Works Together
Now that you’ve seen all the code, let’s break it down. We’ll explore how each piece contributes to our functional React ToDo App. Understanding the flow is key here. It helps you grasp the React lifecycle. We will go through the core components and their interactions. It’s like seeing the engine of a car. You learn how everything moves!
Setting Up State with useState
First, we need to manage our list of to-do items. We use the useState hook for this. It gives us a state variable, like todos, and a function to update it, called setTodos. Each to-do item will be an object. It will have properties like id, text, and completed. When you add a new task, we update this todos state. React then efficiently re-renders only the changed parts of your UI. This process is super fast, thanks to concepts like React Reconciliation Explained – Visual UI/UX Guide.
Pro Tip:
useStatealways returns an array with two elements. The first is the current state value. The second is a function to update that value. It’s a pattern you’ll see everywhere in React!
When you call setTodos, React knows it needs to update the component. It then compares the new state with the old state. This makes sure your UI stays synchronized. Think of it as React keeping tabs on what needs to be shown. It acts like a diligent assistant. This keeps your application fast and responsive.
Handling Side Effects with useEffect
What about saving our to-do items? We want them to stick around. This is where useEffect comes in handy. It lets us perform "side effects." These are operations outside of the normal rendering flow. For our app, we use useEffect to save our todos array to the browser’s local storage. This happens every time the todos state changes. It’s like having a persistent memory for your app.
Remember: The second argument to
useEffectis a dependency array. If it’s empty, the effect runs once after the initial render. If it contains variables like[todos], the effect runs whenever those variables change. It’s crucial for controlling when your effects fire.
We also use useEffect to load existing tasks when the app first starts. It checks local storage. If tasks are found, it sets them as our initial todos state. This ensures your list is always ready. It retrieves your work right where you left off. Therefore, useEffect is perfect for data fetching, subscriptions, and manually changing the DOM.
For more on useEffect, check out the official React documentation on useEffect. It explains the nuances beautifully.
Adding, Toggling, and Deleting Tasks
Each interaction with our React ToDo App involves updating the todos state. When you type in a new task and hit "Add", an addTodo function runs. This function creates a new task object. It then adds it to the existing todos array. It uses setTodos to update the state. The UI immediately reflects this new item.
Similarly, clicking on a task calls a toggleTodo function. This function finds the specific task by its id. It then flips its completed status. We create a new array with the updated task. We never directly modify the original state. This is an important concept in React. It helps prevent unexpected bugs. Finally, the deleteTodo function filters out the unwanted task. It creates a new array without it. Then, setTodos updates the state again. This approach ensures immutability. It makes state changes predictable. It keeps your app robust.
Tips to Customise Your React ToDo App
You’ve built a solid foundation! Now, let’s think about how you can make this app uniquely yours. Customization is a great way to learn more. It helps you explore new React features.
- Add Task Categories: Introduce a category field for each to-do. Then, let users filter tasks by category. This would involve adding more state.
- Priority Levels: Implement a way to set different priority levels (e.g., Low, Medium, High). You could visually differentiate them. Maybe use different colors.
- Edit Task Functionality: Currently, you can only add or delete. Add an "Edit" button next to each task. This would let users modify task text.
- Date Pickers: Allow users to set due dates for tasks. You could then sort tasks by their due date. This makes the app even more powerful.
For more CSS ideas to style these new features, check out CSS-Tricks Almanac. It’s a fantastic resource for all things CSS!
Conclusion: You Did It!
Congratulations! You just built a fully functional and dynamic React ToDo App. You’ve used two of the most fundamental React Hooks: useState and useEffect. You now understand how to manage state, handle side effects, and create an interactive user experience. This is a massive step in your web development journey. Your skills are growing rapidly!
Feel proud of what you’ve accomplished. This project is a great addition to your portfolio. Try to customize it further. Share your amazing creation with the procoder09.com community. We’d love to see what you build next!