Hey there, fellow coders! Have you ever wanted to build a cool project but felt stuck on where to start? You are in the perfect spot today! We are going to build an awesome React Weather App from scratch. This app will fetch real-time weather data. It uses React Hooks and functional components. You’ll be amazed at what we create together!
What We Are Building: Your First React Weather App!
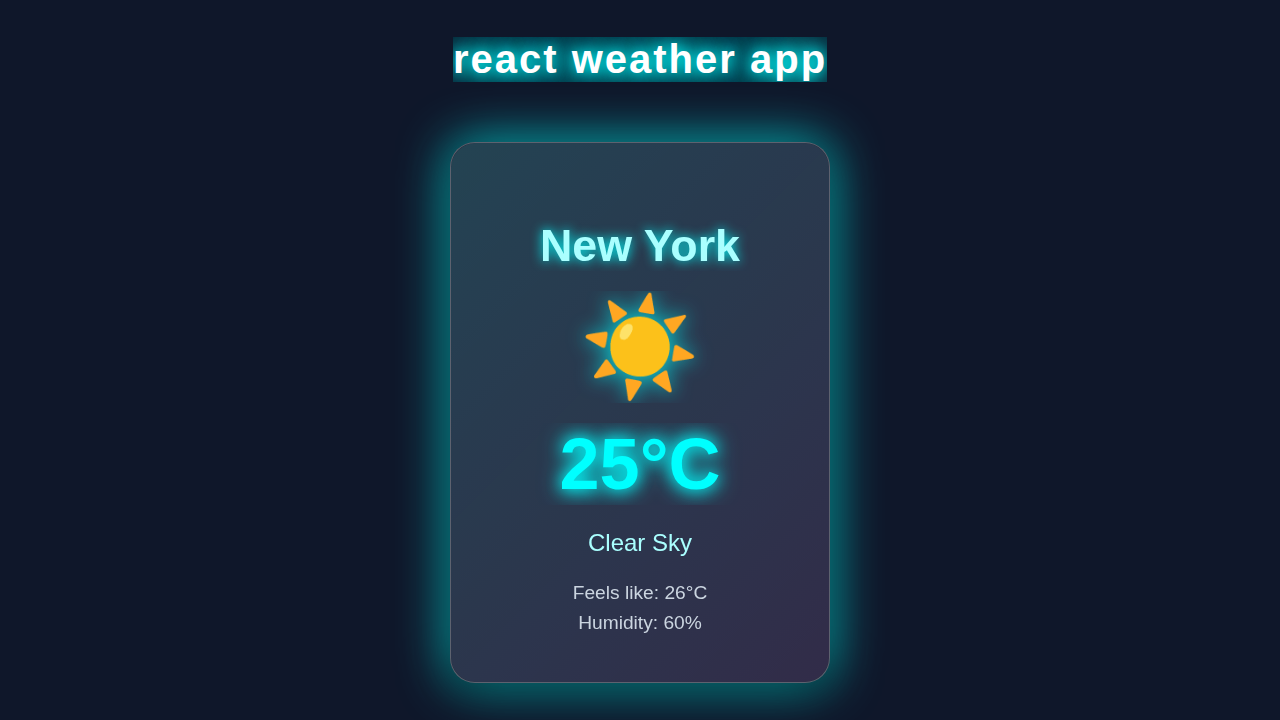
Imagine knowing the weather for any city with just a quick search. That’s exactly what our app will do! We’re crafting a sleek, responsive weather tool. It will show temperature, humidity, and wind speed. This project is not just fun; it’s also a fantastic way to practice React fundamentals. You will use useState and useEffect hooks. Get ready to impress your friends!
Crafting the HTML Structure for Our Weather App
First, we need a basic foundation for our app. The HTML sets up the containers for all our React components. It includes a main div for the app itself. There’s also a search input and a place for weather details. This structure helps organize our content beautifully.
public/index.html
<!DOCTYPE html>
<html lang="en">
<head>
    <meta charset="UTF-8">
    <meta name="viewport" content="width=device-width, initial-scale=1.0">
    <title>React Weather App</title>
</head>
<body>
    <noscript>You need to enable JavaScript to run this app.</noscript>
    <div id="root"></div>
    <!-- The JavaScript bundle will be injected here by your build tool (e.g., Create React App) -->
</body>
</html>
Styling Our React Weather App with CSS
Next, let’s make our app look amazing! The CSS gives our weather app its visual flair. We’ll use modern styling to create a clean, user-friendly interface. This includes a cool background. We’ll also leverage modern CSS properties like Flexbox on CSS-Tricks to manage our layout beautifully. It also ensures the layout is responsive and inviting. You will love the final look!
src/App.css
/* Universal box-sizing for consistency */
*, *::before, *::after {
  box-sizing: border-box;
}

body {
  margin: 0;
  font-family: Arial, Helvetica, sans-serif; /* Safe fonts */
  -webkit-font-smoothing: antialiased;
  -moz-osx-font-smoothing: grayscale;
  background-color: #1a202c; /* Dark background */
  color: #e2e8f0; /* Light text color */
  min-height: 100vh; /* Ensure body takes full viewport height */
  display: flex;
  justify-content: center;
  align-items: flex-start; /* Align content to the top initially */
  padding: 20px;
  overflow-x: hidden; /* Prevent horizontal scroll */
  max-width: 100%;
}

.App {
  text-align: center;
  padding: 20px;
  width: 100%;
  max-width: 800px; /* Max width for the app container */
  margin: auto; /* Center the app container */
  overflow: hidden; /* Prevent content from spilling out */
}

.App-header {
  margin-bottom: 40px;
  color: #0ff; /* Neon blue */
  text-shadow: 0 0 5px #0ff, 0 0 10px #0ff, 0 0 20px rgba(0, 255, 255, 0.7);
}

.App-header h1 {
  font-size: 2.5em;
  margin: 0;
}

.city-search-form {
  display: flex;
  justify-content: center;
  gap: 10px;
  margin-bottom: 30px;
  flex-wrap: wrap; /* Allow wrapping on small screens */
}

.city-input {
  padding: 12px 18px;
  border: 1px solid #0ff;
  border-radius: 8px;
  background-color: #2d3748; /* Darker input background */
  color: #e2e8f0;
  font-size: 1em;
  outline: none;
  transition: border-color 0.3s ease, box-shadow 0.3s ease;
  width: 100%;
  max-width: 300px; /* Max width for input field */
}

.city-input::placeholder {
  color: #a0aec0;
}

.city-input:focus {
  border-color: #00ffff;
  box-shadow: 0 0 10px rgba(0, 255, 255, 0.5);
}

.search-button {
  padding: 12px 25px;
  border: none;
  border-radius: 8px;
  background-color: #0ff; /* Neon blue button */
  color: #1a202c;
  font-size: 1em;
  font-weight: bold;
  cursor: pointer;
  transition: background-color 0.3s ease, box-shadow 0.3s ease, transform 0.2s ease;
  flex-shrink: 0; /* Prevent button from shrinking */
}

.search-button:hover {
  background-color: #00e6e6; /* Slightly darker neon on hover */
  box-shadow: 0 0 15px rgba(0, 255, 255, 0.7);
  transform: translateY(-2px);
}

.search-button:active {
  transform: translateY(0);
  box-shadow: 0 0 5px rgba(0, 255, 255, 0.5);
}

.status-message, .error-message {
  font-size: 1.1em;
  margin-top: 20px;
  padding: 15px;
  border-radius: 8px;
}

.status-message {
  color: #a0aec0;
  background-color: #2d3748;
}

.error-message {
  color: #ff6347; /* Tomato red for errors */
  background-color: #4a1a1a;
  border: 1px solid #ff6347;
}

/* WeatherCard Styles */
.weather-card {
  background: rgba(255, 255, 255, 0.1); /* Semi-transparent white */
  backdrop-filter: blur(10px); /* Glassmorphism effect */
  border: 1px solid rgba(255, 255, 255, 0.2);
  border-radius: 15px;
  padding: 30px;
  margin-top: 30px;
  box-shadow: 0 8px 32px 0 rgba(0, 0, 0, 0.37); /* General shadow */
  transition: transform 0.3s ease-in-out, box-shadow 0.3s ease-in-out;
  max-width: 400px;
  width: 100%;
  margin-left: auto;
  margin-right: auto;
  color: #e2e8f0;
  overflow: hidden;
}

.weather-card:hover {
  transform: translateY(-5px);
  box-shadow: 0 8px 32px 0 rgba(0, 0, 0, 0.5), 0 0 25px rgba(0, 255, 255, 0.7); /* Add neon glow on hover */
}

.weather-city {
  font-size: 2.2em;
  margin-bottom: 15px;
  color: #aaffff; /* Lighter neon blue for city name */
  text-shadow: 0 0 5px #0ff;
  max-width: 100%;
  overflow: hidden;
}

.weather-icon-container {
  display: flex;
  justify-content: center;
  align-items: center;
  margin-bottom: 10px;
}

.weather-icon {
  width: 100px; /* Adjust icon size */
  height: 100px;
  filter: drop-shadow(0 0 8px rgba(0, 255, 255, 0.6)); /* Glow for icon */
  max-width: 100%;
  height: auto;
}

.weather-temp {
  font-size: 3.5em;
  font-weight: bold;
  margin: 10px 0;
  color: #00ffff; /* Primary neon blue for temperature */
  text-shadow: 0 0 10px #00ffff;
  max-width: 100%;
  overflow: hidden;
}

.weather-description {
  font-size: 1.3em;
  text-transform: capitalize;
  margin-bottom: 15px;
  color: #aaffff;
  max-width: 100%;
  overflow: hidden;
}

.weather-feels-like, .weather-humidity {
  font-size: 1.1em;
  margin: 5px 0;
  color: #cbd5e0;
  max-width: 100%;
  overflow: hidden;
}

/* Responsive adjustments */
@media (max-width: 600px) {
  .App-header h1 {
    font-size: 2em;
  }

  .city-search-form {
    flex-direction: column;
    align-items: center;
  }

  .city-input, .search-button {
    width: 100%;
    max-width: 280px;
  }

  .weather-city {
    font-size: 1.8em;
  }

  .weather-temp {
    font-size: 2.8em;
  }
}

@media (max-width: 400px) {
  .App {
    padding: 10px;
  }
  .weather-card {
    padding: 20px;
  }
  .weather-icon {
    width: 80px;
    height: 80px;
  }
}
Bringing Life to Our React Weather App with JavaScript and Hooks
Now for the real magic: JavaScript with React Hooks! We will write the core logic for fetching and displaying weather data. This involves managing state and handling API requests efficiently. We’ll explore useState to keep track of our data. Also, useEffect will handle side effects like data fetching. This is where the app truly comes alive!
src/index.js
import React from 'react';
import ReactDOM from 'react-dom/client'; // Using createRoot for React 18+
import App from './App';

// Create a root and render the App component into it.
const root = ReactDOM.createRoot(document.getElementById('root'));
root.render(
  <React.StrictMode>
    <App />
  </React.StrictMode>
);
src/components/WeatherCard.js
import React from 'react';

/**
 * WeatherCard Component
 * Displays the current weather information.
 * @param {object} props - The component props.
 * @param {object} props.weatherData - Object containing weather details (name, main, weather).
 */
function WeatherCard({ weatherData }) {
  if (!weatherData) {
    return <div className="weather-card loading">No weather data available.</div>;
  }

  const { name, main, weather } = weatherData;
  const temperatureCelsius = (main.temp - 273.15).toFixed(1); // Convert Kelvin to Celsius
  const description = weather[0].description;
  const iconCode = weather[0].icon;
  const iconUrl = `http://openweathermap.org/img/wn/${iconCode}@2x.png`; // OpenWeatherMap icon URL

  return (
    <div className="weather-card">
      <h2 className="weather-city">{name}</h2>
      <div className="weather-icon-container">
        <img src={iconUrl} alt={description} className="weather-icon" />
      </div>
      <p className="weather-temp">{temperatureCelsius}°C</p>
      <p className="weather-description">{description}</p>
      <p className="weather-feels-like">Feels like: {(main.feels_like - 273.15).toFixed(1)}°C</p>
      <p className="weather-humidity">Humidity: {main.humidity}%</p>
    </div>
  );
}

export default WeatherCard;
src/App.js
import React, { useState, useEffect, useCallback } from 'react';
import WeatherCard from './components/WeatherCard';
import './App.css'; // Import the main CSS file

// OpenWeatherMap API details
const API_KEY = 'YOUR_API_KEY'; // Replace with your actual API key from OpenWeatherMap
const BASE_URL = 'https://api.openweathermap.org/data/2.5/weather';

/**
 * Main App Component for the React Weather Application.
 * Manages city input, weather data fetching, and displays weather information.
 */
function App() {
  const [city, setCity] = useState('London'); // Default city for input field
  const [currentCity, setCurrentCity] = useState('London'); // State to trigger effect only on search
  const [weatherData, setWeatherData] = useState(null);
  const [loading, setLoading] = useState(false);
  const [error, setError] = useState(null);

  /**
   * Fetches weather data from the OpenWeatherMap API.
   * Uses useCallback to memoize the function, preventing unnecessary re-renders.
   * @param {string} searchCity - The city name to search for.
   */
  const fetchWeatherData = useCallback(async (searchCity) => {
    setLoading(true);
    setError(null); // Clear previous errors
    setWeatherData(null); // Clear previous data

    if (!API_KEY || API_KEY === 'YOUR_API_KEY') {
      setError("Please replace 'YOUR_API_KEY' with your actual OpenWeatherMap API key. You can get one from openweathermap.org.");
      setLoading(false);
      return;
    }

    try {
      const response = await fetch(`${BASE_URL}?q=${searchCity}&appid=${API_KEY}`);
      if (!response.ok) {
        // Handle HTTP errors
        if (response.status === 404) {
          throw new Error(`City not found: ${searchCity}. Please check the spelling.`);
        } else {
          throw new Error(`HTTP error! status: ${response.status}`);
        }
      }
      const data = await response.json();
      setWeatherData(data);
    } catch (err) {
      console.error("Failed to fetch weather data:", err);
      setError(`Failed to fetch weather data: ${err.message}`);
    } finally {
      setLoading(false);
    }
  }, []); // Empty dependency array means this function is created once

  // useEffect hook to fetch weather data when currentCity changes
  useEffect(() => {
    if (currentCity) {
      fetchWeatherData(currentCity);
    }
  }, [currentCity, fetchWeatherData]); // Re-run when currentCity or fetchWeatherData changes

  /**
   * Handles the change event for the city input field.
   * @param {object} e - The event object from the input.
   */
  const handleCityChange = (e) => {
    setCity(e.target.value);
  };

  /**
   * Handles the form submission event.
   * Prevents default form submission and triggers weather data fetch.
   * @param {object} e - The event object from the form.
   */
  const handleSubmit = (e) => {
    e.preventDefault();
    if (city.trim()) { // Only search if city input is not empty
      setCurrentCity(city.trim());
    }
  };

  return (
    <div className="App">
      <header className="App-header">
        <h1>React Weather Forecast</h1>
      </header>

      <form onSubmit={handleSubmit} className="city-search-form">
        <input
          type="text"
          placeholder="Enter city name"
          value={city}
          onChange={handleCityChange}
          className="city-input"
        />
        <button type="submit" className="search-button">
          Get Weather
        </button>
      </form>

      {loading && <p className="status-message">Loading weather data...</p>}
      {error && <p className="error-message">Error: {error}</p>}

      {!loading && !error && weatherData && (
        <WeatherCard weatherData={weatherData} />
      )}
      {!loading && !error && !weatherData && (
        <p className="status-message">Enter a city to see the weather!</p>
      )}
    </div>
  );
}

export default App;
How It All Works Together: The Magic Behind Our React Weather App
Let’s tie everything together now. We’ve certainly laid out the structure. We also added some really nice style. Now, we will see how React makes our app truly dynamic and interactive. It’s a super cool and important process. You’ll grasp each moving part and its purpose clearly. This understanding builds confidence!
The React Component Structure and State
Our entire weather app typically lives within a single React functional component. This component is the brain of our operation. It expertly manages its own state and handles all user interactions. We use the powerful useState hook to define several pieces of state. For instance, city holds the user’s text input for a location. The weatherData state will then store all the delightful information we get from the API. Importantly, we also have error and loading states. These are crucial for providing clear feedback to the user. Functional components with hooks allow us to write very concise and powerful code. They make state management a breeze!
Pro Tip: Using functional components with hooks makes your code cleaner and much easier to manage. If you want to dive deeper into component patterns, check out our guide on React Server vs Client Components: Understanding the Differences. Understanding these distinctions is a real game-changer for modern React development!
Each time one of these state variables changes, React automatically re-renders our component. This means your app’s user interface always stays up-to-date. It reflects the latest data or user input. This reactivity is one of React’s greatest strengths!
Fetching Weather Data with useEffect
The true heart of our app lies in fetching real-time data from a weather API. We expertly use the useEffect hook for this essential task. useEffect lets us perform “side effects” in our functional components. Think of it like a unified lifecycle method. It combines behaviors similar to componentDidMount, componentDidUpdate, and componentWillUnmount. When the city state changes, or when our app initially loads, our useEffect hook springs into action. It then makes an asynchronous API call. We typically fetch this data from a service like OpenWeatherMap. You will need an API key for this, but don’t worry! You can easily get one for free by signing up on their website. It’s a quick and simple process.
We use the browser’s native Fetch API to grab this data. After successfully fetching the data, we update our weatherData state. We also carefully handle any potential errors that might occur during the network request. This diligent approach ensures your app remains robust and user-friendly. It always provides a smooth experience. This entire mechanism is what makes our app dynamic and powerful!
Handling User Input and Dynamic State Updates
The search bar is absolutely crucial for our weather app. It allows users to query any city they desire. When you type a city name, the input field’s value updates our city state in real-time. We achieve this with an onChange event handler on the input element. This handler captures every keystroke. When you finally hit “Enter” or click a dedicated search button, we trigger the actual data fetch. This is usually done by updating a specific searchQuery state, for example. The useEffect hook then wisely reacts to this searchQuery change. It initiates a new API request. You can learn even more about handling input efficiently and preventing unnecessary API calls by reading our article on building a React Debounced Search Component with Hooks – Tutorial. It’s an incredibly useful skill for any interactive app!
Every time our component’s state is updated, React triggers a re-render. This ensures that the user interface instantly displays the new weather data. React gracefully handles all the complex underlying DOM manipulation for us. This powerful abstraction is precisely why React is so popular and truly beloved by developers worldwide!
Displaying the Weather Information Conditionally
Once we successfully retrieve the weatherData from the API, we need to show it! We use conditional rendering to display this information intelligently. If valid data exists, we proudly show the city name, current temperature, humidity, and wind speed. However, if an error occurred during the fetch, we display a clear, helpful error message. And while the data is still loading, a polite “Loading…” message appears. This thoughtful approach makes the app incredibly user-friendly. It provides clear feedback to the user at every single step. We use simple and expressive JSX to render these elements. JSX perfectly blends HTML-like syntax directly into our JavaScript code. It makes our components highly readable and intuitive. How cool is that for building UIs?
Did you know? JSX allows you to write UI components using an XML-like syntax directly within JavaScript. It makes your component structure very readable and component development super intuitive. Explore more about it in our tutorial on creating a React User Registration Form with JSX. You’ll build some awesome stuff and master JSX along the way!
We also make sure to format the data nicely. For example, temperatures are often converted to a readable format (like Celsius or Fahrenheit). This attention to detail elevates the user experience. You’ve truly built a professional-looking and functioning app!
Tips to Customise Your React Weather App
You’ve built a solid foundation! Now, it’s time to make your weather app truly unique. Here are a few ideas to expand your project. Experiment and have fun!
- Add a forecast: Instead of just current weather, show a 5-day forecast. This means making more API calls. It’s a great challenge!
- Location-based weather: Use the Geolocation API to detect the user’s current location. Then, display weather for their city automatically.
- Theming: Implement dark mode or different color schemes. You could even change themes based on the weather conditions!
- Animations: Add subtle animations for weather icons or transitions. This makes the user experience even more delightful.
Conclusion: You Built Your First React Weather App!
Wow, you did it! You successfully built a functional React Weather App using functional components and hooks. That’s a huge achievement! You’ve tackled state management, API integration, and rendering dynamic data. These are all core skills for any React developer.
Take a moment to appreciate your hard work. You’ve come so far! Now, go forth and build more amazing things. Don’t forget to share your creation with us on social media! We’d love to see what you’ve done. Keep coding, keep learning, and keep building awesome web experiences!