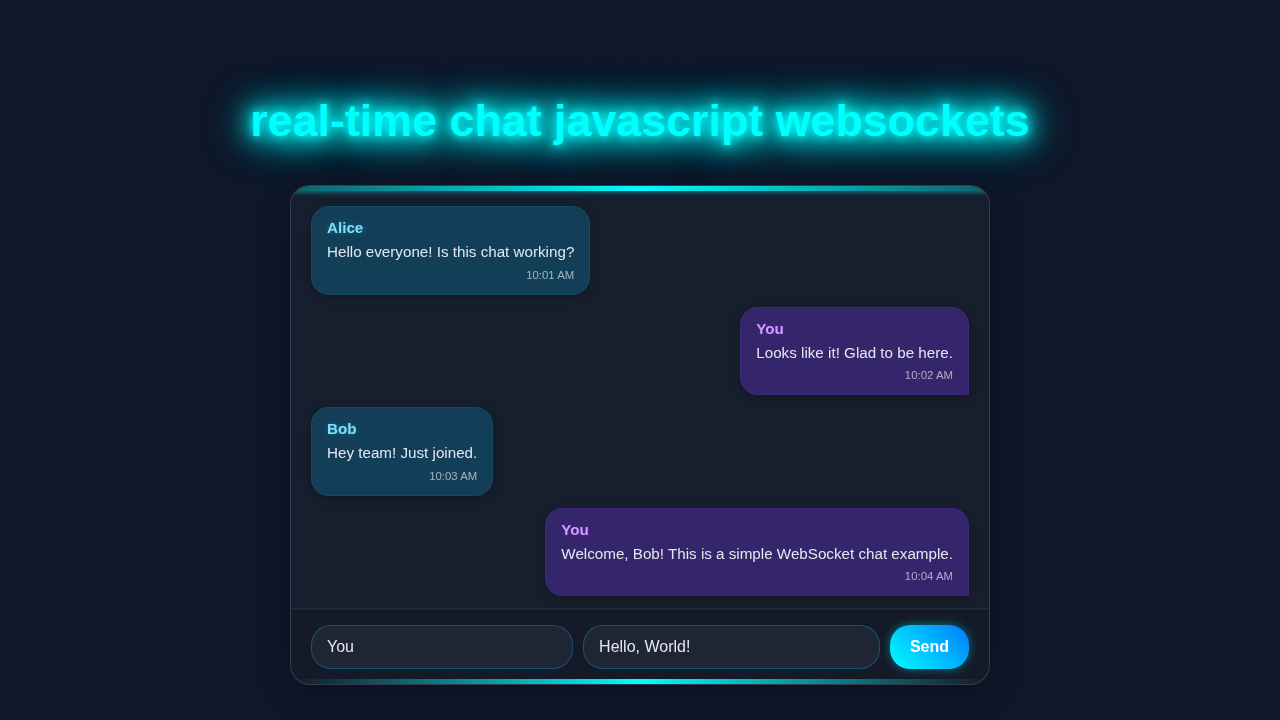
Hey there, awesome coders! If you’ve ever wanted to build a Real-time Chat application but felt a bit lost, you’re in the perfect place. We’re going to create a super cool chat widget together. It updates instantly, just like magic! Modern web applications thrive on instant feedback. This project will teach you so much about live web interactions. You will feel like a web development wizard. Let’s get started!
What We Are Building: Your First Real-time Chat Widget
Imagine a simple chat box, right on your website. Users type messages, and everyone sees them appear instantly. That’s exactly what we are building today! This isn’t just a static form; it’s dynamic and alive. We will use WebSockets. WebSockets are a powerful technology. They allow constant, two-way communication between your browser and a server. This means no more refreshing the page to see new messages. Pretty neat, right? This concept is useful for so many things. Think about live sports updates or collaborative editing tools. You’re learning a fundamental skill!
HTML Structure: Setting Up Our Chatbox
First, we need the basic skeleton for our chat widget. This HTML provides the display area for messages. It also includes a clear input field and a send button. It’s a straightforward setup. We keep it simple and clean. Don’t worry, we’ll make it look good with CSS soon!
index.html
<!DOCTYPE html>
<html lang="en">
<head>
    <meta charset="UTF-8">
    <meta name="viewport" content="width=device-width, initial-scale=1.0">
    <title>Real-time Chat with WebSockets</title>
    <link rel="stylesheet" href="styles.css">
</head>
<body>
    <div class="chat-container">
        <h1>Real-time Chat</h1>
        <div class="messages" id="messages">
            <!-- Chat messages will be appended here by JavaScript -->
        </div>
        <div class="input-area">
            <input type="text" id="usernameInput" placeholder="Your name (optional)" maxlength="20">
            <input type="text" id="messageInput" placeholder="Type a message..." autofocus>
            <button id="sendButton">Send</button>
        </div>
    </div>
    <script src="script.js"></script>
</body>
</html>
CSS Styling: Making Our Chat Widget Look Good
Now, let’s give our chat widget some style. We’ll use CSS to make it visually appealing and user-friendly. We’ll add some colors, adjust sizes, and make sure messages are easy to read. This part makes our project come alive. Good styling improves user experience dramatically. We will use Flexbox for easy alignment.
Pro Tip: Responsive design is key! Always consider how your chat widget will look on different screen sizes from the start. Tools like Flexbox make this much easier to achieve efficiently.
styles.css
/* General styling */
body {
    font-family: Arial, Helvetica, sans-serif;
    margin: 0;
    padding: 0;
    display: flex;
    justify-content: center;
    align-items: center;
    min-height: 100vh;
    background-color: #f0f2f5; /* Light background for the tutorial */
    box-sizing: border-box;
    overflow: hidden; /* Prevent body scrollbars */
}

.chat-container {
    background-color: #ffffff;
    border-radius: 12px;
    box-shadow: 0 4px 20px rgba(0, 0, 0, 0.1);
    width: 100%;
    max-width: 600px;
    height: 80vh; /* Make it take up more vertical space */
    display: flex;
    flex-direction: column;
    overflow: hidden; /* Ensure content inside doesn't overflow */
    box-sizing: border-box;
}

h1 {
    text-align: center;
    color: #333;
    padding: 15px 0;
    margin: 0;
    border-bottom: 1px solid #eee;
    font-size: 1.8em;
}

/* Messages area */
.messages {
    flex-grow: 1; /* Takes up available space */
    padding: 20px;
    overflow-y: auto; /* Enable scrolling for messages */
    display: flex;
    flex-direction: column;
    gap: 10px; /* Space between messages */
    background-color: #e9ecef; /* Light grey background for message area */
    box-sizing: border-box;
}

.message-bubble {
    background-color: #d1e7dd; /* Light green for received messages */
    color: #1a1a1a;
    padding: 10px 15px;
    border-radius: 18px;
    max-width: 75%;
    align-self: flex-start; /* Default for received messages */
    word-wrap: break-word; /* Prevent long words from overflowing */
    line-height: 1.4;
    font-size: 0.95em;
    box-shadow: 0 1px 2px rgba(0,0,0,0.05);
}

.message-bubble.self {
    background-color: #007bff; /* Blue for sent messages */
    color: #ffffff;
    align-self: flex-end; /* Align to the right for sent messages */
    border-bottom-right-radius: 2px; /* Slight design variation */
}

.message-bubble .username {
    font-weight: bold;
    margin-bottom: 3px;
    display: block;
    color: inherit; /* Inherit color from bubble */
}

.message-bubble.self .username {
    color: rgba(255, 255, 255, 0.8); /* Slightly transparent white */
}

.message-bubble .timestamp {
    font-size: 0.75em;
    color: rgba(0, 0, 0, 0.6);
    margin-top: 5px;
    display: block;
    text-align: right;
}

.message-bubble.self .timestamp {
    color: rgba(255, 255, 255, 0.7);
}

.status-message {
    text-align: center;
    font-style: italic;
    color: #666;
    padding: 5px;
    font-size: 0.9em;
}

/* Input area */
.input-area {
    display: flex;
    padding: 15px 20px;
    border-top: 1px solid #eee;
    background-color: #ffffff;
    gap: 10px;
    box-sizing: border-box;
}

.input-area input[type="text"] {
    flex-grow: 1; /* Take up available space */
    padding: 12px 15px;
    border: 1px solid #ced4da;
    border-radius: 20px;
    font-size: 1em;
    outline: none;
    transition: border-color 0.2s ease-in-out, box-shadow 0.2s ease-in-out;
    box-sizing: border-box;
}

.input-area input[type="text"]:focus {
    border-color: #007bff;
    box-shadow: 0 0 0 0.2rem rgba(0, 123, 255, 0.25);
}

#usernameInput {
    flex-grow: 0.4; /* Smaller than message input */
}

.input-area button {
    background-color: #007bff;
    color: white;
    border: none;
    border-radius: 20px;
    padding: 12px 20px;
    cursor: pointer;
    font-size: 1em;
    font-weight: bold;
    transition: background-color 0.2s ease-in-out, transform 0.1s ease-in-out;
    box-sizing: border-box;
}

.input-area button:hover {
    background-color: #0056b3;
}

.input-area button:active {
    transform: translateY(1px);
}

/* Responsive adjustments */
@media (max-width: 768px) {
    .chat-container {
        width: 95%;
        height: 90vh;
    }
    h1 {
        font-size: 1.5em;
        padding: 12px 0;
    }
    .messages {
        padding: 15px;
    }
    .input-area {
        flex-wrap: wrap; /* Allow inputs to wrap */
        padding: 12px 15px;
    }
    #usernameInput, #messageInput {
        flex-basis: 100%; /* Take full width */
        margin-bottom: 8px; /* Add space between inputs when wrapped */
    }
    .input-area button {
        flex-basis: 100%; /* Take full width */
    }
}
JavaScript Magic: Bringing Real-time Chat to Life
Here’s the cool part: the JavaScript! This code will handle connecting to our server. It will send messages and display new ones as they arrive. We’ll manage all the real-time interactions right here. It’s where all the action happens! Get ready to make your widget truly dynamic.
server.js
// server.js
// To run this server:
// 1. Ensure you have Node.js installed.
// 2. Open your terminal in this directory and run: npm install ws
// 3. Then, run the server: node server.js

const WebSocket = require('ws');

const wss = new WebSocket.Server({ port: 8080 });

console.log('WebSocket server started on port 8080');

wss.on('connection', ws => {
    console.log('Client connected');

    // Send a welcome message to the newly connected client
    ws.send(JSON.stringify({ type: 'status', message: 'Welcome to the chat!' }));

    ws.on('message', message => {
        // Assuming messages are always JSON strings
        let parsedMessage;
        try {
            parsedMessage = JSON.parse(message);
        } catch (e) {
            console.error('Failed to parse message:', message, e);
            return;
        }

        console.log('Received:', parsedMessage);

        // Prepare the message with a timestamp
        const chatMessage = {
            type: 'chat',
            username: parsedMessage.username || 'Anonymous',
            text: parsedMessage.text || 'Empty Message',
            timestamp: new Date().toLocaleTimeString()
        };

        // Broadcast message to all connected clients EXCEPT the sender
        wss.clients.forEach(client => {
            if (client !== ws && client.readyState === WebSocket.OPEN) {
                client.send(JSON.stringify(chatMessage));
            }
        });

        // Send the message back to the sender, marking it as their own
        if (ws.readyState === WebSocket.OPEN) {
             ws.send(JSON.stringify({
                ...chatMessage,
                self: true // Indicate this message is from the sender
            }));
        }
    });

    ws.on('close', () => {
        console.log('Client disconnected');
    });

    ws.on('error', error => {
        console.error('WebSocket error:', error);
    });
});
script.js
// script.js
const messagesDiv = document.getElementById('messages');
const usernameInput = document.getElementById('usernameInput');
const messageInput = document.getElementById('messageInput');
const sendButton = document.getElementById('sendButton');

// WebSocket connection
// Ensure your server.js is running on ws://localhost:8080
const socket = new WebSocket('ws://localhost:8080');

// Function to add a message to the chat display
function addMessage(msg) {
    const messageElement = document.createElement('div');

    // Handle different message types (status vs. chat)
    if (msg.type === 'status') {
        messageElement.classList.add('status-message');
        messageElement.textContent = msg.message;
    } else if (msg.type === 'chat') {
        messageElement.classList.add('message-bubble');
        if (msg.self) {
            messageElement.classList.add('self'); // Style messages sent by current user differently
        }

        const usernameSpan = document.createElement('span');
        usernameSpan.classList.add('username');
        usernameSpan.textContent = msg.username || 'Anonymous';
        messageElement.appendChild(usernameSpan);

        const textSpan = document.createElement('span');
        textSpan.textContent = msg.text;
        messageElement.appendChild(textSpan);

        const timestampSpan = document.createElement('span');
        timestampSpan.classList.add('timestamp');
        timestampSpan.textContent = msg.timestamp || new Date().toLocaleTimeString();
        messageElement.appendChild(timestampSpan);
    } else {
        // Fallback for unknown message types
        messageElement.textContent = JSON.stringify(msg);
        messageElement.classList.add('status-message'); // Treat unknown as status
    }

    messagesDiv.appendChild(messageElement);
    // Scroll to the bottom of the message div to show the latest message
    messagesDiv.scrollTop = messagesDiv.scrollHeight;
}

// Event listener for when the WebSocket connection is open
socket.onopen = (event) => {
    console.log('WebSocket connected:', event);
    addMessage({ type: 'status', message: 'Connected to chat server.' });
};

// Event listener for receiving messages from the server
socket.onmessage = (event) => {
    console.log('Message received:', event.data);
    try {
        const msg = JSON.parse(event.data);
        addMessage(msg);
    } catch (e) {
        console.error('Error parsing message:', e);
        addMessage({ type: 'status', message: `Received non-JSON message: ${event.data}` });
    }
};

// Event listener for when the WebSocket connection closes
socket.onclose = (event) => {
    console.log('WebSocket disconnected:', event);
    addMessage({ type: 'status', message: `Disconnected from chat server. Code: ${event.code}` });
};

// Event listener for WebSocket errors
socket.onerror = (error) => {
    console.error('WebSocket error:', error);
    addMessage({ type: 'status', message: `WebSocket error: ${error.message}` });
};

// Function to send a message to the server
function sendMessage() {
    const messageText = messageInput.value.trim();
    const usernameText = usernameInput.value.trim() || 'Anonymous'; // Default to 'Anonymous'

    if (messageText) {
        const message = {
            username: usernameText,
            text: messageText
        };
        // Send the message as a JSON string
        socket.send(JSON.stringify(message));
        messageInput.value = ''; // Clear the input field after sending
        messageInput.focus(); // Keep focus on the message input for quick replies
    }
}

// Event listener for the send button click
sendButton.addEventListener('click', sendMessage);

// Event listener for pressing Enter in the message input field
messageInput.addEventListener('keypress', (event) => {
    if (event.key === 'Enter') {
        sendMessage();
    }
});

// Optionally, set a default random username after a short delay if none is provided
setTimeout(() => {
    if (!usernameInput.value.trim()) {
        usernameInput.value = `User${Math.floor(Math.random() * 1000)}`;
    }
}, 3000);
How It All Works Together: Powering Your Real-time Chat
You’ve seen the HTML, CSS, and JavaScript. Now, let’s break down how these pieces connect. We’re building a truly interactive experience. This section explains the magic behind it all. Pay close attention to each step!
The WebSocket Connection: Your Live Link
Our JavaScript starts by creating a new WebSocket object. This object needs a server URL. Think of this as opening a dedicated phone line to the server. Unlike traditional HTTP requests, which are like quick, one-off phone calls, a WebSocket connection stays open. This persistent connection is crucial for real-time updates. Once connected, we get an onopen event. This tells us the connection is ready. If something goes wrong, an onerror event fires. This ensures we know the status of our connection. We also handle the onclose event. This informs us when the connection breaks. This robust handling makes our chat more reliable.
Sending Messages: Your Voice to the World
When you type a message and hit ‘Send’ or ‘Enter’, our JavaScript takes over. It first grabs the text from your input field. Then, it uses the websocket.send() method. This sends your message directly to the connected server. The server then usually broadcasts it to all other connected clients. This is how everyone sees your message almost instantly. We wrap our messages in a JSON format. We use JSON.stringify() for this. This makes it easy for the server to understand the structured data. For more advanced data handling, understanding JavaScript Closures can help manage local state effectively within event handlers.
Receiving Messages: Hearing from Others
The server doesn’t just receive; it also sends data back. When the server broadcasts a message, our WebSocket client gets an onmessage event. This event contains the new message data. We then parse this data. It usually comes as a JSON string, so we use JSON.parse(). We extract the sender and message content. Finally, we create a new HTML element. We set its text content and append this element to our chat display area. This makes the message visible to you. We also make sure the chat box automatically scrolls down. This keeps the newest messages in view. It all happens without a page refresh!
The Server Side (A Quick Note)
For this tutorial, we are focusing entirely on the client-side widget. However, a fully functional real-time chat needs a server. This server would handle all incoming and outgoing messages. It would broadcast them to everyone who is connected. You could use Node.js, Python, or even Go for your backend. This server keeps track of all active connections. It ensures messages reach the right people instantly. Building such a server is a fantastic next step in your journey. It lets you create truly full-stack applications. For example, you could combine this with a data collecting script, similar to how a Python web scraper works, to log chat data for analytics!
Tips to Customise It: Make It Your Own!
You’ve built a solid foundation. Now, let your creativity flow! Here are some ideas to extend your chat widget:
- Add Usernames: Instead of just messages, let users enter a username. Display it alongside their messages. This makes conversations much clearer and more personal.
- Timestamps: Include the exact time each message was sent. This adds a professional touch. It helps users follow the flow of conversation, especially in busy chats.
- Emoji Support: Integrate a simple emoji picker. Or, convert common text emoticons like
:)to actual emojis automatically. This makes the chat more fun and expressive for users. - Notifications: Implement desktop notifications. Alert users to new messages even when they are in another tab. This keeps them engaged and informed.
- Advanced Styling: Use a CSS framework like Tailwind CSS. You can quickly make your chat widget look even more polished. Check out our guide on building a Tailwind Article Card for styling inspiration.
Keep Learning: Every line of code you write is a step forward. Don’t be afraid to experiment and break things. That’s how you truly learn and grow as a developer! Your skills are expanding.
Conclusion: You Built a Real-time Chat!
Awesome work, future web dev superstar! You just built your very own Real-time Chat widget. You harnessed the power of WebSockets and vanilla JavaScript. That’s a huge accomplishment! You now understand how live communication happens on the web. This skill is incredibly valuable. It opens up a world of interactive possibilities. This project showcases your ability to build dynamic web features. Share your creation with your friends. Show it off! Keep building, keep coding, and keep learning. We can’t wait to see what you create next!