React useActionState Form Submissions & Server Actions
Hey there, pro-coder! If you’ve been wanting to build a robust React useActionState Form with awesome user feedback, but felt a bit lost, you’ve landed in the perfect spot. We’re diving into React 19’s exciting new useActionState hook today. This powerful hook makes handling form submissions and server actions a breeze. You’ll build a form that provides real-time feedback, showing loading states, success messages, and error handling. Get ready to elevate your form game!
What We Are Building
We’re going to create a simple yet highly effective contact form. This isn’t just any form, though! It will elegantly handle submissions using React 19’s features. Imagine a user filling out their details. They hit submit, and immediately see a “Submitting…” message. Then, either a cheerful “Success!” or a clear “Oops, something went wrong!” appears. This immediate, clear feedback makes for a much better user experience. It’s a fantastic way to introduce you to server actions and state management in a modern React application. This project is both practical and a perfect learning tool!
HTML Structure
First, let’s lay down the basic HTML for our form. We’ll keep it simple and semantic. This foundation will hold our input fields and the submit button. We’ll include a spot for our feedback messages too. It’s all about setting up a clear, accessible structure.
index.html
<!DOCTYPE html>
<html lang="en">
  <head>
    <meta charset="utf-8" />
    <meta name="viewport" content="width=device-width, initial-scale=1" />
    <meta name="theme-color" content="#000000" />
    <meta
      name="description"
      content="Web site created using create-react-app to demonstrate React useActionState hook."
    />
    <title>React useActionState Tutorial</title>
    <link rel="stylesheet" href="styles.css">
  </head>
  <body>
    <noscript>You need to enable JavaScript to run this app.</noscript>
    <div id="root"></div>
    <script type="module" src="index.js"></script>
  </body>
</html>
CSS Styling
Next up, we’ll add some CSS to make our form look good and be user-friendly. We’re aiming for a clean, modern aesthetic. This styling will ensure our form is easy to read and interact with. We’ll also add some visual cues for different states, like error messages. A good design always enhances the user experience, after all!
styles.css
/* General Body & Root Styles */
html, body, #root {
  margin: 0;
  padding: 0;
  width: 100%;
  min-height: 100vh; /* Ensure it takes full viewport height */
  overflow-x: hidden; /* Prevent horizontal scrollbars */
  font-family: Arial, Helvetica, sans-serif; /* Safe font */
  box-sizing: border-box;
}

body {
  background-color: #1a202c; /* Dark background */
  color: #e2e8f0; /* Light text color */
  display: flex;
  justify-content: center; /* Center horizontally */
  align-items: center;   /* Center vertically */
}

/* Container for the form */
.useactionstate-container {
  max-width: 500px;
  width: 90%;
  background-color: #2d3748; /* Slightly lighter dark background */
  padding: 30px;
  border-radius: 12px;
  box-shadow: 0 4px 15px rgba(0, 0, 0, 0.4);
  display: flex;
  flex-direction: column;
  gap: 25px;
  box-sizing: border-box; /* Include padding in element's total width and height */
}

.useactionstate-container h1 {
  text-align: center;
  color: #63b3ed; /* Blue header */
  margin-top: 0;
  margin-bottom: 15px;
  font-size: 2em;
}

/* Form Group Styling */
.form-group {
  display: flex;
  flex-direction: column;
  gap: 10px;
}

.form-group label {
  font-size: 1.1em;
  color: #a0aec0; /* Lighter grey for labels */
}

.form-group input[type="text"] {
  padding: 12px 15px;
  border: 1px solid #4a5568; /* Dark border */
  border-radius: 8px;
  background-color: #2d3748; /* Same as container for seamless look */
  color: #e2e8f0; /* Light text */
  font-size: 1em;
  outline: none;
  transition: border-color 0.2s ease, box-shadow 0.2s ease;
  max-width: 100%; /* Ensure input doesn't overflow */
  box-sizing: border-box;
}

.form-group input[type="text"]:focus {
  border-color: #63b3ed; /* Focus blue border */
  box-shadow: 0 0 0 3px rgba(99, 179, 237, 0.5); /* Focus blue glow */
}

/* Button Styling */
.submit-button {
  padding: 14px 20px;
  background-color: #63b3ed; /* Blue button */
  color: #ffffff;
  border: none;
  border-radius: 8px;
  font-size: 1.1em;
  font-weight: bold;
  cursor: pointer;
  transition: background-color 0.2s ease, transform 0.2s ease, box-shadow 0.2s ease;
  max-width: 100%; /* Ensure button doesn't overflow */
  box-sizing: border-box;
}

.submit-button:hover {
  background-color: #4299e1; /* Darker blue on hover */
  transform: translateY(-2px);
  box-shadow: 0 4px 10px rgba(99, 179, 237, 0.4);
}

.submit-button:disabled {
  background-color: #4a5568; /* Grey when disabled */
  cursor: not-allowed;
  transform: none;
  box-shadow: none;
}

/* Message Display Styling */
.message {
  padding: 12px;
  border-radius: 8px;
  text-align: center;
  font-weight: bold;
  font-size: 0.95em;
  border: 1px solid transparent; /* Default transparent border */
  max-width: 100%; /* Ensure message doesn't overflow */
  word-wrap: break-word; /* Prevent long words from overflowing */
  box-sizing: border-box;
}

.message.success {
  background-color: #38a169; /* Green success background */
  border-color: #38a169;
  color: #ffffff;
}

.message.error {
  background-color: #e53e3e; /* Red error background */
  border-color: #e53e3e;
  color: #ffffff;
}
React useActionState Form: The JavaScript Magic
Now for the main event: the JavaScript. This is where we’ll bring our form to life using React. We’ll set up a React component that wraps our HTML. The real star here is the useActionState hook. It will manage our form’s state and connect directly to our server action. This makes handling submissions incredibly streamlined and efficient. Let’s make this form interactive and smart!
index.js
import React from 'react';
import ReactDOM from 'react-dom/client';
import App from './App';

// Create a root to render the React application into the DOM
const root = ReactDOM.createRoot(document.getElementById('root'));

// Render the App component within React's StrictMode
// StrictMode helps in highlighting potential problems in an application.
// It activates additional checks and warnings for its descendants.
root.render(
  <React.StrictMode>
    <App />
  </React.StrictMode>
);
App.js
import React, { useActionState } from 'react';

// Define an asynchronous function that simulates a server action.
// This function takes the previous state and a FormData object as arguments.
// It will be executed when the form is submitted.
async function addTodoAction(prevState, formData) {
  // Simulate a network delay to mimic an actual API call.
  await new Promise(resolve => setTimeout(resolve, 1500));

  // Extract the 'title' field from the FormData object.
  const title = formData.get('title');

  // Basic server-side validation (simulated)
  if (!title || title.trim() === '') {
    // If validation fails, return an error state.
    return {
      success: false,
      message: 'Todo title cannot be empty.'
    };
  }

  // Simulate a successful API response
  console.log(`Simulating API call: Adding todo "${title}"...`);
  return {
    success: true,
    message: `Todo "${title}" added successfully!`
  };
}

function App() {
  // useActionState hook:
  // 1. `addTodoAction`: The asynchronous function (server action) to execute on form submission.
  // 2. `{ success: null, message: '' }`: The initial state of the component.
  //
  // The hook returns:
  // - `state`: The current state, updated by the return value of `addTodoAction`.
  // - `formAction`: A wrapped version of `addTodoAction` that can be directly passed to a <form>'s `action` prop.
  // - `isPending`: A boolean indicating whether the `addTodoAction` is currently executing.
  const [state, formAction, isPending] = useActionState(addTodoAction, { success: null, message: '' });

  return (
    <div className="useactionstate-container">
      <h1>React <code>useActionState</code> Tutorial</h1>

      <p>
        <code>useActionState</code> is a React hook that allows you to manage state updates
        from form submissions and server actions. It simplifies handling pending states,
        errors, and returned data gracefully.
      </p>

      {/* The `action` prop of the form directly uses the `formAction` returned by `useActionState` */}
      <form action={formAction}>
        <div className="form-group">
          <label htmlFor="todo-title">Todo Title:</label>
          <input
            type="text"
            id="todo-title"
            name="title" // Important: The `name` attribute allows `formData.get('title')` to work.
            placeholder="e.g., Learn useActionState"
            required
            disabled={isPending} // Disable input field while the action is pending
          />
        </div>
        <button type="submit" className="submit-button" disabled={isPending}>
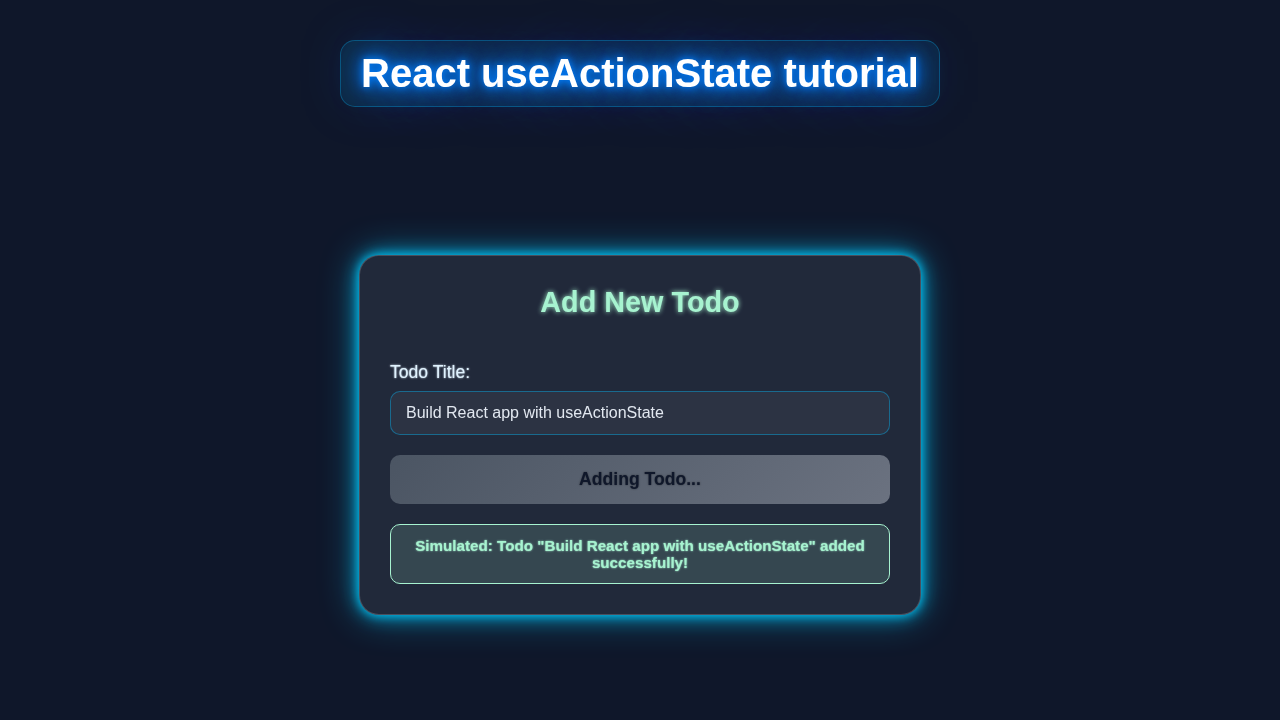
          {isPending ? 'Adding Todo...' : 'Add Todo'} {/* Display pending state */}
        </button>
      </form>

      {/* Display messages based on the state returned from the action */}
      {state.message && (
        <div className={`message ${state.success ? 'success' : 'error'}`}>
          {state.message}
        </div>
      )}

      <p style={{ fontSize: '0.9em', color: '#a0aec0', marginTop: '20px', textAlign: 'center' }}>
        Try adding a todo, observe the "Adding Todo..." state, and then try submitting an empty field.
      </p>
    </div>
  );
}

export default App;
How It All Works Together
You’ve got the HTML, the CSS, and the React component. Now, let’s connect the dots! This section will break down how useActionState orchestrates everything. We’ll look at the server action, form submission, and how state changes provide feedback. It’s a cohesive dance between client and server.
The Core of useActionState
The useActionState hook is a game-changer for forms in React 19. It gives you two main things: state and pending. The state holds the result of your last form submission or action. This could be a success message, an error, or any data your server action returns. Then, pending is a boolean. It tells you if your action is currently running. This is perfect for showing loading indicators! You connect it to your form’s action prop or a button’s formAction. It beautifully bridges your UI with asynchronous server logic. For more on managing component state, check out our guide on React useEffect: Mastering Side Effects with Hooks.
Pro-Tip: Think of
useActionStateas a super-powered `useState` that automatically handles the async lifecycle of a form submission for you. No more manual loading states!
Our Server Action (Simulated)
For this tutorial, we’re simulating a server action. In a real application, this would be an actual API endpoint. It might save data to a database or send an email. Our simulated action is a simple async function. It takes the form data as an argument. Then it pretends to do some work with a short delay using setTimeout. Finally, it either resolves with a success message or rejects with an error. This demonstrates exactly how your client-side form will interact with server-side logic. It’s clean and predictable.
If you’re curious about handling more complex asynchronous operations like file uploads, you might enjoy our post on React File Uploader: Build a Modern Component with Hooks.
Connecting the Form
We pass our server action directly to the action prop of our <form> element. This is the magic connection! When the user submits the form, React automatically invokes our action. The form data is bundled up and sent to the action. It’s incredibly elegant and declarative. The pending value from useActionState automatically updates during this process. We use this to disable the submit button and show a “Submitting…” message. This provides crucial feedback to the user. They know their action is being processed. It stops them from accidentally double-submitting too.
Handling State and Feedback
After the server action finishes, the state value from useActionState updates. If the action succeeded, state will contain our success message. If it failed, it will hold the error message. We then display this state content right below our form. This provides instant, clear feedback to the user about their submission. It’s a direct reflection of what happened on the server. This loop of action, state update, and UI rendering is the core pattern of reactive programming. It truly enhances the user experience. You can even use this state to conditionally render different UI elements.
Remember: Good feedback makes users happy. Always let them know what’s happening!
Tips to Customise It
You’ve built a functional form with excellent feedback. That’s awesome! Here are some ideas to take your React useActionState Form to the next level:
- Add Client-Side Validation: Implement more robust validation before sending data to the server. You can use libraries like Zod or Yup. This prevents unnecessary network requests.
- Integrate with a Real Backend: Replace the simulated server action with a call to a real API endpoint. Perhaps a Node.js server, Firebase, or a serverless function.
- Clear Form on Success: After a successful submission, clear the form fields. This provides a fresh slate for the user.
- Dynamic Success Messages: Tailor the success message based on the form data. For example, “Thanks, John! Your message has been sent.”
- Optimise Performance: For highly dynamic forms or complex calculations, explore performance hooks like
useCallback. Read our article on React useCallback Performance Boost: A Deep Dive for more insights. - Improve Accessibility: Ensure all input fields have proper labels and ARIA attributes. Learn more about form accessibility on MDN Web Docs.
Conclusion
Look at what you’ve accomplished! You’ve successfully built a sophisticated form using React 19’s useActionState hook. You’ve mastered client-server interaction and delivered a fantastic user experience. This powerful hook simplifies so much of the complexity involved in form submissions. You now have a robust pattern for building dynamic and responsive web applications. Keep experimenting, keep building, and don’t forget to share your amazing creations with the procoder09.com community!