Hey! If you have wanted to build a task management app but had no idea where to start, you are in the right place. Today, we’re diving deep into building a fantastic task management application using React TypeScript Tasks. This isn’t just a simple to-do list. We will make a dynamic, efficient, and user-friendly task manager. Get ready to level up your coding skills!
What We Are Building: Your First React TypeScript Tasks App
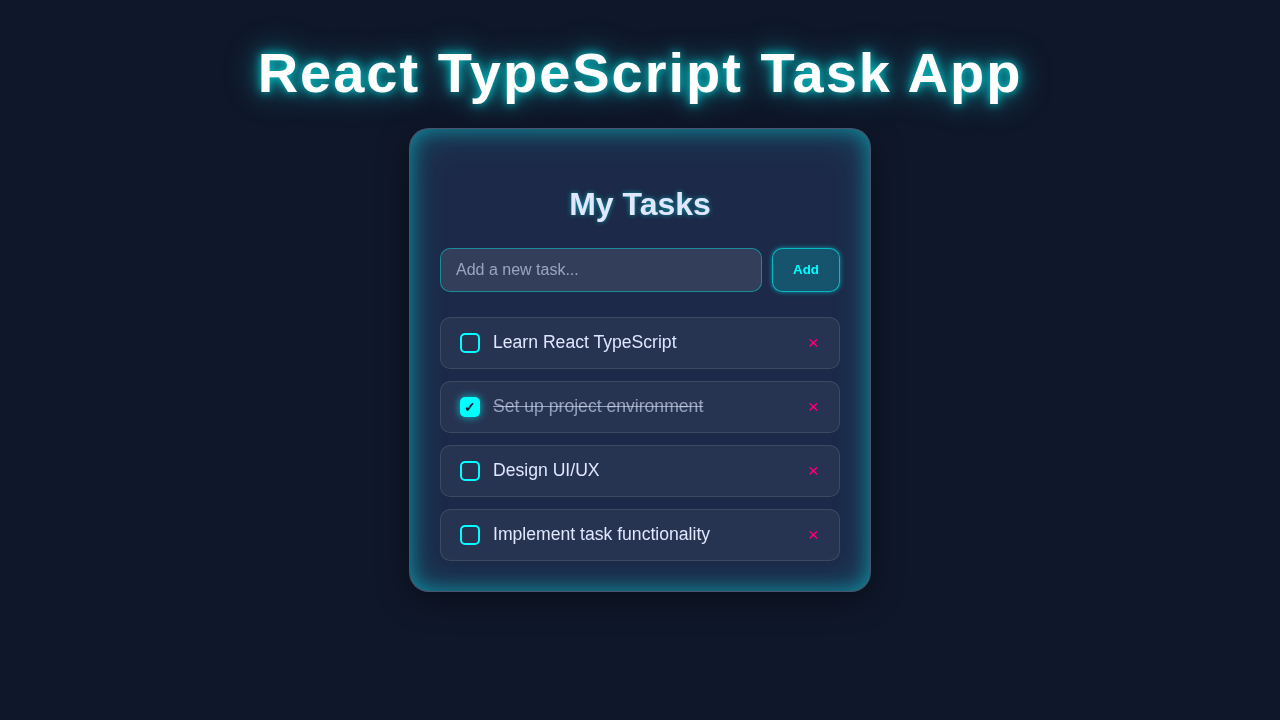
We are building a robust task manager. It will help you organize your daily life. Imagine adding new tasks instantly. You can mark them as complete with a click. You can also delete tasks you no longer need. This app will be responsive and clean. We will use modern React features. TypeScript will add type safety. This makes our code more reliable. You will learn so much by creating this useful tool.
HTML Structure
Our HTML forms the backbone of our application. It’s like the skeleton of our task manager. We will set up a main container. Inside, we will have an input field. There will also be a button to add tasks. Then, we will have a list to display all our tasks. This structure keeps things neat. It also makes styling easier.
public/index.html
<!DOCTYPE html>
<html lang="en">
  <head>
    <meta charset="utf-8" />
    <link rel="icon" href="%PUBLIC_URL%/favicon.ico" />
    <meta name="viewport" content="width=device-width, initial-scale=1" />
    <meta name="theme-color" content="#000000" />
    <meta
      name="description"
      content="Simple React TypeScript Task App - A modern to-do list"
    />
    <link rel="apple-touch-icon" href="%PUBLIC_URL%/logo192.png" />
    <link rel="manifest" href="%PUBLIC_URL%/manifest.json" />
    <title>React TypeScript Task App</title>
  </head>
  <body>
    <noscript>You need to enable JavaScript to run this app.</noscript>
    <div id="root"></div>
  </body>
</html>
CSS Styling
Great styling makes an app a joy to use. Our CSS will bring our app to life. We will ensure it looks clean and modern. We will apply styles to the main container. Task items will also get their own look. Buttons will be distinct and easy to click. We will aim for a user-friendly interface. It will be both functional and beautiful. We will even use Flexbox to align elements neatly.
src/App.css
/* Global Styles */
body {
  margin: 0;
  padding: 0;
  font-family: Arial, Helvetica, sans-serif; /* Safe font stack */
  background-color: #1a202c; /* Dark background */
  color: #e2e8f0; /* Light text color */
  display: flex;
  justify-content: center;
  align-items: flex-start; /* Align at top for scrolling if needed */
  min-height: 100vh;
  box-sizing: border-box; /* Ensure padding/border included in width/height */
}

/* Main App Container */
.App {
  background-color: #2d3748; /* Slightly lighter dark background for app card */
  padding: 30px;
  border-radius: 12px;
  box-shadow: 0 10px 25px rgba(0, 0, 0, 0.4);
  max-width: 500px;
  width: 100%; /* Ensure it takes full width up to max-width */
  margin: 40px auto; /* Center the app card with some top/bottom margin */
  overflow: hidden; /* Hide any overflow within the app card */
}

.App h1 {
  text-align: center;
  color: #63b3ed; /* Accent color for title */
  margin-bottom: 30px;
  font-size: 2.2em;
  border-bottom: 2px solid #4299e1; /* Underline for title */
  padding-bottom: 10px;
}

/* Task Form Styling */
.task-form {
  display: flex;
  gap: 10px;
  margin-bottom: 30px;
}

.task-form input[type="text"] {
  flex-grow: 1;
  padding: 12px 15px;
  border: 1px solid #4a5568;
  border-radius: 8px;
  background-color: #4a5568; /* Darker input background */
  color: #e2e8f0;
  font-size: 1em;
  outline: none;
  transition: border-color 0.3s ease, box-shadow 0.3s ease;
  box-sizing: border-box;
  max-width: 100%; /* Ensure input does not overflow */
}

.task-form input[type="text"]::placeholder {
  color: #a0aec0;
}

.task-form input[type="text"]:focus {
  border-color: #4299e1;
  box-shadow: 0 0 0 3px rgba(66, 153, 225, 0.5);
}

.task-form button {
  padding: 12px 20px;
  background-color: #4299e1; /* Blue accent button */
  color: white;
  border: none;
  border-radius: 8px;
  font-size: 1em;
  cursor: pointer;
  transition: background-color 0.3s ease, transform 0.2s ease;
}

.task-form button:hover {
  background-color: #3182ce;
  transform: translateY(-2px);
}

.task-form button:active {
  transform: translateY(0);
}

/* Task List Styling */
.task-list {
  list-style: none;
  padding: 0;
  margin: 0;
}

.task-item {
  display: flex;
  justify-content: space-between;
  align-items: center;
  background-color: #4a5568; /* Task item background */
  border: 1px solid #63b3ed; /* Blue border for items */
  border-radius: 8px;
  padding: 12px 15px;
  margin-bottom: 15px;
  transition: transform 0.2s ease, box-shadow 0.2s ease;
}

.task-item:last-child {
  margin-bottom: 0;
}

.task-item:hover {
  transform: translateY(-3px);
  box-shadow: 0 5px 15px rgba(0, 0, 0, 0.3);
}

.task-item-content {
  display: flex;
  align-items: center;
  flex-grow: 1;
  cursor: pointer;
}

.task-item-text {
  margin-left: 15px;
  flex-grow: 1;
  font-size: 1.1em;
  color: #e2e8f0;
  transition: color 0.3s ease, text-decoration 0.3s ease;
  word-break: break-word; /* Prevents long words from overflowing */
  max-width: calc(100% - 60px); /* Adjust based on checkbox/margin */
}

/* Completed Task Styling */
.task-item.completed {
  background-color: #2d3748;
  border-color: #a0aec0; /* Faded border */
}

.task-item.completed .task-item-text {
  text-decoration: line-through;
  color: #a0aec0; /* Faded text */
}

/* Custom Checkbox Styling */
input[type="checkbox"] {
  -webkit-appearance: none; /* Hide default checkbox */
  appearance: none;
  width: 20px;
  height: 20px;
  border: 2px solid #63b3ed; /* Blue border */
  border-radius: 4px;
  background-color: transparent;
  cursor: pointer;
  position: relative;
  display: flex;
  justify-content: center;
  align-items: center;
  transition: background-color 0.2s ease, border-color 0.2s ease, box-shadow 0.2s ease;
}

input[type="checkbox"]:checked {
  background-color: #63b3ed; /* Blue background when checked */
  border-color: #63b3ed;
  box-shadow: 0 0 0 3px rgba(99, 179, 237, 0.4); /* Subtle glow */
}

input[type="checkbox"]:checked::after {
  content: '\2713'; /* Checkmark symbol */
  color: #1a202c; /* Dark checkmark */
  font-size: 14px;
  font-weight: bold;
}

input[type="checkbox"]:focus {
  outline: none;
  box-shadow: 0 0 0 3px rgba(99, 179, 237, 0.5);
}

/* Delete Button Styling */
.delete-btn {
  background: none;
  border: none;
  color: #ef4444; /* Red color for delete */
  font-size: 1.5em;
  cursor: pointer;
  transition: color 0.3s ease, transform 0.2s ease;
  padding: 0 5px; /* Add some padding for easier clicking */
}

.delete-btn:hover {
  color: #dc2626;
  transform: scale(1.1);
}

/* Responsive Adjustments */
@media (max-width: 600px) {
  .App {
    margin: 20px;
    padding: 20px;
  }

  .App h1 {
    font-size: 1.8em;
  }

  .task-form {
    flex-direction: column;
  }

  .task-form button {
    width: 100%;
  }
}
JavaScript (React TypeScript Tasks Logic)
Now, for the really exciting part: the brain of our application! This is where React and TypeScript shine. We will manage all our tasks here. Adding tasks, completing them, and deleting them happens in this code. TypeScript ensures our data types are correct. This prevents common errors. React handles updating our user interface efficiently. Get ready to see the power of React TypeScript Tasks in action!
src/App.tsx
import React, { useState, useEffect } from 'react';
import TaskForm from './components/TaskForm';
import TaskList from './components/TaskList';
import './App.css'; // Main styling for the app

// Define the interface for a Task object
interface Task {
  id: string;
  text: string;
  completed: boolean;
}

const App: React.FC = () => {
  // State to hold the list of tasks, initialized from localStorage or an empty array
  const [tasks, setTasks] = useState<Task[]>(() => {
    const savedTasks = localStorage.getItem('react-ts-tasks');
    return savedTasks ? JSON.parse(savedTasks) : [];
  });

  // Effect to save tasks to localStorage whenever the tasks state changes
  useEffect(() => {
    localStorage.setItem('react-ts-tasks', JSON.stringify(tasks));
  }, [tasks]);

  // Function to add a new task
  const addTask = (taskText: string) => {
    if (taskText.trim() === '') return; // Prevent adding empty tasks
    const newTaskId = Math.random().toString(36).substring(2, 9); // Generate a simple unique ID
    const newTasks: Task = {
      id: newTaskId,
      text: taskText,
      completed: false,
    };
    setTasks((prevTasks) => [...prevTasks, newTasks]);
  };

  // Function to toggle the completion status of a task
  const toggleTask = (id: string) => {
    setTasks((prevTasks) =>
      prevTasks.map((task) =>
        task.id === id ? { ...task, completed: !task.completed } : task
      )
    );
  };

  // Function to delete a task
  const deleteTask = (id: string) => {
    setTasks((prevTasks) => prevTasks.filter((task) => task.id !== id));
  };

  return (
    <div className="App">
      <h1>React TypeScript Task App</h1>
      <TaskForm onAddTask={addTask} />
      <TaskList tasks={tasks} onToggleTask={toggleTask} onDeleteTask={deleteTask} />
    </div>
  );
};

export default App;
src/index.tsx
import React from 'react';
import ReactDOM from 'react-dom/client';
import './index.css'; // Global CSS if any, otherwise rely on App.css
import App from './App';

const root = ReactDOM.createRoot(
  document.getElementById('root') as HTMLElement
);
root.render(
  <React.StrictMode>
    <App />
  </React.StrictMode>
);
src/components/TaskForm.tsx
import React, { useState } from 'react';

// Define props interface for TaskForm
interface TaskFormProps {
  onAddTask: (taskText: string) => void;
}

const TaskForm: React.FC<TaskFormProps> = ({ onAddTask }) => {
  const [taskText, setTaskText] = useState('');

  // Handle form submission
  const handleSubmit = (e: React.FormEvent) => {
    e.preventDefault(); // Prevent default form submission behavior
    if (taskText.trim()) {
      onAddTask(taskText); // Call the prop function to add the task
      setTaskText(''); // Clear the input field
    }
  };

  return (
    <form className="task-form" onSubmit={handleSubmit}>
      <input
        type="text"
        placeholder="What needs to be done?"
        value={taskText}
        onChange={(e) => setTaskText(e.target.value)}
        aria-label="New task description"
      />
      <button type="submit">Add Task</button>
    </form>
  );
};

export default TaskForm;
src/components/TaskList.tsx
import React from 'react';
import TaskItem from './TaskItem';

// Define the interface for a Task object (should match App.tsx)
interface Task {
  id: string;
  text: string;
  completed: boolean;
}

// Define props interface for TaskList
interface TaskListProps {
  tasks: Task[];
  onToggleTask: (id: string) => void;
  onDeleteTask: (id: string) => void;
}

const TaskList: React.FC<TaskListProps> = ({ tasks, onToggleTask, onDeleteTask }) => {
  return (
    <ul className="task-list">
      {tasks.length === 0 ? (
        <p style={{ textAlign: 'center', color: '#a0aec0' }}>No tasks yet! Add one above.</p>
      ) : (
        tasks.map((task) => (
          <TaskItem
            key={task.id}
            task={task}
            onToggleTask={onToggleTask}
            onDeleteTask={onDeleteTask}
          />
        ))
      )}
    </ul>
  );
};

export default TaskList;
src/components/TaskItem.tsx
import React from 'react';

// Define the interface for a Task object (should match App.tsx)
interface Task {
  id: string;
  text: string;
  completed: boolean;
}

// Define props interface for TaskItem
interface TaskItemProps {
  task: Task;
  onToggleTask: (id: string) => void;
  onDeleteTask: (id: string) => void;
}

const TaskItem: React.FC<TaskItemProps> = ({ task, onToggleTask, onDeleteTask }) => {
  return (
    <li className={`task-item ${task.completed ? 'completed' : ''}`}>
      <div className="task-item-content" onClick={() => onToggleTask(task.id)}>
        <input
          type="checkbox"
          checked={task.completed}
          onChange={() => onToggleTask(task.id)} // Redundant but good for accessibility/direct interaction
          aria-label={`Mark task "${task.text}" as ${task.completed ? 'incomplete' : 'complete'}`}
        />
        <span className="task-item-text">{task.text}</span>
      </div>
      <button
        className="delete-btn"
        onClick={() => onDeleteTask(task.id)}
        aria-label={`Delete task "${task.text}"`}
      >
        ×
      </button>
    </li>
  );
};

export default TaskItem;
How It All Works Together
Let me explain what’s happening here. We will break down our task manager into logical steps. Each part plays a crucial role. Understanding these steps helps solidify your learning. Let’s dive in!
Setting Up Our Project
First, we start with a new React project. We use a tool like Vite or Create React App. This sets up all the initial files. It also configures TypeScript for us. We get a clean slate to begin coding. This foundation is super important. It gives us all the development tools we need.
Defining Our Task Structure
TypeScript is amazing for defining data types. We create an interface for our tasks. An interface describes the shape of an object. Our Task interface will have an id, text, and isCompleted. This makes our code predictable. It helps prevent bugs early on. It’s a best practice for strong code.
Pro Tip: Using interfaces in TypeScript is a game-changer! It forces you to think about your data’s structure. This leads to more robust and easier-to-maintain code. Embrace type safety early!
Managing State with useState
Our app needs to remember our tasks. This is where React’s useState hook comes in. We will use useState to hold an array of tasks. This array is our app’s central task list. When tasks change, useState tells React to re-render. This keeps our UI updated. React Props & State: Master Data Flow in Components are fundamental here. Mastering them is key to dynamic apps.
Adding New Tasks
When you type a task and click ‘Add’, a function runs. This function takes the input text. It creates a new Task object. We give it a unique ID. Then, we add this new task to our tasks array. useState updates the array. React then displays the new task on the screen. It’s a smooth process!
Toggling Task Completion
Each task item has a checkbox. Clicking it toggles the task’s isCompleted status. We use the map() array method to update our list. We find the task that was clicked. Then, we flip its isCompleted value. This also triggers a re-render. The task visually changes, maybe a strikethrough effect. It’s instant feedback for the user.
Deleting Tasks
Every task also has a delete button. When clicked, a function filters the tasks array. It removes the task with the matching ID. This creates a new array without the deleted task. React updates the UI. The task disappears from the list. It’s efficient and clean!
Heads Up! Thinking about how data flows is crucial in React. Components react to state changes. React Components Explained: Node Tree & Neon Glow can help you visualize this better. Make sure your components are well-defined.
Using Props and Component Reusability
We will likely create a TaskItem component. This component will display a single task. It will receive task data as props. Props are like arguments for components. This makes our code modular. We can reuse TaskItem for every task. It’s a powerful React concept. React derived state – Mastering Component Data Flow talks more about component interactions.
Tips to Customise It
You’ve built a solid foundation! But the fun doesn’t stop here. Here are some ideas to make this task manager truly your own:
- Add Categories: Implement different categories for tasks. Think ‘Work’, ‘Personal’, ‘Shopping’. Users can filter tasks by category. This adds a powerful organizational layer.
- Due Dates: Include an option to set a due date for each task. You could even add a visual reminder when a task is overdue. This makes the app much more practical.
- Persistence: Currently, tasks disappear on refresh. Learn about
localStorage. Store tasks there. Your tasks will then persist across browser sessions. This is a huge step for a real-world app. - Drag and Drop: Implement drag-and-drop functionality. Users can reorder tasks easily. This improves the user experience significantly. Look into libraries like
react-beautiful-dnd. - User Authentication: For advanced users, add user accounts. Each user gets their own task list. This opens up possibilities for team collaboration. It’s a big but rewarding challenge.
Conclusion
Wow! You just built a functional task management app! You harnessed the power of React and TypeScript. You created a useful tool from scratch. This is a huge accomplishment! You tackled state management. You handled user interactions. You applied type safety. Feel proud of your work!
Now, share your creation! Show it to friends. Deploy it online. Keep experimenting and building. This is how you grow as a developer. What will you build next? Keep coding!