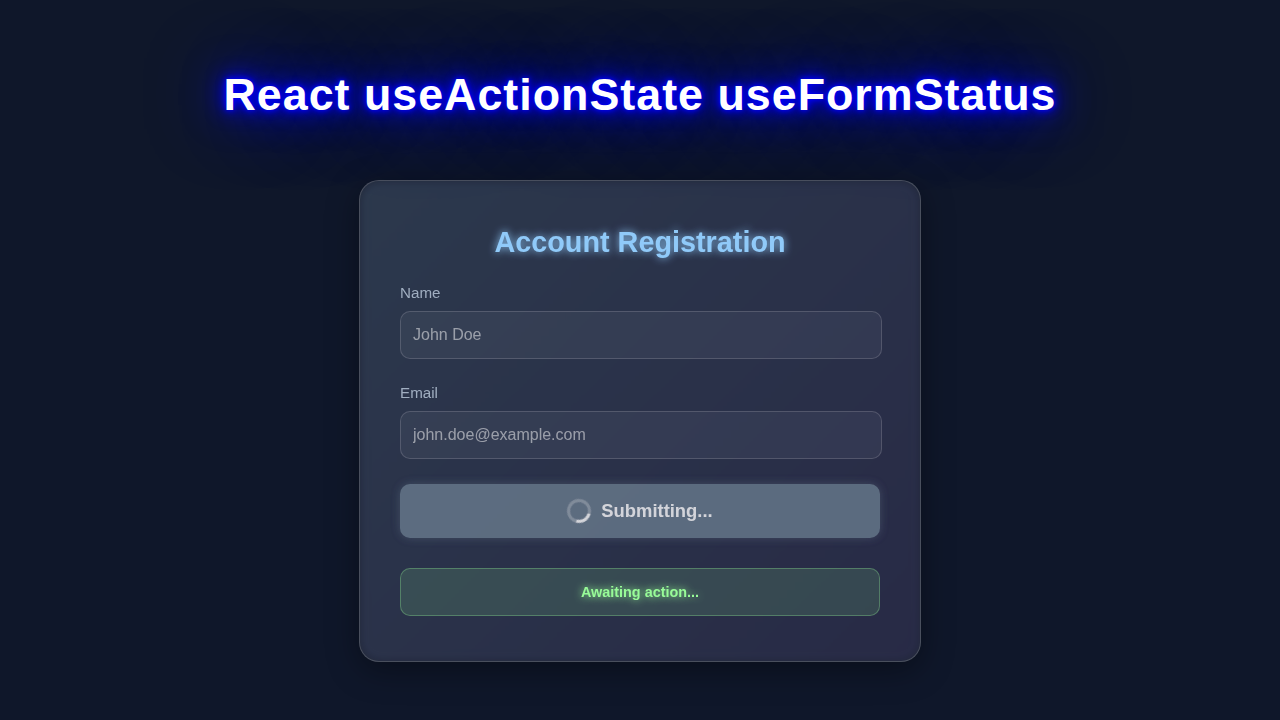
Hey! If you have wanted to build an interactive form with real-time feedback but had no idea where to start, you are in the right place. Today, we’re diving deep into React Form Actions! We will build a simple feedback form. It will show messages while submitting and after completion. This instantly makes your forms much more user-friendly. You will love how easy this is!
What We Are Building
We are going to create a super neat feedback form. Imagine a simple form where you can type a message. When you click ‘Send’, the button will disable and show ‘Submitting…’ This instantly tells the user something is happening. Once submitted, it will display a success or error message. This instant feedback is crucial. It keeps your users informed and happy. It’s a small detail that makes a big difference in user experience! We will bring this to life together.
HTML Structure
Let’s start with the basic layout for our form. We will keep it simple and semantic. This foundation will hold our React components. It sets the stage for all the magic!
index.html
<!DOCTYPE html>
<html lang="en">
<head>
    <meta charset="UTF-8">
    <meta name="viewport" content="width=device-width, initial-scale=1.0">
    <title>React useActionState useFormStatus Tutorial</title>
    <link rel="stylesheet" href="styles.css">

    <!--
        These hooks (useActionState, useFormStatus) are experimental or require React 19.
        For this tutorial, we are linking to an experimental React build via CDN.
        In a stable production environment, you would typically use a build tool (e.g., Vite, Create React App)
        with a React 19 project or configure experimental features in React 18.
    -->
    <script src="https://unpkg.com/react@0.0.0-experimental-8e3b0ea7e-20240325/umd/react.development.js"></script>
    <script src="https://unpkg.com/react-dom@0.0.0-experimental-8e3b0ea7e-20240325/umd/react-dom.development.js"></script>
    <!-- Babel is needed to transpile JSX directly in the browser -->
    <script src="https://unpkg.com/@babel/standalone/babel.min.js"></script>
</head>
<body>
    <div id="root"></div>

    <!-- Our React application script -->
    <script type="text/babel" src="script.js"></script>
</body>
</html>
CSS Styling
Now for the fun part: making it look good! Our CSS will provide a clean and modern design. We will style the form, input, button, and feedback messages. This ensures a great user experience. Good styling is always important!
styles.css
/* styles.css */

/* Basic Reset & Box Sizing */
*, *::before, *::after {
    box-sizing: border-box;
    margin: 0;
    padding: 0;
}

body {
    font-family: Arial, Helvetica, sans-serif; /* Safe fonts */
    background-color: #f0f2f5; /* Light background for the main tutorial */
    display: flex;
    justify-content: center;
    align-items: center;
    min-height: 100vh;
    color: #333;
    line-height: 1.6;
    overflow-x: hidden; /* Prevent horizontal scroll */
}

.app-wrapper {
    max-width: 100%; /* Ensure responsiveness */
    width: 500px; /* Max width for the app container */
    padding: 20px;
}

/* Signup Form Styling */
.signup-form {
    background-color: #ffffff;
    padding: 30px;
    border-radius: 10px;
    box-shadow: 0 4px 20px rgba(0, 0, 0, 0.1);
    border: 1px solid #e0e0e0;
    width: 100%;
    max-width: 450px; /* Specific max-width for the form itself */
    margin: 0 auto; /* Center the form */
}

.signup-form h2 {
    font-size: 2em;
    margin-bottom: 15px;
    color: #0056b3; /* A nice blue for headings */
    text-align: center;
}

.signup-form p {
    font-size: 0.95em;
    margin-bottom: 25px;
    text-align: center;
    color: #555;
}

.form-group {
    margin-bottom: 20px;
    text-align: left;
}

.form-group label {
    display: block;
    margin-bottom: 8px;
    font-weight: bold;
    color: #444;
}

.form-group input[type="text"],
.form-group input[type="email"] {
    width: 100%;
    padding: 12px;
    border: 1px solid #ccc;
    border-radius: 5px;
    font-size: 1em;
    transition: border-color 0.3s ease;
}

.form-group input[type="text"]:focus,
.form-group input[type="email"]:focus {
    border-color: #007bff;
    outline: none;
    box-shadow: 0 0 0 2px rgba(0, 123, 255, 0.25);
}

.submit-button {
    width: 100%;
    padding: 12px 20px;
    background-color: #007bff; /* Primary blue */
    color: white;
    border: none;
    border-radius: 5px;
    font-size: 1.1em;
    font-weight: bold;
    cursor: pointer;
    transition: background-color 0.3s ease, transform 0.1s ease;
}

.submit-button:hover:not(:disabled) {
    background-color: #0056b3;
    transform: translateY(-2px);
}

.submit-button:disabled {
    background-color: #cccccc;
    cursor: not-allowed;
    opacity: 0.7;
}

.status-message {
    margin-top: 25px;
    padding: 12px;
    border-radius: 5px;
    font-weight: bold;
    text-align: center;
    font-size: 0.9em;
}

.status-message.success {
    background-color: #d4edda;
    color: #155724;
    border: 1px solid #c3e6cb;
}

.status-message.error {
    background-color: #f8d7da;
    color: #721c24;
    border: 1px solid #f5c6cb;
}
JavaScript
Here’s where the real power of React shines! We will implement our form logic. This includes handling submissions and managing state. We will use the new useActionState and useFormStatus hooks. They make form actions a breeze. These tools simplify complex interactions. Let’s write some awesome code!
script.js
// script.js
// This code uses React's experimental useActionState and useFormStatus hooks.
// It requires React 19 or an experimental React 18+ build.
// For this tutorial, we are linking to an experimental React build via CDN in index.html.

// To use these hooks in a stable production environment, you would typically
// set up a React 19 project or enable experimental features in a React 18 project
// via a bundler like Vite or Webpack.

// These hooks are available on the global React and ReactDOM objects due to the CDN setup.
const { useState, useActionState } = React;
const { useFormStatus } = ReactDOM;

/**
 * SubmitButton Component
 * A child component of the form that uses useFormStatus to display submission state.
 */
function SubmitButton() {
  // useFormStatus provides information about the form's submission status.
  // It must be called within a component rendered inside a <form> element
  // or whose action is passed to the form's `action` prop.
  const { pending } = useFormStatus();

  return (
    <button type="submit" aria-disabled={pending} disabled={pending} className="submit-button">
      {pending ? 'Submitting...' : 'Sign Up'}
    </button>
  );
}

/**
 * SignupForm Component
 * A functional component demonstrating useActionState and useFormStatus.
 */
function SignupForm() {
  /**
   * signUpAction: An asynchronous function that processes form data.
   * This function is passed to `useActionState` and will be invoked when the form is submitted.
   * It receives the previous state and a FormData object containing the form's input values.
   * It should return the next state to be managed by `useActionState`.
   */
  const signUpAction = async (prevState, formData) => {
    const name = formData.get('name');
    const email = formData.get('email');
    console.log('Form data received:', { name, email });

    // Simulate a network delay for an API call
    await new Promise(resolve => setTimeout(resolve, 2000));

    // Simulate server-side validation or business logic errors
    if (name && name.toLowerCase().includes('error')) {
      return { message: 'Signup failed! The name cannot contain "error".', type: 'error' };
    }
    if (email && !email.includes('@')) {
        return { message: 'Signup failed! Please enter a valid email address.', type: 'error' };
    }

    // Simulate successful signup
    return { message: `Welcome, ${name || 'Guest'}! Your account has been created.`, type: 'success' };
  };

  /**
   * useActionState Hook:
   * - `signUpAction`: The asynchronous function that handles the form submission.
   * - `{ message: '', type: '' }`: The initial state for `useActionState`.
   *
   * It returns:
   * - `state`: The current state returned by `signUpAction`.
   * - `formAction`: A new function to be passed directly to the form's `action` prop.
   *                 When the form is submitted, `formAction` will call `signUpAction`.
   */
  const [state, formAction] = useActionState(signUpAction, { message: '', type: '' });

  return (
    <form action={formAction} className="signup-form">
      <h2>Create Your Account</h2>
      <p>Fill out the form to register. Try typing "error" as your name for a simulated failure!</p>

      <div className="form-group">
        <label htmlFor="name">Name:</label>
        <input type="text" id="name" name="name" required autoComplete="name" />
      </div>

      <div className="form-group">
        <label htmlFor="email">Email:</label>
        <input type="email" id="email" name="email" required autoComplete="email" />
      </div>

      {/* SubmitButton uses useFormStatus to react to the form's submission state */}
      <SubmitButton />

      {/* Display status messages based on the state managed by useActionState */}
      {state.message && (
        <p className={`status-message ${state.type}`}>
          {state.message}
        </p>
      )}
    </form>
  );
}

/**
 * App Component
 * The root component that renders our SignupForm.
 */
const App = () => (
  <div className="app-wrapper">
    <SignupForm />
  </div>
);

// Render the React application into the 'root' div.
const container = document.getElementById('root');
// Using ReactDOM.createRoot for React 18+ compatibility.
const root = ReactDOM.createRoot(container);
root.render(<App />);
Bringing React Form Actions to Life: How It All Works Together
Alright, let’s break down the JavaScript. We will see how these new React hooks connect everything. You will understand each piece of the puzzle. This will bring our interactive form to life. Get ready to learn some cool stuff! We will look at how useActionState and useFormStatus work. They make our form dynamic and smart. We will go step-by-step. So you can truly grasp the magic behind them.
Setting Up Our Action
The useActionState hook is truly a game-changer for forms. It takes an action function and an initial state value. Our action function is what React calls when the form submits. We define it right in our component. This function simulates an API call, perhaps to save a message. For instance, it might send data to a database. After processing, it returns a new state object. This new state includes a success or error message. The useActionState hook gives us two important things. First, the current state of our action. Second, it returns a new function. This new function wraps our action. We then pass this wrapped function to our form’s action prop. This setup greatly simplifies managing loading, success, and error states. You won’t need separate useState calls for all these. It truly keeps your component logic clean and focused. It feels like modern React development! For deeper understanding of form actions, check out the MDN documentation on the action attribute of HTML forms. This hook really builds upon that established web standard.
Pro Tip: Think of the action function like a server endpoint! It receives the FormData object. It can then process that data. It returns the next state of your UI. This makes server-side and client-side forms feel more unified. It also makes your forms resilient. They even work without JavaScript!
Tracking Form Status
Next up, we have useFormStatus. This incredibly handy hook tells us the current status of the form. Is it submitting right now? Has it completed its work? We use it typically inside our submit button component. This hook provides us with an pending property. When pending is true, our form is actively submitting its data. This is absolutely perfect for several crucial tasks. We can disable the submit button immediately. This prevents accidental multiple submissions. It also lets us show a clear ‘Submitting…’ message. This provides immediate and helpful feedback to the user. This small but mighty detail improves the user experience significantly. Knowing when a form is busy is key for responsive UIs. It also helps build more robust and user-friendly web applications. You will love how simple it is to implement! If you’re curious about the fundamental structure of forms, the MDN documentation on the HTML <form> element is a great resource.
We are also using useTransition for our interactive search component on the blog. If you ever wondered how to build a dynamic search feature, check out our guide on building a React Live Search Component Tutorial with Hooks. It shows how useTransition helps keep your UI responsive!
Showing Feedback and State
Our useActionState hook provides us with the state variable. This state holds our crucial feedback message. If the action succeeded, it might delightfully say ‘Feedback sent successfully!’ If an error, unfortunately, occurred, it would instead show a specific error message. We display this state information right below our form. This gives immediate and clear feedback to the user. It tells them if their submission was successful or not. We use simple conditional rendering for this. If state exists, we proudly show it. It’s a clean and effective way to manage messages. This creates a truly interactive experience. It feels super professional to the user. This level of responsiveness builds trust. For more on managing different UI states, you might find our React Dark Mode Local Storage Tutorial with Hooks helpful. It explores how to persist and manage state across user sessions effectively. It truly makes your apps feel complete!
Keep Learning: Building forms can seem tricky. But with tools like
useActionStateanduseFormStatus, it becomes fun! These hooks abstract away much of the complexity. You can focus on the user experience.
Tips to Customise It
You have just built an amazing interactive form! But don’t stop here. There are so many ways to make it even better.
- Add Form Validation: Implement client-side validation. Ensure required fields are filled. Check for valid email formats. You could use libraries like Zod or React Hook Form.
- Integrate with a Real Backend: Right now, our action is simulated. Connect it to a real API endpoint. Send that feedback message to a database.
- Clear Form on Success: After a successful submission, clear the input field. This gives a fresh start. It signals completion clearly.
- Error Handling Enhancements: Show specific error messages for different issues. Maybe a ‘Network error’ or ‘Invalid input’. This provides better guidance.
- Multi-step Forms: Break down a complex form into several steps. Use
useActionStatefor each step. This can improve user flow for long forms.
Conclusion
Wow, you did it! You built an interactive form using React Form Actions! You mastered useActionState and useFormStatus. This is a huge step in building modern web applications. These hooks make forms much more manageable. They improve the user experience significantly. You now have powerful tools in your React toolkit. Remember, practice is key to mastery! Keep experimenting with these concepts. Share what you have built on social media. Tag us @procoder09. We love to see your creations! If you’re looking for more state management insights, our React Dark Mode with Context API: A Complete Tutorial dives into another powerful React concept.