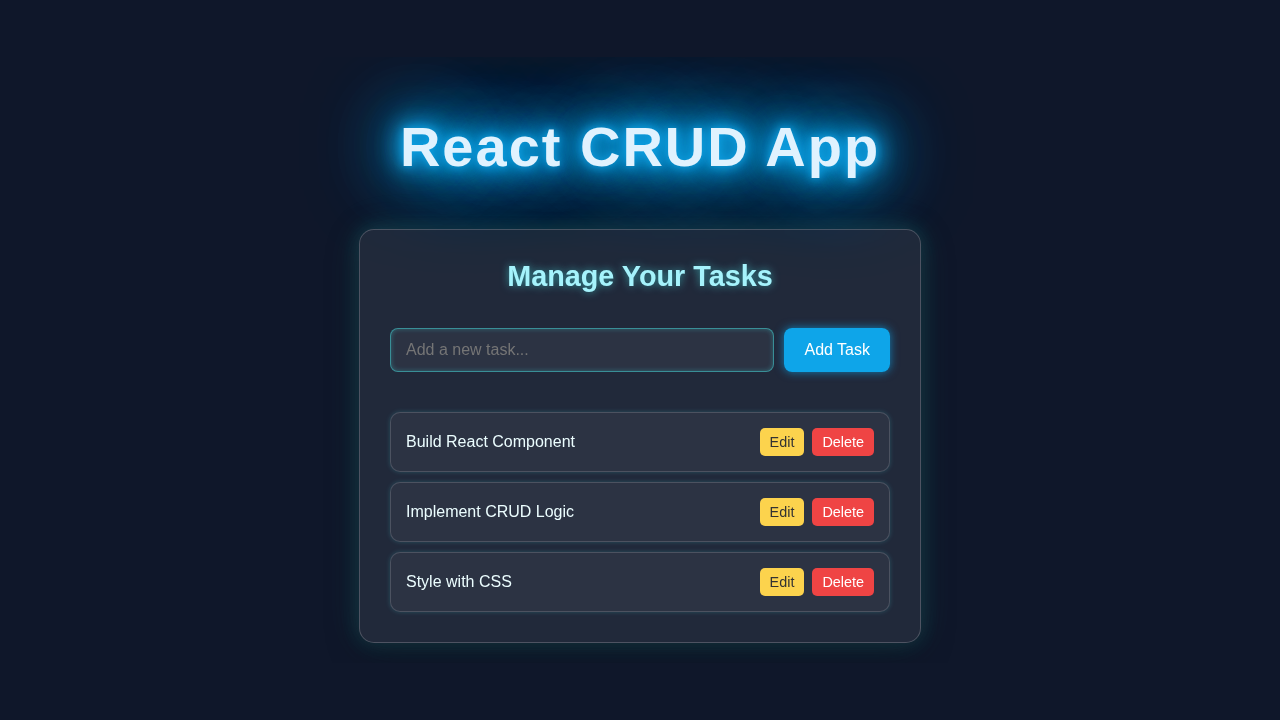
React CRUD App Tutorial: Build a Full CRUD Application with JSX
Hey! If you have wanted to build a React CRUD App but had no idea where to start, you are in the right place. We are going to create a simple, yet powerful, web application. This project uses React and your browser’s local storage. It’s a fantastic way to grasp core React concepts while building something truly functional.
What We Are Building: Your First React CRUD App
We’re diving into the world of CRUD operations! CRUD stands for Create, Read, Update, and Delete. These are the fundamental actions for almost any data-driven application. Think of social media posts or even a simple to-do list. This tutorial will guide you through creating a mini-notes application. You can add new notes, view all your existing ones, edit them when needed, and delete them forever. All your notes will save directly in your browser. Therefore, they persist even after you close the tab. This makes our app super convenient!
This project is perfect for solidifying your React skills. We will use React hooks like useState and useEffect. Also, we will interact with the browser’s localStorage API. By the end, you’ll have a working app and a deeper understanding of how React handles state and data persistence. It’s exciting to see everything come together!
Pro Tip: CRUD is a foundational concept in web development. Mastering it in React prepares you for working with databases and APIs later on. It truly is a gateway skill!
HTML Structure: The Canvas for Our React Magic
Our HTML will be wonderfully simple. React takes care of most of the heavy lifting for us. We just need a single root element where our entire React application will live. This element acts as the main entry point for our JSX code. Therefore, let’s keep it minimal and clean.
index.html
<!DOCTYPE html>
<html lang="en">
<head>
    <meta charset="UTF-8">
    <meta name="viewport" content="width=device-width, initial-scale=1.0">
    <title>React CRUD App</title>
    <!-- Link to global styles -->
    <link rel="stylesheet" href="styles.css">
</head>
<body>
    <noscript>You need to enable JavaScript to run this app.</noscript>
    <div id="root"></div>
    <!--
        Script tags for React and Babel (for development without a build tool).
        In a real production setup, you would use a build tool like Create React App or Vite
        which handles bundling and transpilation automatically. For a simple copy-pasteable
        tutorial, this setup allows direct browser execution.
    -->
    <script src="https://unpkg.com/react@18/umd/react.development.js"></script>
    <script src="https://unpkg.com/react-dom@18/umd/react-dom.development.js"></script>
    <script src="https://unpkg.com/@babel/standalone/babel.min.js"></script>
    <!--
        Our main application logic. The type="text/babel" tells the browser
        to use Babel to transpile JSX before execution.
    -->
    <script type="text/babel" data-type="module" src="index.js"></script>
</body>
</html>
CSS Styling: Making Our App Look Good
A functional app is great, but a good-looking one is even better! Our CSS will provide a clean, user-friendly interface. We’ll add some basic styling to make our notes and input fields easy to read. Furthermore, we will ensure that buttons are clear and clickable. Don’t worry about making it super fancy right now. The goal is clarity and usability. You can always jazz it up later!
styles.css
/* General reset and base styles */
body {
    margin: 0;
    font-family: Arial, Helvetica, sans-serif;
    background-color: #f4f4f4; /* Light background for the tutorial example */
    color: #333;
    line-height: 1.6;
    box-sizing: border-box;
    -webkit-font-smoothing: antialiased;
    -moz-osx-font-smoothing: grayscale;
}

/* Ensure all elements inherit box-sizing */
*, *::before, *::after {
    box-sizing: inherit;
}

/* Root container for the React app */
#root {
    display: flex;
    justify-content: center;
    align-items: flex-start; /* Align to top, allowing content to flow downwards */
    min-height: 100vh;
    padding: 20px;
    background-color: #e2e8f0; /* Soft blue-gray background */
    overflow: auto; /* Allow scrolling if content exceeds viewport height */
}

/* Main application container styling */
.app-container {
    background-color: #ffffff;
    border-radius: 12px;
    box-shadow: 0 4px 20px rgba(0, 0, 0, 0.1); /* Subtle shadow for depth */
    padding: 30px;
    width: 100%;
    max-width: 600px; /* Max width for readability */
    text-align: center;
    overflow: hidden; /* Hide any potential overflowing content */
}

h1 {
    color: #2c3e50;
    margin-bottom: 30px;
    font-size: 2.2em;
}

/* Task Form Styles (Add New Task) */
.task-form {
    display: flex;
    gap: 10px;
    margin-bottom: 30px;
}

.task-form input[type="text"] {
    flex-grow: 1;
    padding: 12px 15px;
    border: 1px solid #ccc;
    border-radius: 8px;
    font-size: 1em;
    outline: none; /* Remove default focus outline */
    transition: border-color 0.2s ease-in-out;
}

.task-form input[type="text"]:focus {
    border-color: #007bff; /* Highlight border on focus */
    box-shadow: 0 0 0 3px rgba(0, 123, 255, 0.25); /* Soft glow on focus */
}

.task-form button {
    padding: 12px 20px;
    background-color: #007bff;
    color: white;
    border: none;
    border-radius: 8px;
    cursor: pointer;
    font-size: 1em;
    transition: background-color 0.2s ease-in-out, transform 0.1s ease;
}

.task-form button:hover {
    background-color: #0056b3;
    transform: translateY(-1px); /* Slight lift effect on hover */
}

.task-form button:active {
    transform: translateY(0); /* Return to original position on click */
}

/* Task List Styles */
.task-list {
    list-style: none;
    padding: 0;
    margin: 0;
}

/* Individual Task Item Styles */
.task-item {
    display: flex;
    align-items: center;
    justify-content: space-between;
    background-color: #f9f9f9;
    border: 1px solid #eee;
    border-radius: 8px;
    padding: 15px;
    margin-bottom: 10px;
    transition: box-shadow 0.2s ease-in-out;
}

.task-item:hover {
    box-shadow: 0 2px 10px rgba(0, 0, 0, 0.08); /* Subtle shadow on hover */
}

/* Hide task text when editing, show input */
.task-item.editing .task-text {
    display: none;
}

.task-item.editing .edit-input {
    display: block;
    flex-grow: 1;
    padding: 8px 10px;
    margin-right: 10px;
    border: 1px solid #007bff;
    border-radius: 5px;
    font-size: 1em;
    outline: none;
}

.task-item .edit-input {
    display: none; /* Hidden by default */
}

.task-item .task-text {
    flex-grow: 1;
    text-align: left;
    margin-right: 10px;
    word-break: break-word; /* Prevent long words from overflowing */
}

.task-item .task-actions {
    display: flex;
    gap: 8px;
}

.task-item .task-actions button {
    padding: 8px 12px;
    border: none;
    border-radius: 5px;
    cursor: pointer;
    font-size: 0.9em;
    transition: background-color 0.2s ease-in-out;
}

/* Button specific styles */
.task-item .task-actions .edit-btn {
    background-color: #ffc107; /* Yellow for Edit */
    color: #333;
}

.task-item .task-actions .edit-btn:hover {
    background-color: #e0a800;
}

.task-item .task-actions .delete-btn {
    background-color: #dc3545; /* Red for Delete */
    color: white;
}

.task-item .task-actions .delete-btn:hover {
    background-color: #c82333;
}

.task-item .task-actions .save-btn {
    background-color: #28a745; /* Green for Save */
    color: white;
}

.task-item .task-actions .save-btn:hover {
    background-color: #218838;
}

/* Message for when there are no tasks */
.no-tasks-message {
    color: #6c757d;
    font-style: italic;
    margin-top: 20px;
    padding: 15px;
    background-color: #f0f4f8;
    border-radius: 8px;
}

/* Responsive adjustments */
@media (max-width: 600px) {
    .app-container {
        padding: 20px;
    }

    .task-form {
        flex-direction: column;
        gap: 8px;
    }

    .task-form button {
        width: 100%;
    }

    .task-item {
        flex-direction: column;
        align-items: flex-start;
        gap: 10px;
    }

    .task-item .task-actions {
        width: 100%;
        justify-content: flex-end; /* Align buttons to the right */
    }

    .task-item .task-text {
        width: 100%;
        margin-right: 0;
    }
}
JavaScript (React): The Brains of Our Operation
Here’s the cool part! This is where all our React logic lives. We’ll build a main component that manages all our notes. This component will handle adding, editing, and deleting notes. It also takes care of saving and loading notes from local storage. We will use modern React hooks, making our code clean and efficient. Get ready to write some powerful React code!
index.js
// index.js: The main JavaScript file for our React application.
// This file contains all functional components and the main App logic,
// leveraging React Hooks for state management and effects.

// TaskItem Component: Represents a single task in the list.
const TaskItem = ({ task, updateTask, deleteTask }) => {
    // State to manage whether the task is currently being edited.
    const [isEditing, setIsEditing] = React.useState(false);
    // State to hold the text of the task during editing.
    const [editedText, setEditedText] = React.useState(task.text);

    // Function to initiate edit mode.
    const handleEdit = () => {
        setIsEditing(true);
    };

    // Function to save the edited task text.
    const handleSave = () => {
        // Ensure the edited text is not empty or just whitespace.
        if (editedText.trim()) {
            updateTask(task.id, editedText); // Call parent's update function.
            setIsEditing(false); // Exit edit mode.
        } else {
            // If edited text is empty, revert to original or prompt user.
            setEditedText(task.text); // Revert to original text.
            setIsEditing(false);
        }
    };

    // Function to handle task deletion.
    const handleDelete = () => {
        // Confirm deletion with the user for better UX.
        if (window.confirm(`Are you sure you want to delete "${task.text}"?`)) {
            deleteTask(task.id); // Call parent's delete function.
        }
    };

    return (
        <li className={`task-item ${isEditing ? 'editing' : ''}`}>
            {isEditing ? (
                // Render an input field when in edit mode.
                <input
                    type="text"
                    className="edit-input"
                    value={editedText}
                    onChange={(e) => setEditedText(e.target.value)}
                    onKeyPress={(e) => {
                        if (e.key === 'Enter') handleSave(); // Save on Enter key press.
                    }}
                    onBlur={handleSave} // Save when the input loses focus.
                    autoFocus // Automatically focus the input when it appears.
                    aria-label="Edit task text"
                />
            ) : (
                // Render the task text normally when not editing.
                <span className="task-text">{task.text}</span>
            )}
            <div className="task-actions">
                {isEditing ? (
                    // Show Save button when editing.
                    <button className="save-btn" onClick={handleSave} aria-label="Save task changes">
                        Save
                    </button>
                ) : (
                    // Show Edit button when not editing.
                    <button className="edit-btn" onClick={handleEdit} aria-label="Edit task">
                        Edit
                    </button>
                )}
                {/* Delete button is always visible */}
                <button className="delete-btn" onClick={handleDelete} aria-label="Delete task">
                    Delete
                </button>
            </div>
        </li>
    );
};

// TaskList Component: Displays a list of tasks.
const TaskList = ({ tasks, updateTask, deleteTask }) => {
    return (
        <ul className="task-list">
            {tasks.length === 0 ? (
                // Display a message if there are no tasks.
                <p className="no-tasks-message">No tasks yet! Add a new one above.</p>
            ) : (
                // Map over the tasks array and render a TaskItem for each.
                tasks.map((task) => (
                    <TaskItem
                        key={task.id} // Unique key for list rendering efficiency.
                        task={task}
                        updateTask={updateTask}
                        deleteTask={deleteTask}
                    />
                ))
            )}
        </ul>
    );
};

// TaskForm Component: Handles adding new tasks.
const TaskForm = ({ addTask }) => {
    // State to hold the text for the new task input.
    const [newTaskText, setNewTaskText] = React.useState('');

    // Function to handle form submission.
    const handleSubmit = (e) => {
        e.preventDefault(); // Prevent default form submission behavior (page reload).
        // Only add task if the input is not empty after trimming whitespace.
        if (newTaskText.trim()) {
            addTask(newTaskText); // Call parent's addTask function.
            setNewTaskText(''); // Clear the input field after adding.
        }
    };

    return (
        <form className="task-form" onSubmit={handleSubmit}>
            <input
                type="text"
                value={newTaskText}
                onChange={(e) => setNewTaskText(e.target.value)}
                placeholder="Add a new task..."
                aria-label="New task text"
            />
            <button type="submit" aria-label="Add task">
                Add Task
            </button>
        </form>
    );
};

// App Component: The main application component that orchestrates the CRUD operations.
const App = () => {
    // State to manage the list of tasks.
    // Initializes tasks from localStorage or with a default set of tasks.
    const [tasks, setTasks] = React.useState(() => {
        try {
            const savedTasks = localStorage.getItem('react-crud-tasks');
            return savedTasks ? JSON.parse(savedTasks) : [
                { id: 1, text: 'Learn React Hooks', completed: false },
                { id: 2, text: 'Build a CRUD App', completed: false },
                { id: 3, text: 'Master JSX Syntax', completed: false }
            ];
        } catch (error) {
            console.error("Failed to parse tasks from localStorage, returning empty array", error);
            return []; // Return empty array on error to prevent app crash.
        }
    });

    // useEffect Hook: Synchronizes tasks state with localStorage.
    // This effect runs whenever the 'tasks' array changes.
    React.useEffect(() => {
        localStorage.setItem('react-crud-tasks', JSON.stringify(tasks));
    }, [tasks]); // Dependency array: effect re-runs when 'tasks' changes.

    // CRUD Operations:

    // Function to add a new task.
    const addTask = (text) => {
        const newTask = {
            id: Date.now(), // Use current timestamp as a simple unique ID.
            text,
            completed: false // New tasks are initially not completed.
        };
        setTasks((prevTasks) => [...prevTasks, newTask]); // Add new task to the end of the array.
    };

    // Function to update an existing task's text.
    const updateTask = (id, newText) => {
        setTasks((prevTasks) =>
            prevTasks.map((task) =>
                task.id === id ? { ...task, text: newText } : task // Update task if ID matches.
            )
        );
    };

    // Function to delete a task.
    const deleteTask = (id) => {
        setTasks((prevTasks) => prevTasks.filter((task) => task.id !== id)); // Filter out the task with the given ID.
    };

    return (
        <div className="app-container">
            <h1>React Task Manager</h1>
            <TaskForm addTask={addTask} />
            <TaskList
                tasks={tasks}
                updateTask={updateTask}
                deleteTask={deleteTask}
            />
        </div>
    );
};

// Render the main App component into the 'root' div defined in index.html.
ReactDOM.render(<App />, document.getElementById('root'));
How It All Works Together: Step by Step
Let’s break down the magic behind our React CRUD App. Each piece plays a crucial role. Understanding these parts helps you debug and extend your applications. We will look at state management, data persistence, and user interaction. This comprehensive overview ensures you grasp every essential concept.
Setting Up Our React State
Our app needs to keep track of two main things: the list of notes and the text currently being typed into the input field. We use React’s useState hook for this. For example, const [notes, setNotes] = useState([]); initializes our notes array. This array will hold all our note objects. Similarly, const [newNoteText, setNewNoteText] = useState(''); manages the text in our input. When these state variables change, React efficiently re-renders only the necessary parts of our UI. This keeps our application fast and responsive.
Storing Data Locally with useEffect
What if you close your browser? We want our notes to stick around! This is where localStorage comes in. We use the useEffect hook to interact with it. First, when the component mounts, useEffect tries to load existing notes. It uses localStorage.getItem('notes'). Remember to parse it back into a JavaScript array using JSON.parse(). Conversely, whenever the notes state changes, another useEffect saves the updated array. It uses localStorage.setItem('notes', JSON.stringify(notes)). Stringifying the array is essential because local storage only stores strings. This ensures data persistence across sessions.
Creating New Notes
Adding a new note is simple. When a user types into the input and clicks "Add Note", a function triggers. This function first checks if the input is empty. If it is, we prevent adding a blank note. Otherwise, we create a new note object. This object includes a unique ID (perhaps using Date.now() or a library like uuid) and the note text. Then, we update our notes state using setNotes. We spread the existing notes and add the new one: [...notes, newNote]. Finally, we clear the input field by resetting newNoteText. This prepares the UI for the next note.
Reading and Displaying Notes
Displaying all our notes is quite elegant in React. We take our notes array from the state. Then, we use the map() function to iterate over it. For each note object, we render a dedicated component or a simple div. Inside this div, we display the note text. We also include buttons for editing and deleting. Providing a unique key prop to each mapped item is crucial. For further reading on why this is important, check out the React documentation on lists and keys. This key helps React efficiently update the list when items change.
Updating Existing Notes
Editing a note involves a few steps. When the "Edit" button is clicked, we might enter an "edit mode" for that specific note. This could involve replacing the note’s text with an input field. When the user saves changes, we find the note by its ID in our notes array. We then create a *new* array with the updated note. It is important to avoid direct mutation of state in React. Instead, we use methods like map to create a new array: notes.map(note => note.id === id ? { ...note, text: updatedText } : note). This immutable update strategy keeps our application predictable and easier to manage. You can explore more about managing complex state in React with the React Context API Guide: Master State Management.
Deleting Notes
Deleting a note is straightforward. When a user clicks the "Delete" button, we pass the note’s ID to a handler function. This function uses the array filter() method. It creates a new array that includes all notes *except* the one with the matching ID. For instance: notes.filter(note => note.id !== id). We then update our state with this new filtered array using setNotes. This instantly removes the note from the UI. Deleting a note ensures our list stays clean and relevant. This also demonstrates a simple yet powerful way to manage collections of data in React.
Educator’s Insight: Many beginners struggle with immutable updates. Always remember: in React, treat state as read-only. Create new copies of arrays or objects when making changes. This prevents unexpected side effects!
Tips to Customise It: Make It Your Own!
Now that you have a fully functional React CRUD App, it’s time to get creative! Here are some ideas to extend your project:
- Add Validation: Prevent users from saving empty notes. You could also set a character limit.
- Implement Categories: Allow users to assign categories (e.g., "Work", "Personal") to notes. Then, add filters to display notes by category.
- Search Functionality: Add a search bar to filter notes by keywords. This improves usability significantly.
- Visual Enhancements: Play with different fonts, colors, or animations. Maybe a dark mode toggle? Explore CSS transitions for a smoother experience.
- Improve UI for Editing: Instead of replacing the note text with an input, perhaps a modal dialog appears for editing. This provides a clearer user flow. If your component tree gets complex, understanding state flow is key; check out the React Prop Drilling: A Component Tree Visualization for insights. Also, consider adding a React Password Strength Indicator with Hooks Tutorial as a fun challenge in a different context.
Conclusion: You Did It!
Congratulations! You’ve successfully built a fully functional React CRUD App using local storage. This is a huge milestone in your web development journey. You’ve tackled state management, data persistence, and user interaction. These are all core skills for any React developer. Furthermore, you now have a solid foundation for more complex projects. Share your creation with friends, tweak it, and keep building! The best way to learn is by doing, and you’ve just done something awesome. Keep coding, and happy building!