Hello there, future web wizard! If you are brand new to this topic, you have probably stumbled into a wall of text that left you even more confused. Maybe your browser console is screaming at you with a message like “Access to fetch has been blocked by CORS policy.” Sound familiar? You are definitely not alone. When I first saw these messages, I thought my code was completely broken!
Today, we will unravel one of the most common and often frustrating hurdles for new web developers: CORS errors explained. We will break down what Cross-Origin Resource Sharing (CORS) is. You will understand why it exists. More importantly, you will learn how to approach fixing these tricky issues. Let’s make that error message a thing of the past for you!
What You Need to Know First: The Web Browser’s Security Guard
Imagine your web browser is a highly protective security guard. This guard has strict rules about who can talk to whom. When you visit a website, let’s say myblog.com, your browser loads everything from that specific place. This specific place is called an origin.
An origin is basically the unique address of a website. It is made up of three parts. First, there is the protocol, like http:// or https://. Then, you have the host, which is the domain name, such as myblog.com. Finally, there is the port number, though it is often hidden (like :80 or :443).
So, https://www.myblog.com:443 is one origin. If your website tries to fetch data from http://api.anotherdomain.com, that is a completely different origin. Your browser’s security guard takes these differences very seriously. It wants to keep you safe from malicious websites. Without these rules, any website could potentially steal your private information. That would be a huge problem, right?
CORS Errors Explained: Why Your Browser Says “No!”
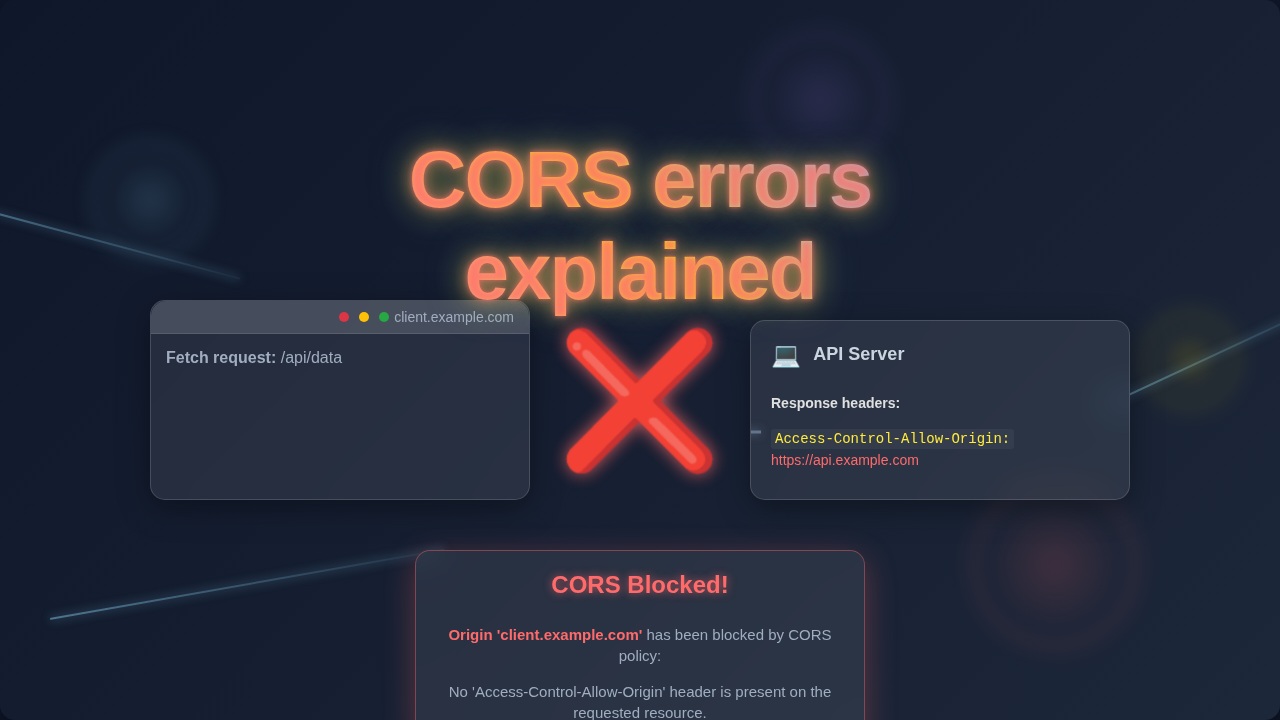
So, you are building an amazing frontend application. It runs on your local development server, perhaps at http://localhost:3000. You want it to get some data from an API. This API might be hosted at https://api.yourbackend.com. You send a request. Then, BAM! A CORS error. This is where CORS errors explained becomes super important for you.
Think of it like trying to enter a super exclusive club. Your frontend website is at the club entrance. The API server is inside the club. The bouncer, your web browser, checks your ID. If your ID (your origin) does not match the club’s guest list, the bouncer says, “Sorry, you cannot come in!” It does not matter if you know someone inside. The rules are strict.
This “No!” message is your browser protecting you. It stops your website from making requests to an origin that has not explicitly given permission. This protection is a good thing for security. But it can be a headache when you are the developer trying to make your own legitimate requests!
Core Idea 1: The Same-Origin Policy (SOP)
The foundation of CORS errors is something called the Same-Origin Policy (SOP). This is a fundamental security concept in web browsers. It is the default rule. The SOP dictates that a web page can only request resources from the same origin that served the page itself. Make sense? It is like a default security setting that is always on.
For example, a script loaded from https://yourwebsite.com cannot directly access data from https://anotherwebsite.com. This rule prevents a rogue script on one site from reading sensitive data. Imagine your banking website. You definitely do not want a random ad script reading your balance! The SOP keeps that from happening. Most of the time, this policy works silently in the background. You only notice it when it blocks something you want to happen, leading to those frustrating CORS errors.
Core Idea 2: How CORS Lets You Share (Safely)
If the SOP is a strict bouncer, then CORS is the official “guest list” system. CORS is a mechanism that allows a server to explicitly tell a browser, “Hey, it is okay for an application from this specific origin to access my resources.” It is a way to safely relax the Same-Origin Policy. The browser and the server have a little conversation. They negotiate whether a cross-origin request is allowed.
This conversation happens through special HTTP headers. When your browser sends a request to a different origin, it includes an Origin header. This header tells the server where the request is coming from. If the server is willing to allow the request, it responds with an Access-Control-Allow-Origin header. This header specifies which origins are permitted. If your origin is on that list, your browser lets the request go through. If not, you get that familiar CORS error!
Core Idea 3: Simple Requests vs. Preflight Requests
Not all cross-origin requests are treated equally by your browser. There are two main types:
- Simple Requests: These are straightforward. They use specific HTTP methods like
GET,POST(with certain content types), orHEAD. They also do not include certain custom headers. For simple requests, your browser just sends the request with theOriginheader. The server then decides whether to allow it with anAccess-Control-Allow-Originresponse. - Preflight Requests: Many cross-origin requests are more complex. They might use methods like
PUTorDELETE. They could also have custom headers. For these, your browser sends a special “preflight” request first. This is anOPTIONSHTTP request. The browser is essentially asking the server, “Hey, before I send the real request, can I even do this? Are you open to it?”
The server then responds to this OPTIONS request. It uses headers like Access-Control-Allow-Methods and Access-Control-Allow-Headers to list what is permitted. Only if the preflight request is successful will your browser send the actual request. This two-step process adds an extra layer of security. It ensures that potentially destructive or complex actions are explicitly approved beforehand.
Pro-Tip: Often, new developers forget that preflight
OPTIONSrequests need their own permission. Your server might be configured forGETorPOST, but not forOPTIONS. Make sure your server-side CORS configuration covers all necessary methods!
Fixing CORS Errors Explained: Practical Steps
Okay, so you understand why CORS errors happen. Now, let’s talk about how to fix them. Most CORS errors require changes on the server-side. Your frontend code (the browser) is just following the rules.
Here’s what you usually need to do:
-
Identify the Problematic Origin: Look at your browser’s console error message. It will tell you which origin is being blocked. For example, if your frontend is at
http://localhost:3000, that’s your origin. -
Configure Your Server to Allow Your Origin: This is the most common solution. You need to tell your API server to add the
Access-Control-Allow-Originheader to its responses. This header should contain your frontend’s origin. It is like telling the club bouncer, “Addhttp://localhost:3000to the guest list!”For instance, if your backend uses a framework like Node.js with Express, you might add middleware. In Python, you can achieve this with libraries like
Flask-CORS. It involves setting the correct headers for specific routes. If you are working with a Python Requests Library Explained – Blog Thumbnail, remember that client-side Python doesn’t face browser CORS, but server-side Python *serves* requests that browsers do check. -
Be Specific (or Use Wildcard Carefully): Ideally, you should list specific origins. For local development,
http://localhost:3000is fine. In production, list your actual domain, likehttps://www.yourfrontend.com. You can use*(a wildcard) to allow requests from *any* origin. This is easy, but it is less secure. Only use it if your API has no sensitive data or is publicly accessible anyway. -
Handle Preflight Requests: Remember those
OPTIONSrequests? Your server needs to respond to them correctly. It must includeAccess-Control-Allow-Methods(e.g.,GET, POST, PUT, DELETE) andAccess-Control-Allow-Headers(e.g.,Content-Type, Authorization) in itsOPTIONSresponse. If you are using libraries for CORS, they often handle this automatically.
Debugging Tip: Use your browser’s developer tools (usually F12). Go to the “Network” tab. Look for the failed request. Check the “Headers” section. You can see the request headers your browser sent and the response headers the server sent back. This helps you confirm if the
Access-Control-Allow-Originheader is present or missing!
Sometimes, frameworks like React, which often lead to React Prop Drilling: A Component Tree Visualization when passing data, might make you think the problem is frontend logic. But CORS is almost always a server configuration issue. You are just seeing the browser enforce the rule.
What to Learn Next
You have taken a huge step in understanding web security! To deepen your knowledge, consider diving into a few more topics:
- HTTP Headers: Learn more about all the different headers. They are fundamental to how the web works.
- Backend Frameworks: Explore how to implement CORS in popular backend languages. Think Node.js, Python Flask/Django, or Ruby on Rails.
- Web Security Concepts: CORS is just one piece of the puzzle. There are many other security considerations for web applications.
- Modern Web Styling: While not directly related to CORS, understanding modern styling techniques with tools like Tailwind CSS vs Plain CSS – Modern Web Styling Comparison can enhance your overall web development skills.
Resources for Your Journey
To continue your learning, here are some excellent resources:
- MDN Web Docs: Understanding Cross-Origin Resource Sharing – Dive deeper into the technical specifications and examples.
- CSS-Tricks: Enabling Cross-Domain AJAX Requests – Practical tips and explanations for making cross-origin requests work.
Keep Building!
You just tackled one of the most common web development headaches. You did great! CORS errors can feel like a brick wall. But now, you have the tools to understand and fix them. This knowledge makes you a more capable developer. Keep experimenting. Keep building. Every error you solve makes you stronger!