Hey there, fellow coder! If you’ve ever wanted to build a practical web application but felt overwhelmed, you’re in the right place. Today, we’re going to create a super useful Flask To-Do App from scratch. This project will teach you Flask fundamentals. You will build something tangible. It’s truly exciting!
What We Are Building: Your Own Flask To-Do App
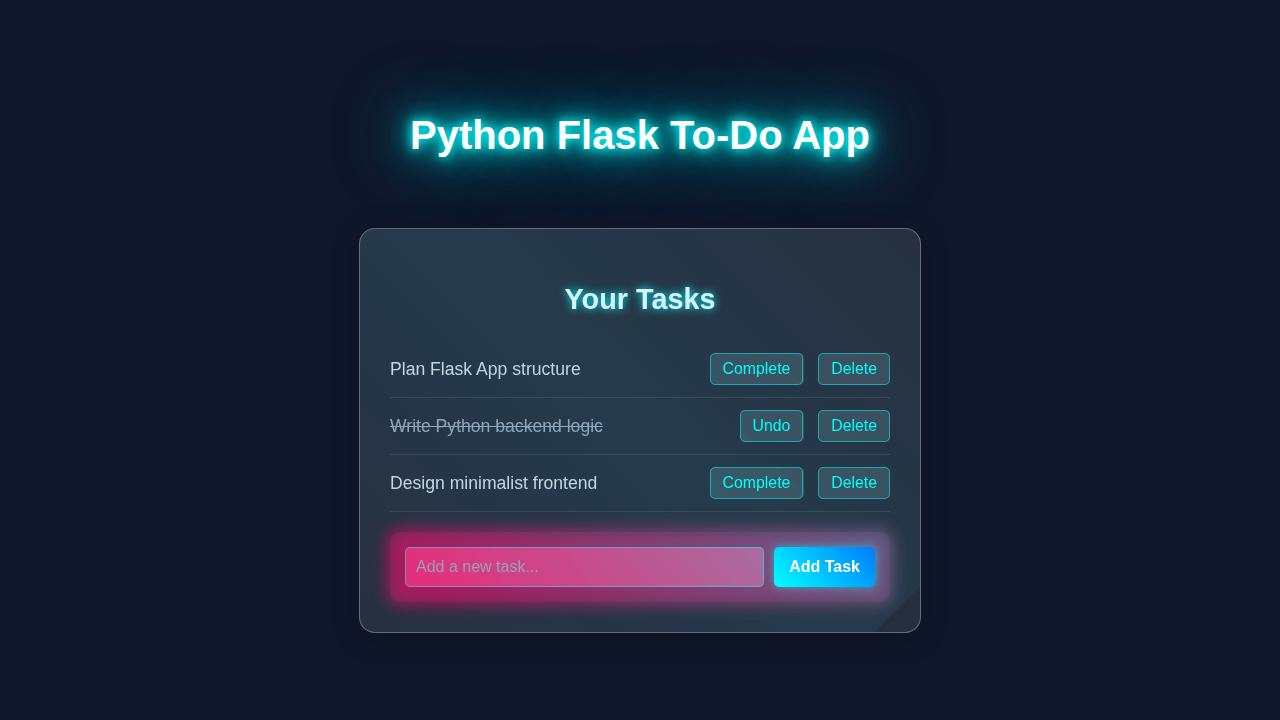
Imagine having a simple web app where you can jot down your tasks. You can add them, mark them as done, and even delete them. That’s precisely what we will build! Our Flask To-Do App will be clean and functional. It uses Python for the backend logic and basic HTML/CSS for the frontend. This project is perfect for understanding how web apps connect different parts. It’s a fantastic stepping stone for more complex projects. Plus, everyone needs a good to-do list, right? This basic structure is the backbone of almost any web application you’ll encounter. It shows you the full stack: front-end, back-end, and database (even if it’s just a simple list for now!). You’ll gain so much confidence.
HTML Structure: Laying the Foundation
First, we need the bones of our application. This is where HTML comes in. We will set up a basic page with a title, an input field for new tasks, and a list to display them. Don’t worry, it’s very straightforward! The HTML provides the content and structure. It’s like the blueprint of our house. We will use simple tags to make our elements clear. You’ll see how easy it is to create interactive forms.
templates/index.html
<!-- templates/index.html -->
<!DOCTYPE html>
<html lang="en">
<head>
    <meta charset="UTF-8">
    <meta name="viewport" content="width=device-width, initial-scale=1.0">
    <title>Flask To-Do App</title>
    <!-- Link to the external stylesheet located in the 'static' folder -->
    <link rel="stylesheet" href="{{ url_for('static', filename='styles.css') }}">
</head>
<body>
    <div class="container">
        <h1>Flask To-Do List</h1>

        <!-- Form to add new tasks -->
        <form action="{{ url_for('add_task') }}" method="post" class="add-task-form">
            <input type="text" name="description" placeholder="Add a new task..." required>
            <button type="submit">Add Task</button>
        </form>

        <!-- List of existing tasks -->
        <ul class="task-list">
            {% if tasks %} {# Check if there are any tasks to display #}
                {% for task in tasks %}
                <li class="task-item {% if task.completed %}completed{% endif %}"> {# Add 'completed' class if task is done #}
                    <span class="task-description">{{ task.description }}</span>
                    <div class="task-actions">
                        <!-- Form to toggle task completion status -->
                        <form action="{{ url_for('complete_task', task_id=task.id) }}" method="post" style="display:inline;">
                            <button type="submit">
                                {% if task.completed %}Undo{% else %}Complete{% endif %} {# Change button text based on status #}
                            </button>
                        </form>
                        <!-- Form to delete a task -->
                        <form action="{{ url_for('delete_task', task_id=task.id) }}" method="post" style="display:inline;">
                            <button type="submit" class="delete-button">Delete</button>
                        </form>
                    </div>
                </li>
                {% endfor %}
            {% else %}
                <li class="no-tasks">No tasks yet! Add one above.</li> {# Message when no tasks are present #}
            {% endif %}
        </ul>
    </div>
</body>
</html>
CSS Styling: Making It Look Good
Next, let’s add some style! CSS will make our To-Do App look neat and user-friendly. We want clear buttons and readable text. This styling will make your app a pleasure to use. You will learn some basic design principles here. We’ll use CSS to arrange our elements nicely. It truly transforms a plain HTML page into an appealing interface. Get ready for some visual magic!
static/styles.css
/* static/styles.css */

/* Base styles for the entire page */
body {
    font-family: Arial, Helvetica, sans-serif; /* Safe fonts */
    background-color: #1a202c; /* Dark background */
    color: #e2e8f0; /* Light text color */
    margin: 0;
    padding: 20px;
    display: flex;
    justify-content: center;
    align-items: flex-start; /* Align to top, allowing for longer lists to scroll */
    min-height: 100vh;
    box-sizing: border-box; /* Include padding and border in the element's total width and height */
    overflow: auto; /* Allow scrolling if content overflows the viewport */
}

/* Container for the To-Do app */
.container {
    background-color: #2d3748; /* Slightly lighter dark background for the container */
    padding: 30px;
    border-radius: 8px;
    box-shadow: 0 4px 10px rgba(0, 0, 0, 0.5); /* Subtle shadow for depth */
    width: 100%;
    max-width: 600px; /* Max width to keep the layout clean on larger screens */
    box-sizing: border-box;
}

/* Styling for the main title */
h1 {
    color: #4fd1c5; /* Accent color for the title */
    text-align: center;
    margin-bottom: 30px;
    font-size: 2.2em;
    border-bottom: 2px solid #4fd1c5;
    padding-bottom: 10px;
}

/* Form for adding new tasks */
.add-task-form {
    display: flex;
    gap: 10px;
    margin-bottom: 30px;
}

.add-task-form input[type="text"] {
    flex-grow: 1; /* Input field takes available space */
    padding: 12px;
    border: 1px solid #4a5568;
    border-radius: 5px;
    background-color: #2d3748;
    color: #e2e8f0;
    font-size: 1em;
    outline: none; /* Remove default outline */
    transition: border-color 0.3s ease; /* Smooth transition for border focus */
}

.add-task-form input[type="text"]:focus {
    border-color: #4fd1c5; /* Accent color on focus */
}

.add-task-form button {
    padding: 12px 20px;
    background-color: #4fd1c5; /* Accent button color */
    color: #1a202c;
    border: none;
    border-radius: 5px;
    cursor: pointer;
    font-size: 1em;
    font-weight: bold;
    transition: background-color 0.3s ease, transform 0.2s ease; /* Smooth transitions for hover effects */
}

.add-task-form button:hover {
    background-color: #38b2ac;
    transform: translateY(-2px); /* Slight lift on hover */
}

/* Styling for the task list */
.task-list {
    list-style: none; /* Remove default bullet points */
    padding: 0;
}

.task-item {
    display: flex;
    justify-content: space-between;
    align-items: center;
    background-color: #2c3546;
    border: 1px solid #4a5568;
    padding: 15px;
    margin-bottom: 10px;
    border-radius: 5px;
    transition: background-color 0.3s ease;
}

.task-item:hover {
    background-color: #3c465a; /* Slightly lighter background on hover */
}

/* Style for completed tasks */
.task-item.completed .task-description {
    text-decoration: line-through; /* Strikethrough for completed tasks */
    color: #a0aec0; /* Faded color for completed tasks */
}

.task-description {
    flex-grow: 1;
    margin-right: 15px;
    font-size: 1.1em;
    word-break: break-word; /* Prevents long words from overflowing */
}

/* Task action buttons (Complete/Undo, Delete) */
.task-actions button {
    padding: 8px 12px;
    border: none;
    border-radius: 5px;
    cursor: pointer;
    font-size: 0.9em;
    margin-left: 8px;
    transition: background-color 0.3s ease;
}

/* Specific style for 'Complete' and 'Undo' buttons */
.task-actions button:not(.delete-button) {
    background-color: #63b3ed; /* Blue color */
    color: #1a202c;
}

.task-actions button:not(.delete-button):hover {
    background-color: #4299e1;
}

/* Specific style for 'Delete' button */
.task-actions .delete-button {
    background-color: #fc8181; /* Red color */
    color: #1a202c;
}

.task-actions .delete-button:hover {
    background-color: #e53e3e;
}

/* Message for when there are no tasks */
.no-tasks {
    text-align: center;
    color: #a0aec0;
    padding: 20px;
    font-style: italic;
}
JavaScript: Adding Interactivity
While Flask handles most of our logic, a little JavaScript makes the user experience smoother. We will use a tiny bit of JS to dynamically update our task list. This means instant feedback for you! It’s super cool to see your app respond immediately. JavaScript helps us respond to user actions right in the browser. For example, it can toggle a “done” class without a full page reload. This makes the app feel very snappy and modern.
app.py
# app.py
from flask import Flask, render_template, request, redirect, url_for
import json
import os

# Initialize the Flask application
app = Flask(__name__)

# --- Configuration ---
# Path to store tasks data. Using a JSON file for simple persistence.
TASKS_FILE = 'tasks.json'

# Ensure the tasks file exists upon application start
# If it doesn't exist, create it with an empty list.
if not os.path.exists(TASKS_FILE):
    with open(TASKS_FILE, 'w') as f:
        json.dump([], f) # Initialize with an empty list

# --- Helper Functions for Task Management ---

def load_tasks():
    """Loads tasks from the JSON file."""
    with open(TASKS_FILE, 'r') as f:
        return json.load(f)

def save_tasks(tasks):
    """Saves tasks to the JSON file."""
    with open(TASKS_FILE, 'w') as f:
        json.dump(tasks, f, indent=4) # Use indent=4 for human-readable JSON

# --- Flask Routes ---

@app.route('/')
def index():
    """Renders the main To-Do list page, displaying all current tasks."""
    tasks = load_tasks()
    return render_template('index.html', tasks=tasks)

@app.route('/add', methods=['POST'])
def add_task():
    """Handles adding a new task submitted via a POST request."""
    task_description = request.form.get('description')
    if task_description and task_description.strip(): # Ensure description is not empty or just whitespace
        tasks = load_tasks()
        # Assign a unique ID to the new task
        new_id = 1 if not tasks else max(task['id'] for task in tasks) + 1
        new_task = {
            'id': new_id,
            'description': task_description.strip(),
            'completed': False
        }
        tasks.append(new_task)
        save_tasks(tasks)
    return redirect(url_for('index')) # Redirect back to the home page

@app.route('/complete/<int:task_id>', methods=['POST'])
def complete_task(task_id):
    """Toggles the completion status of a specific task."""
    tasks = load_tasks()
    for task in tasks:
        if task['id'] == task_id:
            task['completed'] = not task['completed'] # Toggle completion status
            break
    save_tasks(tasks)
    return redirect(url_for('index'))

@app.route('/delete/<int:task_id>', methods=['POST'])
def delete_task(task_id):
    """Deletes a specific task from the list."""
    tasks = load_tasks()
    tasks = [task for task in tasks if task['id'] != task_id] # Filter out the task to be deleted
    save_tasks(tasks)
    return redirect(url_for('index'))

# --- Running the App ---

if __name__ == '__main__':
    # Run the Flask development server.
    # debug=True allows for automatic reloading on code changes and provides a debugger.
    # Set debug=False in a production environment.
    app.run(debug=True)
    # To run this app:
    # 1. Make sure you have Flask installed (`pip install Flask`).
    # 2. Save this code as `app.py`.
    # 3. Create a folder named `templates` in the same directory.
    # 4. Save `index.html` inside the `templates` folder.
    # 5. Create a folder named `static` in the same directory as `app.py`.
    # 6. Save `styles.css` inside the `static` folder.
    # 7. Open your terminal in the directory where `app.py` is located.
    # 8. Run the command: `python app.py`
    # 9. Access the application in your web browser at: `http://127.0.0.1:5000/`
How Your Flask To-Do App Comes Alive: The Backend Magic
Now, for the Python part! Flask is a micro web framework. It handles requests, serves pages, and interacts with our data. We will set up routes to display tasks, add new ones, and manage their status. This is where your Flask To-Do App truly starts to shine. Let me explain what’s happening here. Flask is lightweight but incredibly powerful. It provides all the tools you need to build web services. It’s a fantastic choice for beginners!
Setting Up Your Flask Environment
Before writing any Python, you need a safe space for your project. This means creating a virtual environment. It keeps your project dependencies isolated. Therefore, your global Python setup stays clean. Open your terminal and run python3 -m venv venv. This command creates a new folder named ‘venv’. Then activate it: source venv/bin/activate (macOS/Linux) or venv\Scripts\activate (Windows). This step ensures you install Flask only for this project. Finally, install Flask: pip install Flask. You are now ready to code! This practice is essential for all your Python projects.
Creating the Flask Application
Our main Python file, usually called app.py, will hold all our Flask logic. We will import Flask and create an instance of our app: app = Flask(__name__). This line creates your Flask web server. We need a way to store our tasks. For simplicity, we’ll use a Python list for now, like tasks = []. It works perfectly for a basic tutorial. Remember, for a production app, you’d use a database like SQLite! We also add if __name__ == '__main__': app.run(debug=True) to run our app. The debug=True part is great for development. It automatically reloads the server on code changes.
Pro Tip: Using a Python list for tasks is great for quick learning. However, if your app needs to remember tasks after closing, consider integrating a database like SQLite or even a full-fledged PostgreSQL. It’s a common next step for web developers!
We define routes using the @app.route() decorator. This decorator tells Flask which URL should trigger which Python function. For instance, @app.route('/') handles requests to the homepage. This is fundamental for any Flask application. Each route connects a URL path to a specific Python function. This makes organizing your app’s logic very clear.
Handling Task Display and Addition
When someone visits our homepage, we want to show all existing tasks. So, our index() function will render our HTML template using render_template(). It passes the current task list to it. We also need a way to add new tasks. When you submit the form, a POST request is sent. Our Flask app captures this data using request.form.get('task_name'). It then adds the new task to our list. After adding, we redirect back to the homepage using redirect(url_for('index')). This ensures the page refreshes with the new task. It keeps our UI consistent. This entire process brings new data into your application. It’s the core of many dynamic web pages.
Want to learn more about how web requests work? Check out our article on Python Requests Explained: Mastering HTTP in Python. It breaks down the process beautifully.
Managing Task Completion and Deletion
Each task will have buttons to mark it as complete or to delete it. When these buttons are clicked, they send requests to specific Flask routes. For completion, we update the task’s status in our Python list. We’ll pass the task’s unique ID in the URL, like /complete/1. Flask captures this ID. For deletion, we simply remove the task from our list using its ID. We use unique identifiers for each task. This helps Flask know exactly which task to modify. Afterward, we redirect the user. They return to the updated task list immediately. It’s all about smooth user interaction. These actions show how Flask handles dynamic updates to your data.
Speaking of smooth operations, understanding how data flows is key. Our post on How Python Requests Works – Blog Thumbnail Design provides more insights into backend interactions.
Connecting Front-End and Back-End
Our HTML forms and buttons are designed to send data to our Flask routes. The form’s action attribute points to the correct URL. The method attribute specifies if it’s a GET or POST request. Learning more about HTML forms on MDN can deepen your understanding. Flask receives this, processes it, and then renders an updated HTML page. This is often done using Jinja2 templates. Jinja2 lets you embed Python-like logic directly into your HTML. This full cycle is how web apps communicate. It’s a truly amazing process! You’re seeing the full power of web development here.
Learning Tip: Pay close attention to how your HTML forms interact with Flask routes. The names of your input fields often correspond to the data Flask expects. This connection is super important! Always check your form element names!
Tips to Customise Your To-Do App
You have built a working Flask To-Do App! Now, how can you make it even better? Here are some exciting ideas to expand your project:
- Add User Authentication: Make it so only logged-in users can manage tasks. This involves adding user registration and login features. It’s a significant step! You could use Flask-Login for this.
- Use a Database: Instead of a simple Python list, integrate SQLite or PostgreSQL. This will make your tasks persistent. They won’t disappear when the server restarts. Flask-SQLAlchemy is a great tool for this.
- Advanced Task Features: Implement due dates, priorities, or categories for tasks. You could even add a search function! This adds much more utility. Think about how Google Calendar manages tasks.
- Improve Frontend Design: Experiment with more advanced CSS frameworks like Bootstrap or Tailwind CSS. Make your app look truly professional. MDN Web Docs on Flexbox can help you with responsive layouts. A polished UI significantly improves user experience.
- Deployment: Learn how to deploy your app to a service like Heroku or Render. This makes it accessible to anyone online. It’s a huge achievement! Imagine sharing your creation with the world!
For those thinking about bigger Python applications, ensuring your data is safe is crucial. Take a look at our Django S3 Backup Script: Automated Python Solution for ideas on robust data handling. Always think about data integrity!
Conclusion: You Did It!
Wow, you just built your very own Flask To-Do App! You tackled HTML, CSS, JavaScript, and Python Flask. That’s a huge accomplishment. You now understand how different parts of a web application work together. This is a solid foundation for your web development journey. Keep building, keep learning, and don’t be afraid to experiment. Share your Flask To-Do App with friends. Show off your new skills! What will you build next? The possibilities are truly endless!