WebSockets Chat Tutorial: HTML, CSS & Vanilla JavaScript
Hey! If you have wanted to build a real-time WebSockets Chat but had no idea where to start, you are in the right place. Today, we’re diving into the exciting world of WebSockets. We will build a simple, interactive chat application. It will update instantly for all connected users. Get ready to make some real-time magic!
What We Are Building
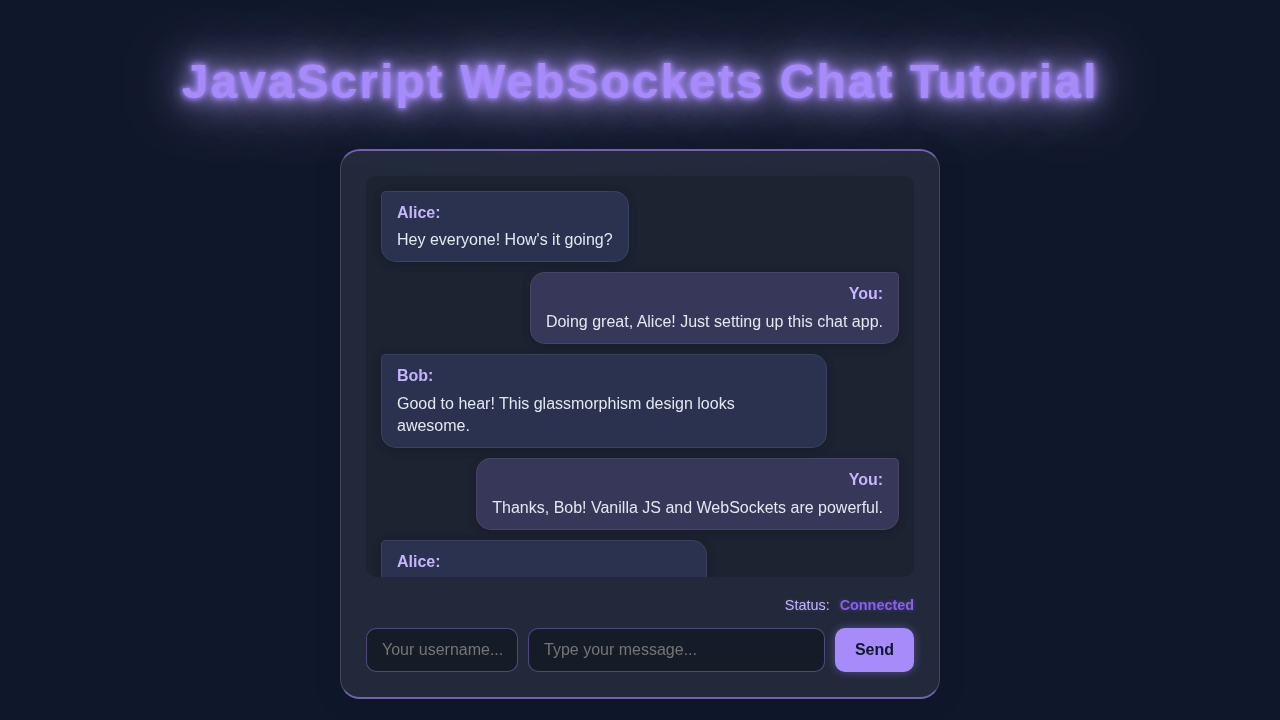
We are going to craft a basic but fully functional chat interface. Imagine a simple message box and a “Send” button. Below that, you’ll see all the messages appear. The best part? Everyone connected to the chat will see new messages as they are sent. It’s truly real-time communication! This project will give you a solid foundation. You can build even more complex interactive features later on.
HTML Structure
First, we need the bones of our chat application. Our HTML will be super straightforward. We will create a main container. Inside, we will have a place to display messages. Also, we will add an input field for new messages. Finally, a button to send them. This simple structure makes our app easy to understand.
index.html
<!DOCTYPE html>
<html lang="en">
<head>
    <meta charset="UTF-8">
    <meta name="viewport" content="width=device-width, initial-scale=1.0">
    <title>WebSockets Chat</title>
    <link rel="stylesheet" href="styles.css">
</head>
<body>
    <div class="chat-wrapper">
        <div class="chat-header">
            <h1>WebSockets Chat</h1>
            <div class="connection-status">
                Status: <span id="status-display" class="disconnected">Disconnected</span>
                <button id="toggle-connection">Connect</button>
            </div>
        </div>

        <div class="chat-messages" id="chat-messages">
            <!-- Messages will be appended here by JavaScript -->
        </div>

        <div class="chat-input-area">
            <input type="text" id="username-input" placeholder="Your Name" maxlength="20">
            <input type="text" id="message-input" placeholder="Type a message..." maxlength="255">
            <button id="send-button">Send</button>
        </div>
    </div>

    <script src="script.js"></script>
</body>
</html>
CSS Styling
Next, let’s make our chat look presentable. Our CSS will add some basic styling. We want it to be user-friendly and clear. We’ll style the chat container, message bubbles, and input area. This will make your chat app look clean and modern. A good design makes all the difference!
Pro Tip: Thinking about future enhancements? You could totally integrate a theme switcher into your chat app. This would allow users to pick their favorite color scheme, adding a personal touch to their chat experience!
styles.css
/* Basic Reset & Box Model */
*, *::before, *::after {
    box-sizing: border-box;
    margin: 0;
    padding: 0;
}

body {
    font-family: Arial, Helvetica, sans-serif;
    background-color: #f0f2f5; /* Light background for the tutorial */
    color: #333;
    display: flex;
    justify-content: center;
    align-items: center;
    min-height: 100vh;
    padding: 20px;
    overflow-y: auto; /* Allow scrolling if content overflows */
}

/* Chat Wrapper */
.chat-wrapper {
    background-color: #ffffff;
    border-radius: 12px;
    box-shadow: 0 4px 20px rgba(0, 0, 0, 0.1);
    width: 100%;
    max-width: 700px;
    display: flex;
    flex-direction: column;
    overflow: hidden; /* Contains children, especially border-radius */
    min-height: 600px; /* A reasonable minimum height */
}

/* Chat Header */
.chat-header {
    background-color: #4CAF50; /* A pleasant green */
    color: #fff;
    padding: 15px 20px;
    display: flex;
    justify-content: space-between;
    align-items: center;
    border-bottom: 1px solid #388E3C;
}

.chat-header h1 {
    font-size: 1.8em;
    font-weight: bold;
}

.connection-status {
    display: flex;
    align-items: center;
    gap: 10px;
}

.connection-status span {
    font-weight: bold;
}

.connection-status .connected {
    color: #d4edda; /* Light green */
}

.connection-status .disconnected {
    color: #f8d7da; /* Light red */
}

.connection-status button {
    background-color: #f0f0f0;
    color: #333;
    border: none;
    padding: 8px 15px;
    border-radius: 8px;
    cursor: pointer;
    font-size: 0.9em;
    transition: background-color 0.2s ease;
}

.connection-status button:hover {
    background-color: #e0e0e0;
}

/* Chat Messages Area */
.chat-messages {
    flex-grow: 1;
    padding: 20px;
    overflow-y: auto;
    background-color: #e9ecef; /* Light grey background for messages */
    display: flex;
    flex-direction: column;
    gap: 10px;
    border-bottom: 1px solid #dee2e6;
    max-height: 400px; /* Constrain message area height */
}

/* Individual Message Styles */
.message {
    background-color: #fff;
    padding: 12px 18px;
    border-radius: 18px;
    max-width: 80%;
    word-wrap: break-word;
    line-height: 1.5;
    box-shadow: 0 1px 3px rgba(0, 0, 0, 0.1);
    align-self: flex-start; /* Default alignment */
}

.message strong {
    display: block;
    margin-bottom: 4px;
    color: #4CAF50; /* Green for username */
    font-weight: bold;
}

.message.self {
    background-color: #DCF8C6; /* Light green for self-sent messages */
    align-self: flex-end;
    border-bottom-right-radius: 5px; /* Tail effect */
}

.message.other {
    background-color: #F1F0F0; /* Light grey for other messages */
    align-self: flex-start;
    border-bottom-left-radius: 5px; /* Tail effect */
}

/* Chat Input Area */
.chat-input-area {
    padding: 15px 20px;
    background-color: #f8f9fa;
    display: flex;
    gap: 10px;
    border-top: 1px solid #dee2e6;
}

.chat-input-area input[type="text"] {
    border: 1px solid #ced4da;
    border-radius: 8px;
    padding: 10px 15px;
    font-size: 1em;
    flex-grow: 1;
    outline: none;
    transition: border-color 0.2s ease, box-shadow 0.2s ease;
}

.chat-input-area input[type="text"]::placeholder {
    color: #6c757d;
}

.chat-input-area input[type="text"]:focus {
    border-color: #4CAF50;
    box-shadow: 0 0 0 0.2rem rgba(76, 175, 80, 0.25);
}

#username-input {
    flex-grow: 0;
    width: 120px; /* Fixed width for username input */
    max-width: 120px;
}

#message-input {
    flex-grow: 1;
}

.chat-input-area button {
    background-color: #4CAF50;
    color: #fff;
    border: none;
    border-radius: 8px;
    padding: 10px 20px;
    cursor: pointer;
    font-size: 1em;
    font-weight: bold;
    transition: background-color 0.2s ease;
}

.chat-input-area button:hover {
    background-color: #45a049;
}

/* Responsive adjustments */
@media (max-width: 768px) {
    .chat-wrapper {
        min-height: 90vh; /* Taller on smaller screens */
    }

    .chat-header h1 {
        font-size: 1.5em;
    }

    .chat-input-area {
        flex-wrap: wrap; /* Wrap inputs and button */
    }

    #username-input {
        width: 100%; /* Full width on smaller screens */
        max-width: 100%;
        margin-bottom: 10px;
    }

    #message-input {
        flex-grow: 1;
        width: calc(100% - 70px); /* Leave space for send button if not full width */
    }

    .chat-input-area button {
        flex-grow: 1; /* Allow button to grow as well */
        width: auto;
    }
}
JavaScript: The Magic Behind Our WebSockets Chat
Now, for the core of our real-time experience! JavaScript is where the action happens. We will use JavaScript to connect to a WebSocket server. Then, we will send messages. We will also listen for new incoming messages. WebSockets are a powerful way to create persistent connections. They enable instant, two-way communication. It’s super cool!
script.js
document.addEventListener('DOMContentLoaded', () => {
    const chatMessages = document.getElementById('chat-messages');
    const usernameInput = document.getElementById('username-input');
    const messageInput = document.getElementById('message-input');
    const sendButton = document.getElementById('send-button');
    const statusDisplay = document.getElementById('status-display');
    const toggleConnectionButton = document.getElementById('toggle-connection');

    let ws; // Declare WebSocket object
    const WS_URL = 'ws://localhost:8080'; // Replace with your WebSocket server URL

    // --- Helper Functions ---

    /**
     * Appends a message to the chat display.
     * @param {string} username - The sender's username.
     * @param {string} messageText - The message content.
     * @param {boolean} isSelf - True if the message was sent by the current user.
     */
    function appendMessage(username, messageText, isSelf) {
        const messageDiv = document.createElement('div');
        messageDiv.classList.add('message');
        messageDiv.classList.add(isSelf ? 'self' : 'other');

        const userSpan = document.createElement('strong');
        userSpan.textContent = username + ':';

        const textSpan = document.createElement('span');
        textSpan.textContent = messageText;

        messageDiv.appendChild(userSpan);
        messageDiv.appendChild(textSpan);
        chatMessages.appendChild(messageDiv);

        // Scroll to the bottom of the chat
        chatMessages.scrollTop = chatMessages.scrollHeight;
    }

    /**
     * Updates the connection status display.
     * @param {boolean} isConnected - True if connected, false otherwise.
     */
    function updateStatus(isConnected) {
        if (isConnected) {
            statusDisplay.textContent = 'Connected';
            statusDisplay.classList.remove('disconnected');
            statusDisplay.classList.add('connected');
            toggleConnectionButton.textContent = 'Disconnect';
            toggleConnectionButton.style.backgroundColor = '#d9534f'; // Red for disconnect
            toggleConnectionButton.style.color = '#fff';
        } else {
            statusDisplay.textContent = 'Disconnected';
            statusDisplay.classList.remove('connected');
            statusDisplay.classList.add('disconnected');
            toggleConnectionButton.textContent = 'Connect';
            toggleConnectionButton.style.backgroundColor = '#f0f0f0'; // Default grey
            toggleConnectionButton.style.color = '#333';
        }
    }

    // --- WebSocket Logic ---

    /**
     * Initializes and connects to the WebSocket server.
     */
    function connectWebSocket() {
        if (ws && (ws.readyState === WebSocket.OPEN || ws.readyState === WebSocket.CONNECTING)) {
            console.log("WebSocket is already open or connecting.");
            return;
        }

        ws = new WebSocket(WS_URL);

        ws.onopen = () => {
            console.log('WebSocket connection established.');
            updateStatus(true);
            appendMessage('System', 'Connected to chat.', false);
        };

        ws.onmessage = (event) => {
            // Assuming messages are simple strings or JSON objects
            try {
                const data = JSON.parse(event.data);
                if (data.username && data.message) {
                    // Check if the message is from the current user (based on username)
                    // Note: This is a client-side guess. A proper server would send a unique ID.
                    const isSelf = (usernameInput.value.trim() === data.username.trim());
                    appendMessage(data.username, data.message, isSelf);
                } else {
                    appendMessage('Server', event.data, false); // Fallback for plain messages
                }
            } catch (e) {
                // If it's not JSON, just display as a plain server message
                appendMessage('Server', event.data, false);
            }
        };

        ws.onclose = (event) => {
            console.log('WebSocket connection closed:', event);
            updateStatus(false);
            appendMessage('System', 'Disconnected from chat.', false);
            // Optional: Reconnect logic (e.g., setTimeout(connectWebSocket, 3000))
        };

        ws.onerror = (error) => {
            console.error('WebSocket error:', error);
            updateStatus(false);
            appendMessage('System', 'WebSocket error occurred.', false);
        };
    }

    /**
     * Sends a message to the WebSocket server.
     */
    function sendMessage() {
        const username = usernameInput.value.trim();
        const messageText = messageInput.value.trim();

        if (!username) {
            alert('Please enter your username!');
            usernameInput.focus();
            return;
        }

        if (!messageText) {
            alert('Please type a message!');
            messageInput.focus();
            return;
        }

        if (ws && ws.readyState === WebSocket.OPEN) {
            try {
                const messageData = {
                    username: username,
                    message: messageText
                };
                ws.send(JSON.stringify(messageData));
                messageInput.value = ''; // Clear input after sending
            } catch (error) {
                console.error('Failed to send message:', error);
                appendMessage('System', 'Failed to send message.', false);
            }
        } else {
            alert('Not connected to the chat server. Please connect first!');
            console.warn('WebSocket is not open.');
        }
    }

    // --- Event Listeners ---

    sendButton.addEventListener('click', sendMessage);

    messageInput.addEventListener('keypress', (event) => {
        if (event.key === 'Enter') {
            event.preventDefault(); // Prevent new line in input field
            sendMessage();
        }
    });

    toggleConnectionButton.addEventListener('click', () => {
        if (ws && ws.readyState === WebSocket.OPEN) {
            ws.close(); // Close existing connection
        } else {
            connectWebSocket(); // Attempt to connect
        }
    });

    // Initialize status on load (disconnected)
    updateStatus(false);

    // Optional: Auto-connect on page load
    // connectWebSocket();

    // --- Server-side Recommendation (for the user) ---
    // To run this client-side code, you need a WebSocket server.
    // Here's a very simple Node.js example using the 'ws' library:
    /*
    // 1. Install Node.js: https://nodejs.org/
    // 2. Create a folder (e.g., 'websocket-server').
    // 3. Open terminal in that folder and run: `npm init -y`
    // 4. Then: `npm install ws`
    // 5. Create a file named `server.js` with the following content:

    const WebSocket = require('ws');

    const wss = new WebSocket.Server({ port: 8080 });

    wss.on('connection', ws => {
        console.log('Client connected');

        ws.send(JSON.stringify({ username: 'Server', message: 'Welcome to the chat!' }));

        ws.on('message', message => {
            console.log(`Received: ${message}`);
            // Broadcast message to all connected clients
            wss.clients.forEach(client => {
                if (client !== ws && client.readyState === WebSocket.OPEN) {
                    client.send(message.toString()); // Re-send the message to others
                } else if (client === ws) {
                     // For the sender, optionally acknowledge or just let them know it was sent (client-side append handles this)
                     // Or, the server could send a modified message (e.g., with timestamp) back to everyone including sender
                }
            });
        });

        ws.on('close', () => {
            console.log('Client disconnected');
        });

        ws.onerror = error => {
            console.error('WebSocket error:', error);
        };
    });

    console.log('WebSocket server started on port 8080');

    // 6. Run the server from your terminal: `node server.js`
    // 7. Then open `index.html` in your browser.
    */
});
How It All Works Together
Let’s break down the JavaScript. It connects our HTML and CSS to the real-time world. You’ll see how each piece plays a vital role. Understanding this flow is key. It helps you grasp how WebSockets power dynamic web applications.
Connecting to the WebSocket Server
At the start of our JavaScript, we create a new WebSocket object. This object needs the server’s address. For example, ws://localhost:8080. This line of code tries to open a connection. It creates a dedicated channel. This channel stays open between your browser and the server. It’s like establishing a direct phone line! This line allows messages to flow back and forth quickly. Therefore, it’s perfect for real-time applications.
Sending Messages
When you type a message and click ‘Send’, our JavaScript takes over. It grabs the text from the input field. Then, it uses websocket.send(). This method sends your message through the open channel. The server receives it almost instantly. The server then broadcasts it to all other connected clients. This process is very efficient. Moreover, it ensures everyone sees your message quickly.
Heads Up: Sending and receiving messages in real-time like this is incredibly powerful. It’s a similar principle to how a debounced search input processes user input, but here the focus is on immediate, continuous data exchange.
Receiving Messages
Our chat application constantly listens for incoming messages. This happens through the websocket.onmessage event handler. When the server sends a message, this function runs. It takes the message data. Then, it appends it to our chat display area. We create a new div element for each message. This ensures they are nicely formatted. We also scroll to the bottom. This keeps the newest messages in view. Therefore, the chat feels fluid and natural.
Handling Connection Status
WebSockets also provide events for connection status. The websocket.onopen event fires when the connection is successful. This is a great place to show a “Connected!” message. websocket.onclose fires if the connection drops. We also have websocket.onerror. This catches any issues during communication. Monitoring these events makes your application more robust. You can give users clear feedback. Furthermore, you can handle unexpected situations gracefully.
Tips to Customise It
You’ve built a functional WebSockets Chat! That’s awesome! Now, consider these ideas to take it further:
- Add Usernames: Prompt users for a name. Then, prefix each message with it. This makes conversations much clearer.
- Timestamps: Include the time each message was sent. This adds valuable context. You can use JavaScript’s
Dateobject. - Scroll to Bottom: Implement an auto-scroll function. It always shows the latest messages. This enhances user experience greatly.
- Private Messaging: This is more advanced. It involves server-side logic. Users could send messages to specific individuals.
Extending projects like this is key for learning. Think of it like adding more features to a React Todo App. The possibilities are endless!
For more deep dives into the WebSockets API, check out the MDN Web Docs on WebSockets. If you’re looking for advanced chat UI styling ideas, CSS-Tricks has some great examples!
Conclusion
Wow, you did it! You just built a real-time WebSockets Chat application. That’s a huge accomplishment! You’ve learned about HTML structure, CSS styling, and the incredible power of WebSockets in JavaScript. This project showcases your ability to create dynamic web experiences. You should be super proud of this work! Keep experimenting and building. Share your amazing chat app with friends. The world of real-time web development is now open to you. Happy coding!