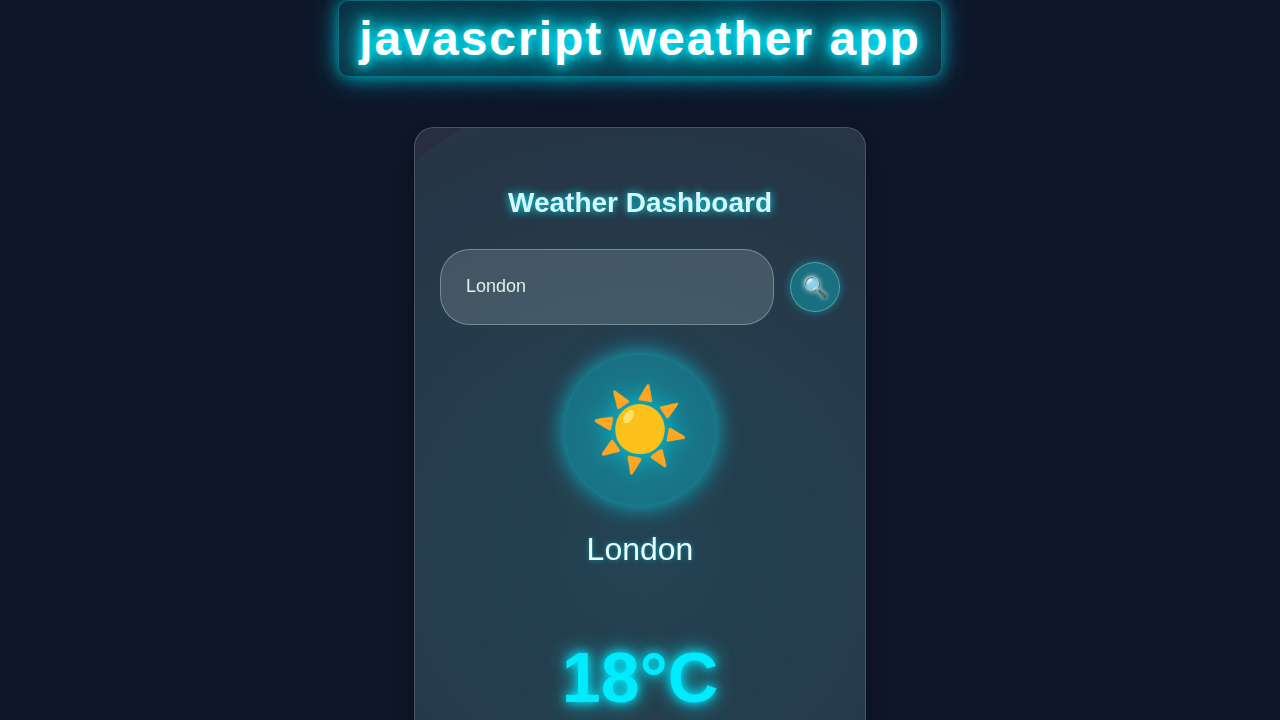
Hey there, fellow coders! If you’ve ever wanted to build a real-time web application but felt a bit lost, you’re in the right place. Today, we’re going to create an amazing JavaScript Weather App. This project uses the Fetch API to get live weather data. It also updates the UI dynamically. You’ll learn so much, and you’ll have a cool app to show off!
What We Are Building
We are building a sleek, interactive weather dashboard. You can search for any city worldwide. Then, our app will instantly display its current weather conditions. Think temperature, humidity, wind speed, and a descriptive icon. This project is a fantastic way to grasp fetching data from APIs. It also teaches you how to update your webpage in real-time. This skill is super useful for many web projects!
Heads Up: Building a real-world application like this is incredibly rewarding. Each step you take solidifies your understanding. Don’t be afraid to experiment and break things as you learn!
This skill is super useful for many web projects! It also lays the groundwork for more complex applications. You’re becoming a pro coder with every line of code!
HTML Structure
First, we’ll set up the basic skeleton for our app. This HTML will provide all the necessary containers. It holds our search bar, weather display, and error messages. We’re keeping it simple and semantic. This makes it easy to style and manipulate with JavaScript.
index.html
<!DOCTYPE html>
<html lang="en">
<head>
    <meta charset="UTF-8">
    <meta name="viewport" content="width=device-width, initial-scale=1.0">
    <title>JavaScript Weather App</title>
    <link rel="stylesheet" href="styles.css">
</head>
<body>
    <div class="weather-app">
        <h1>Weather Dashboard</h1>
        <div class="search-box">
            <input type="text" id="city-input" placeholder="Enter city name" spellcheck="false">
            <!--
                Ensure you have an 'images' folder in your project root
                and place a search icon image named 'search.png' inside it.
            -->
            <button id="search-btn"><img src="images/search.png" alt="Search"></button>
        </div>
        <div class="error-message" id="error-message">
            <p>Invalid city name or network error!</p>
        </div>
        <div class="weather-display hidden" id="weather-display">
            <!--
                Weather icons will be dynamically updated by JavaScript.
                Ensure you have an 'images' folder with 'clear.png', 'clouds.png',
                'drizzle.png', 'mist.png', 'rain.png', 'snow.png' and 'wind.png', 'humidity.png'.
            -->
            <img src="images/clear.png" class="weather-icon" alt="Weather Icon">
            <h2 class="city" id="city-name">City Name</h2>
            <p class="temp" id="temperature">--°C</p>
            <p class="description" id="weather-description">--</p>
            <div class="details">
                <div class="col">
                    <img src="images/humidity.png" alt="Humidity Icon">
                    <div>
                        <p class="humidity" id="humidity-value">--%</p>
                        <p>Humidity</p>
                    </div>
                </div>
                <div class="col">
                    <img src="images/wind.png" alt="Wind Icon">
                    <div>
                        <p class="wind" id="wind-speed">-- km/h</p>
                        <p>Wind Speed</p>
                    </div>
                </div>
            </div>
        </div>
    </div>

    <script src="script.js"></script>
</body>
</html>
CSS Styling
Next, let’s make our app look fantastic. Our CSS will transform the plain HTML into a visually appealing weather card. We’ll use modern CSS properties for a clean and responsive design. This includes flexbox for layout and smooth transitions.
styles.css
/* Basic Reset & Box Sizing */
* {
    margin: 0;
    padding: 0;
    box-sizing: border-box;
}

body {
    font-family: Arial, Helvetica, sans-serif; /* Safe font stack */
    background: linear-gradient(135deg, #00feba, #5b548a); /* A pleasant background gradient */
    display: flex;
    justify-content: center;
    align-items: center;
    min-height: 100vh;
    padding: 20px;
    overflow: hidden; /* Prevent scrollbars */
}

.weather-app {
    width: 90%;
    max-width: 400px; /* Max width for the app container */
    background: linear-gradient(180deg, rgba(255, 255, 255, 0.2), rgba(255, 255, 255, 0.1)); /* Light glass effect */
    border-radius: 20px;
    padding: 40px 25px;
    text-align: center;
    color: #fff;
    box-shadow: 0 10px 30px rgba(0, 0, 0, 0.2); /* Soft shadow */
    backdrop-filter: blur(10px); /* Glassmorphism blur effect */
    -webkit-backdrop-filter: blur(10px); /* Safari support */
    border: 1px solid rgba(255, 255, 255, 0.3); /* Subtle border */
    overflow: hidden; /* Ensures content stays within rounded borders */
}

.weather-app h1 {
    font-size: 28px;
    margin-bottom: 30px;
    font-weight: bold;
    color: #fff;
    text-shadow: 0 0 5px rgba(0,255,255,0.7), 0 0 10px rgba(0,255,255,0.5); /* Subtle glow */
}

.search-box {
    width: 100%;
    display: flex;
    align-items: center;
    justify-content: space-between;
    margin-bottom: 30px;
}

.search-box input {
    border: 0;
    outline: 0;
    background: rgba(255, 255, 255, 0.8); /* Light input background */
    color: #333;
    padding: 12px 25px;
    height: 50px;
    border-radius: 30px;
    flex: 1;
    margin-right: 16px;
    font-size: 18px;
    transition: all 0.3s ease;
}

.search-box input::placeholder {
    color: #666;
}

.search-box input:focus {
    box-shadow: 0 0 0 3px rgba(0, 180, 255, 0.7); /* Focus glow */
}

.search-box button {
    border: 0;
    outline: 0;
    background: rgba(255, 255, 255, 0.4); /* Button background */
    border-radius: 50%;
    width: 50px;
    height: 50px;
    cursor: pointer;
    display: flex;
    justify-content: center;
    align-items: center;
    transition: background 0.3s ease, transform 0.2s ease;
}

.search-box button img {
    width: 20px;
    filter: invert(1); /* Make icon white */
}

.search-box button:hover {
    background: rgba(255, 255, 255, 0.6);
    transform: scale(1.05);
}

.error-message {
    color: #ffdddd;
    background: rgba(255, 0, 0, 0.3);
    border-radius: 8px;
    padding: 10px;
    margin-bottom: 20px;
    font-size: 16px;
    display: none; /* Hidden by default */
    max-width: 100%; /* Ensure it doesn't overflow */
}

.error-message.show {
    display: block;
}

.weather-icon {
    width: 170px;
    margin-top: 30px;
    margin-bottom: 20px;
    filter: drop-shadow(0 0 10px rgba(255,255,255,0.5)); /* Subtle icon glow */
    max-width: 100%; /* Ensure icon responsiveness */
    height: auto; /* Maintain aspect ratio */
}

.city {
    font-size: 32px;
    font-weight: 500;
    margin-bottom: 5px;
}

.temp {
    font-size: 60px;
    font-weight: bold;
    margin-bottom: 10px;
}

.description {
    font-size: 20px;
    font-weight: 400;
    margin-bottom: 40px;
    text-transform: capitalize;
}

.details {
    display: flex;
    align-items: center;
    justify-content: space-between;
    padding: 0 20px;
    margin-top: 20px;
    flex-wrap: wrap; /* Allow columns to wrap on smaller screens */
    max-width: 100%;
}

.col {
    display: flex;
    align-items: center;
    text-align: left;
    flex-basis: 48%; /* Ensures two columns initially */
    min-width: 150px; /* Minimum width for each column */
    margin-bottom: 15px; /* Spacing between rows if wrapped */
}

.col img {
    width: 40px;
    margin-right: 10px;
    max-width: 100%; /* Ensure icon responsiveness */
    height: auto;
}

.col p {
    font-size: 16px;
}

.humidity, .wind {
    font-size: 20px;
    font-weight: 500;
}

.weather-display.hidden {
    display: none;
}

/* Responsive adjustments */
@media (max-width: 480px) {
    .weather-app {
        padding: 30px 15px;
    }

    .search-box input {
        font-size: 16px;
        padding: 10px 20px;
        height: 45px;
    }

    .search-box button {
        width: 45px;
        height: 45px;
    }

    .city {
        font-size: 28px;
    }

    .temp {
        font-size: 50px;
    }

    .description {
        font-size: 18px;
    }

    .details {
        padding: 0 10px;
        flex-direction: column; /* Stack columns vertically on very small screens */
    }

    .col {
        flex-basis: 100%; /* Full width for columns when stacked */
        justify-content: center; /* Center content in stacked columns */
    }
}
JavaScript for Your Live Weather App
Now for the exciting part: the brain of our application! This JavaScript code will handle everything. It listens for user input, fetches data from a weather API, and then updates our UI. We’ll use the Fetch API for requests. We will also dynamically manipulate the DOM.
script.js
// --- API Configuration ---
// 1. Get your API key from OpenWeatherMap (https://openweathermap.org/)
//    Sign up, then navigate to "API keys" in your profile.
// 2. IMPORTANT: In a real-world production app, do NOT expose your API key directly in client-side JS.
//    Use a backend proxy to make API calls securely. For this tutorial, we'll keep it simple.
const apiKey = "YOUR_OPENWEATHERMAP_API_KEY"; // <<< REPLACE WITH YOUR API KEY
const apiUrl = "https://api.openweathermap.org/data/2.5/weather?units=metric&q=";

// --- DOM Elements ---
const cityInput = document.getElementById("city-input");
const searchBtn = document.getElementById("search-btn");
const weatherIcon = document.querySelector(".weather-icon");
const cityName = document.getElementById("city-name");
const temperature = document.getElementById("temperature");
const weatherDescription = document.getElementById("weather-description");
const humidityValue = document.getElementById("humidity-value");
const windSpeed = document.getElementById("wind-speed");
const weatherDisplay = document.getElementById("weather-display");
const errorMessage = document.getElementById("error-message");

// --- Function to Fetch Weather Data ---
async function checkWeather(city) {
    // Trim whitespace from the city input
    const trimmedCity = city.trim();

    // Validate input
    if (trimmedCity === "") {
        errorMessage.querySelector('p').textContent = "Please enter a city name.";
        errorMessage.classList.add("show");
        weatherDisplay.classList.add("hidden"); // Hide weather display
        return;
    }

    try {
        errorMessage.classList.remove("show"); // Hide any previous error messages
        weatherDisplay.classList.add("hidden"); // Hide weather display while fetching

        const response = await fetch(apiUrl + trimmedCity + `&appid=${apiKey}`);

        // Handle HTTP errors (e.g., 404 City not found, 401 Invalid API key)
        if (!response.ok) {
            if (response.status === 404) {
                errorMessage.querySelector('p').textContent = `City "${trimmedCity}" not found!`;
            } else if (response.status === 401) {
                errorMessage.querySelector('p').textContent = "Invalid API key. Please check your OpenWeatherMap API key.";
            }
            else {
                errorMessage.querySelector('p').textContent = "Could not retrieve weather data. Please try again later.";
            }
            errorMessage.classList.add("show");
            return; // Exit function if there's an error
        }

        const data = await response.json();

        // Update DOM with weather data
        cityName.textContent = data.name;
        temperature.textContent = Math.round(data.main.temp) + "°C";
        weatherDescription.textContent = data.weather[0].description;
        humidityValue.textContent = data.main.humidity + "%";
        windSpeed.textContent = Math.round(data.wind.speed) + " km/h";

        // Update weather icon based on weather condition
        // Make sure you have an 'images' folder in your project root
        // containing 'clear.png', 'clouds.png', 'drizzle.png', 'mist.png',
        // 'rain.png', 'snow.png', 'humidity.png', 'wind.png'.
        const weatherCondition = data.weather[0].main.toLowerCase();
        if (weatherCondition === "clouds") {
            weatherIcon.src = "images/clouds.png";
        } else if (weatherCondition === "clear") {
            weatherIcon.src = "images/clear.png";
        } else if (weatherCondition === "rain") {
            weatherIcon.src = "images/rain.png";
        } else if (weatherCondition === "drizzle") {
            weatherIcon.src = "images/drizzle.png";
        } else if (weatherCondition === "mist" || weatherCondition === "haze" || weatherCondition === "fog") {
            weatherIcon.src = "images/mist.png";
        } else if (weatherCondition === "snow") {
            weatherIcon.src = "images/snow.png";
        } else {
            // Default icon for other conditions (e.g., thunderstorm, tornado)
            weatherIcon.src = "images/clear.png"; // A generic fallback
        }

        weatherDisplay.classList.remove("hidden"); // Show weather display

    } catch (error) {
        console.error("Error fetching weather data:", error);
        errorMessage.querySelector('p').textContent = "Failed to fetch weather data. Please check your internet connection.";
        errorMessage.classList.add("show");
    }
}

// --- Event Listeners ---
// Search button click
searchBtn.addEventListener("click", () => {
    checkWeather(cityInput.value);
});

// Enter key press in input field
cityInput.addEventListener("keypress", (e) => {
    if (e.key === "Enter") {
        checkWeather(cityInput.value);
    }
});

// --- Initial Load (Optional) ---
// You can uncomment the line below to load weather for a default city on page load.
// checkWeather("London");
How It All Works Together: Your JavaScript Weather App in Action
Let’s break down the magic behind our new application. Every part plays a crucial role. We combine HTML, CSS, and JavaScript. This creates a smooth user experience.
Setting Up Your API Key
The first crucial step is connecting to a reliable weather service. For this project, we will proudly use the OpenWeatherMap API. This incredible service provides up-to-the-minute weather data. It covers cities from every corner of the globe. To access this valuable data, you absolutely need an API key. Think of this key as your unique passport or a special password. It tells the OpenWeatherMap servers that you are an authorized user. This ensures fair use and security for everyone.
Pro Tip: Always keep your API keys secure. For simple client-side applications like our weather app, embedding it directly in your JavaScript is often acceptable. However, for more complex or server-side projects, it’s best practice to use environment variables. This prevents exposing your keys to the public and keeps them super safe.
Head over to the OpenWeatherMap website. Sign up for a free account. You will then receive your very own unique API key. It’s a series of letters and numbers. Remember to copy this key carefully. You will paste it directly into your JavaScript file. Look for the line where the apiKey variable is declared. Without this key, our amazing app won’t be able to fetch any weather information. So, this step is absolutely essential for your JavaScript Weather App!
Fetching Weather Data with the Fetch API
Here’s the cool part: fetching the actual weather data! This is where the powerful JavaScript Fetch API truly shines. When you type a city name into our search bar and press enter, something exciting happens. An event listener, a watchful eye in our code, immediately activates. It grabs the city name you just typed. Then, it cleverly constructs a special URL. This URL is unique for your request. It contains your chosen city name. It also includes your secret API key. The fetch() function then swings into action. It sends this request off to the OpenWeatherMap server.
fetch(apiUrl)
  .then(response => response.json())
  .then(data => {
    // Process the weather data here
  })
  .catch(error => {
    // Handle any errors gracefully
  });
The Fetch API works asynchronously. This means it doesn’t block your page. It returns a Promise. We use the .then() method to handle the successful response. This is where we tell our code what to do next. We also use a .catch() method. This is super important for managing any errors. Errors might include a lost internet connection. Or maybe you typed a city name that doesn’t exist. Understanding Promises is a core skill. You can delve deeper into the Fetch API and Promises on MDN Web Docs. It’s a foundational tool for modern web requests.
Displaying the Weather Information Dynamically
Once we successfully receive the weather data, it arrives in a standard JSON format. This format is perfect for web applications. It’s easy for JavaScript to understand. Our JavaScript code then gets to work. It parses this raw JSON data. It carefully extracts all the key details we need. This includes the current temperature. It also grabs the humidity level and the wind speed. We also get the main weather condition. This could be “Clouds,” “Clear,” or “Rain.” The API also provides a handy URL for a corresponding weather icon.
We then use document.querySelector(). This powerful method helps us find specific HTML elements. These are our dedicated display areas on the page. We update their textContent property. For instance, the paragraph showing the temperature gets new data. The image element for the weather icon also gets its src attribute updated. This process is incredibly fast. It instantly refreshes the UI. Your screen now proudly shows the live, up-to-the-minute weather. All of this happens for your chosen city. This dynamic updating is the absolute core. It makes our app so interactive and useful!
Handling Errors and Loading States Gracefully
A truly robust application always plans for things going wrong. What happens if a city isn’t found by the API? What if the user loses their internet connection? Our code includes smart checks for these very scenarios. If the OpenWeatherMap API returns an error, we don’t just leave a blank screen. Instead, we display a clear, friendly message. This message tells the user exactly what happened. For example, it might say “City not found!” This message replaces the weather information. It prevents a broken or confusing display.
We also think about the loading state. Fetching data from an API takes a tiny bit of time. There might be a small delay. You could even add a simple loading spinner here. This provides instant visual feedback to the user. It clearly shows them that something is happening. This little touch makes the user experience much smoother and more professional. For more awesome UI patterns and layout techniques, you can explore guides on CSS-Tricks. They offer great tips for creating polished interfaces.
Beyond the Basics: Building More Interactive UIs
Now that you’ve mastered the basics of our JavaScript Weather App, you’re ready for more! Building interactive user interfaces is a fundamental skill. It’s also a common and exciting challenge in web development. You can explore similar dynamic updates. For example, check out this great React Debounced Search Input tutorial. It shows how to handle user input efficiently. Also, if you’re fascinated by real-time communication, don’t miss our WebSockets Chat Tutorial. That project offers another thrilling journey into live web experiences. You’ll keep learning amazing new ways. These allow you to build truly engaging web applications. Keep up the fantastic work, pro coder!
Tips to Customise It
You just built an awesome JavaScript Weather App! Now, make it uniquely yours.
- Add More Details: Integrate sunrise/sunset times or a 5-day forecast. The API usually provides this extended data.
- Location Detection: Use the Geolocation API to detect the user’s current location. Then, automatically show their local weather.
- Themed Backgrounds: Change the background image or color based on weather conditions. Sunny day? Bright yellow background!
- Unit Conversion: Add a toggle for Celsius and Fahrenheit. Let users switch between their preferred temperature units.
- Save Favorite Cities: Implement local storage to save a list of favorite cities. This lets users access them quickly. You can learn more about local storage in our React Todo Local Storage App Tutorial.
Conclusion
Wow, you did it! You successfully built a functional and dynamic JavaScript Weather App. You mastered using the Fetch API. You also learned how to update the DOM with live data. This is a huge step in your web development journey. You now have a fantastic foundation. Feel proud of what you’ve created. Share it with your friends and family! Keep experimenting and building. The web development world is waiting for your next amazing creation!