Building an AI Generator UI is an exciting project. The AI Generator UI is a crucial aspect of any content creation tool. It provides users with an interface to input their requirements and receive generated content.
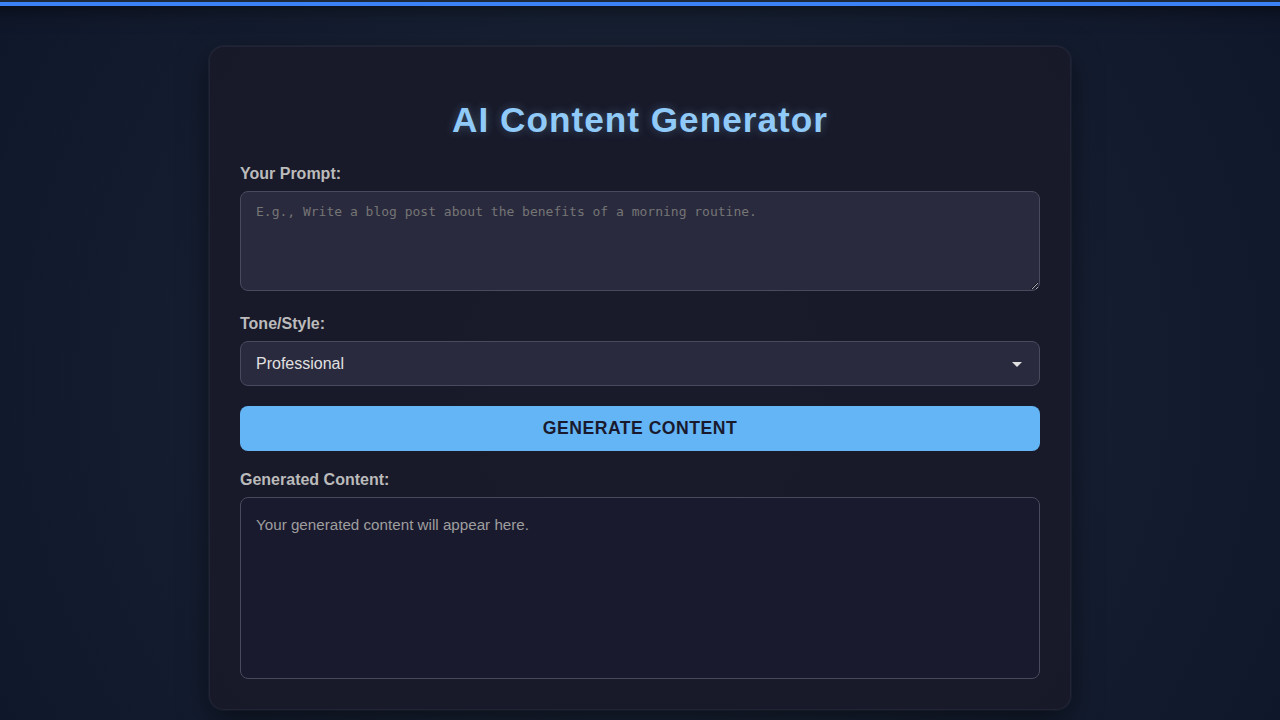
What We Are Building
Design inspiration for AI generator UIs comes from various sources. The trend of using AI in content creation is on the rise. You can use this UI in blogging platforms, social media, or even e-learning websites.
A well-designed AI generator UI can make a significant difference in the user experience. For instance, a simple and intuitive interface can encourage users to generate more content. Moreover, it can also help reduce errors and improve overall productivity.
As Chatbot UI Design: HTML, CSS & JS Interface Guide suggests, a good UI design should be conversational and engaging. This principle applies to AI generator UIs as well.
HTML Structure
The HTML structure for the AI generator UI will consist of a container element that holds the input field, a button to trigger the content generation, and a display area for the generated content.
index.html
<!DOCTYPE html>
<html lang="en">
<head>
    <meta charset="UTF-8">
    <meta name="viewport" content="width=device-width, initial-scale=1.0">
    <title>AI Content Generator</title>
    <link rel="stylesheet" href="styles.css">
</head>
<body>
    <div class="ai-generator-container">
        <h1>AI Content Generator</h1>

        <div class="input-group">
            <label for="promptInput">Your Prompt:</label>
            <textarea id="promptInput" placeholder="E.g., Write a blog post about the benefits of a morning routine."></textarea>
        </div>

        <div class="input-group">
            <label for="toneSelect">Tone/Style:</label>
            <select id="toneSelect">
                <option value="professional">Professional</option>
                <option value="creative">Creative</option>
                <option value="casual">Casual</option>
                <option value="persuasive">Persuasive</option>
                <option value="informative">Informative</option>
            </select>
        </div>

        <button id="generateBtn">Generate Content</button>

        <div class="loading-spinner" id="loadingSpinner"></div>

        <div class="input-group">
            <label for="outputArea">Generated Content:</label>
            <div id="outputArea">Your generated content will appear here.</div>
        </div>
    </div>
    <script src="script.js"></script>
</body>
</html>
script.js
document.addEventListener('DOMContentLoaded', () => {
    const generateBtn = document.getElementById('generateBtn');
    const promptInput = document.getElementById('promptInput');
    const toneSelect = document.getElementById('toneSelect');
    const outputArea = document.getElementById('outputArea');
    const loadingSpinner = document.getElementById('loadingSpinner');

    generateBtn.addEventListener('click', () => {
        const prompt = promptInput.value.trim();
        const tone = toneSelect.value;

        if (!prompt) {
            outputArea.textContent = 'Please enter a prompt to generate content.';
            outputArea.style.color = '#ff8a80'; // Error color
            return;
        }

        outputArea.style.color = '#9e9e9e'; // Reset color
        outputArea.textContent = 'Generating...';
        generateBtn.disabled = true;
        loadingSpinner.classList.add('active');

        // Simulate API call to an AI content generation service
        // In a real application, you would make an actual fetch() or XMLHttpRequest here
        // For demonstration, we use a setTimeout to simulate a delay and generate dummy text
        setTimeout(() => {
            let generatedText;
            switch(tone) {
                case 'professional':
                    generatedText = `Subject: Comprehensive Analysis of "${prompt}"\n\nDear Reader,\n\nThis document presents a detailed and professional examination of the topic "${prompt}". Our findings indicate a robust correlation between [Concept A] and [Concept B], suggesting significant implications for [Industry/Field]. Further research is recommended to explore [Future Direction].\n\nBest regards,\nAI Systems`;
                    break;
                case 'creative':
                    generatedText = `Unleash your imagination! For "${prompt}":\n\nIn a realm where "${prompt}" reigns supreme, a symphony of ideas began to dance. Colors swirled, concepts blossomed, and a tapestry of words wove itself into existence. Let your mind wander through the boundless possibilities this creation offers, a testament to pure ingenuity.\n\nEnjoy the journey!`;
                    break;
                case 'casual':
                    generatedText = `Hey there! Here's some quick content for "${prompt}":\n\nSo, you wanted something about "${prompt}"? No problem! Basically, it's all about keeping things simple and chill. Think of it as your friendly guide to [Topic]. Super easy, super fun!\n\nCheers!`;
                    break;
                case 'persuasive':
                    generatedText = `Act Now! Discover the undeniable power of "${prompt}"!\n\nAre you ready to transform your approach to [Related Area]? "${prompt}" is not just a concept; it's a solution designed to empower you, drive results, and unlock unparalleled potential. Don't miss out on this opportunity to elevate your success.\n\nTransform your future today!`;
                    break;
                case 'informative':
                default:
                    generatedText = `Here is your informative content based on "${prompt}":\n\n"${prompt}" refers to [definition or core concept]. It is characterized by [key feature 1], [key feature 2], and [key feature 3]. Understanding "${prompt}" is crucial for [reason]. Applications include [example 1] and [example 2]. This overview provides a foundational understanding of the subject.`;
                    break;
            }

            outputArea.textContent = generatedText;
            generateBtn.disabled = false;
            loadingSpinner.classList.remove('active');
        }, 2500);
    });
});
CSS Styling
CSS styling will enhance the visual appeal of the AI generator UI. We’ll use CSS to add colors, fonts, and spacing to the elements.
styles.css
/* Basic Reset & Box Sizing */
*, *::before, *::after {
    box-sizing: border-box;
}

body {
    margin: 0;
    font-family: Arial, Helvetica, sans-serif;
    background: linear-gradient(135deg, #1a1a2e, #16213e, #0f3460);
    color: #e0e0e0;
    display: flex;
    justify-content: center;
    align-items: center;
    min-height: 100vh;
    overflow-x: hidden; /* Prevent horizontal scroll, allow vertical if content grows */
    max-width: 100vw;
}

.ai-generator-container {
    background-color: rgba(25, 25, 40, 0.85);
    border-radius: 15px;
    padding: 30px;
    box-shadow: 0 10px 30px rgba(0, 0, 0, 0.5), 0 0 0 1px rgba(255, 255, 255, 0.05);
    max-width: 800px;
    width: 90%;
    display: flex;
    flex-direction: column;
    gap: 20px;
    animation: fadeIn 1s ease-out;
    border: 1px solid rgba(40, 40, 60, 0.7);
    overflow: hidden; /* Ensure content within container doesn't overflow */
}

@keyframes fadeIn {
    from { opacity: 0; transform: translateY(20px); }
    to { opacity: 1; transform: translateY(0); }
}

h1 {
    color: #90caf9;
    text-align: center;
    margin-bottom: 5px;
    font-size: 2.2em;
    letter-spacing: 1px;
    text-shadow: 0 0 10px rgba(144, 202, 249, 0.3);
}

label {
    display: block;
    margin-bottom: 8px;
    color: #bbbbbb;
    font-weight: bold;
}

textarea, select {
    width: 100%;
    padding: 12px 15px;
    border: 1px solid #4a4a5e;
    border-radius: 8px;
    background-color: #2a2a3e;
    color: #e0e0e0;
    font-size: 1em;
    box-sizing: border-box;
    resize: vertical;
    min-height: 100px;
    transition: border-color 0.3s ease, box-shadow 0.3s ease;
}

textarea:focus, select:focus {
    border-color: #64b5f6;
    outline: none;
    box-shadow: 0 0 0 3px rgba(100, 181, 246, 0.3);
}

select {
    appearance: none;
    -webkit-appearance: none;
    -moz-appearance: none;
    background-image: url('data:image/svg+xml;utf8,<svg fill="%23e0e0e0" height="24" viewBox="0 0 24 24" width="24" xmlns="http://www.w3.org/2000/svg"><path d="M7 10l5 5 5-5z"/><path d="M0 0h24v24H0z" fill="none"/></svg>');
    background-repeat: no-repeat;
    background-position: right 10px center;
    padding-right: 35px;
    min-height: 45px;
}

button {
    background-color: #64b5f6;
    color: #1a1a2e;
    border: none;
    padding: 12px 25px;
    border-radius: 8px;
    font-size: 1.1em;
    font-weight: bold;
    cursor: pointer;
    transition: background-color 0.3s ease, transform 0.2s ease, box-shadow 0.3s ease;
    width: 100%;
    text-transform: uppercase;
    letter-spacing: 0.5px;
}

button:hover {
    background-color: #42a5f5;
    transform: translateY(-2px);
    box-shadow: 0 5px 15px rgba(66, 165, 245, 0.4);
}

button:active {
    transform: translateY(0);
    box-shadow: 0 2px 8px rgba(66, 165, 245, 0.3);
}

#outputArea {
    background-color: #1a1a2e;
    border: 1px solid #4a4a5e;
    border-radius: 8px;
    padding: 15px;
    min-height: 150px;
    color: #9e9e9e;
    font-size: 0.95em;
    line-height: 1.6;
    white-space: pre-wrap;
    overflow-y: auto;
    word-wrap: break-word;
}

.loading-spinner {
    border: 4px solid rgba(255, 255, 255, 0.2);
    border-top: 4px solid #64b5f6;
    border-radius: 50%;
    width: 24px;
    height: 24px;
    animation: spin 1s linear infinite;
    margin: 15px auto 0;
    display: none;
}

.loading-spinner.active {
    display: block;
}

@keyframes spin {
    0% { transform: rotate(0deg); }
    100% { transform: rotate(360deg); }
}
Step-by-Step Breakdown
Setting up the HTML
We start by creating the basic HTML structure. Then, we add the necessary elements such as input fields, buttons, and display areas.
Adding CSS Styles
Next, we add CSS styles to the HTML elements. This is where we define the layout, colors, and fonts for the AI generator UI.
JavaScript Implementation
Finally, we implement the JavaScript code that handles the content generation. This involves using AI algorithms or APIs to generate content based on user input.
Making It Responsive
To make the AI generator UI responsive, we use media queries and a mobile-first approach. This ensures that the UI looks good on various devices and screen sizes.
As per the guidelines on MDN, we should prioritize mobile devices when designing responsive layouts.
Final Output
The final output of the AI generator UI should be visually appealing and functional. It should have a clean and simple design that makes it easy for users to generate content.
Additionally, the UI should also provide features such as notification systems to inform users when the content is generated.
AI generator UIs have the potential to revolutionize the way we create content. With the right design and implementation, they can make content creation faster, easier, and more efficient.
Conclusion
In conclusion, building an AI generator UI with HTML, CSS, and JavaScript is an exciting project. By following the steps outlined in this article, you can create a functional and visually appealing AI generator UI.
Moreover, you can also experiment with different AI algorithms and APIs to enhance the content generation capabilities. For more information on accessible design, check out Accessible Tabs: HTML, CSS & JS Interface Design.
Visit CSS-Tricks for more web development tutorials and tips.
Remember, the key to a successful AI generator UI is a well-designed interface that provides a seamless user experience.