JavaScript Fetch API Tutorial: HTML, CSS & JS Guide
Hey there, awesome coder! Have you ever wanted to bring dynamic content to your web pages? If so, the JavaScript Fetch API is your perfect tool. Today, we’re building a super cool user profile card. It will fetch live user data from an external source. You’ll see how incredibly easy it is to display that data on your site!
What We Are Building
We are going to create a simple, yet powerful, user profile card. Imagine clicking a button and instantly seeing new user information! This includes an avatar, a name, and their location. It’s incredibly useful for dynamic content. Think about user directories or even a basic contact list. Our card will look clean and modern. It will adapt nicely to different screen sizes too. This project will make you feel like a web development wizard. You’ll truly see your page come alive with data!
HTML Structure
First, we need a basic HTML structure for our profile card. This HTML sets up containers for our data. We’ll have a main card container. Inside, we’ll place an image for the avatar. There will also be a few paragraphs for the text information. Don’t forget a button to trigger our data fetch! It’s quite straightforward, so let’s get it set up.
index.html
<!DOCTYPE html>
<html lang="en">
<head>
    <meta charset="UTF-8">
    <meta name="viewport" content="width=device-width, initial-scale=1.0">
    <title>JavaScript Fetch API Tutorial</title>
    <link rel="stylesheet" href="styles.css">
</head>
<body>
    <div class="container">
        <h1>JavaScript Fetch API Tutorial</h1>
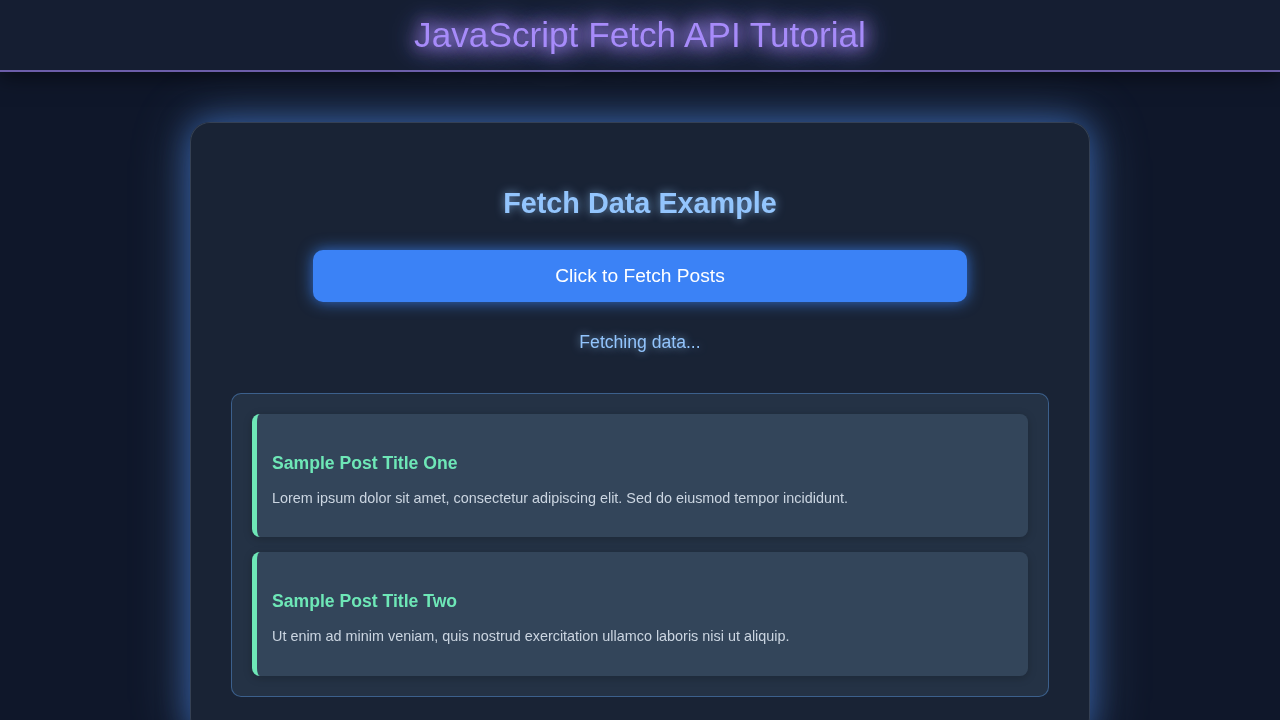
        <p>Learn how to use the browser's native <strong>Fetch API</strong> to make HTTP requests and handle responses in your web applications. This tutorial demonstrates fetching data from a public API (JSONPlaceholder).</p>

        <!-- Button to trigger the fetch request -->
        <button id="fetchButton">Fetch Sample Posts</button>

        <!-- Loading message, hidden by default -->
        <div id="loadingMessage" class="message loading-message">Loading data...</div>

        <!-- Error message, hidden by default -->
        <div id="errorMessage" class="message error-message"></div>

        <!-- Container to display fetched data -->
        <div id="dataContainer" class="data-container">
            <p>Click the button above to fetch some sample posts from JSONPlaceholder.</p>
        </div>
    </div>

    <!-- Link to the JavaScript file -->
    <script src="script.js"></script>
</body>
</html>
CSS Styling
Next, let’s make our profile card look fantastic! These CSS rules will style our card. They will center it on the page. We’ll also add some nice shadows for depth. The styles ensure everything is readable and appealing. Plus, we are making it responsive. So, it will look good on any device. Give your card a professional and friendly vibe with these styles.
Pro Tip: Responsive design is super important! Using relative units like percentages or
remfor fonts helps your layout adapt beautifully across devices. It makes your site accessible to everyone.
styles.css
/* Global Box-Sizing and Basic Reset */
*, *::before, *::after {
    box-sizing: border-box; /* Ensures consistent box model */
    margin: 0;
    padding: 0;
}

body {
    font-family: Arial, Helvetica, sans-serif; /* Safe sans-serif font stack */
    background-color: #1a202c; /* Dark background color */
    color: #e2e8f0; /* Light text color for contrast */
    line-height: 1.6; /* Improved readability */
    display: flex;
    justify-content: center; /* Center content horizontally */
    align-items: flex-start; /* Align content to the top */
    min-height: 100vh; /* Full viewport height */
    padding: 20px; /* Padding around the content */
    overflow-x: hidden; /* Prevent horizontal scrollbars */
}

.container {
    background-color: rgba(30, 41, 59, 0.7); /* Semi-transparent dark background for glass effect */
    border-radius: 12px; /* Rounded corners */
    padding: 30px;
    width: 100%;
    max-width: 800px; /* Max width for readability on large screens */
    box-shadow: 0 4px 15px rgba(0, 0, 0, 0.3); /* Subtle shadow */
    border: 1px solid rgba(71, 85, 105, 0.5); /* Light border */
    backdrop-filter: blur(8px); /* Glassmorphism blur effect */
    -webkit-backdrop-filter: blur(8px); /* Safari compatibility */
    overflow: hidden; /* Ensures content respects border-radius */
}

h1 {
    color: #93c5fd; /* Light blue heading */
    text-align: center;
    margin-bottom: 20px;
    text-shadow: 0 0 8px rgba(147, 197, 253, 0.7); /* Neon glow effect */
}

p {
    margin-bottom: 15px;
}

/* Button Styling */
button {
    display: block;
    width: 100%;
    padding: 12px 20px;
    margin-top: 20px;
    margin-bottom: 20px;
    background-color: #3b82f6; /* Primary blue button color */
    color: #ffffff;
    border: none;
    border-radius: 8px;
    font-size: 1.1em;
    cursor: pointer;
    transition: background-color 0.3s ease, transform 0.2s ease, box-shadow 0.3s ease; /* Smooth transitions */
    box-shadow: 0 0 10px rgba(59, 130, 246, 0.5); /* Neon glow for button */
}

button:hover {
    background-color: #2563eb; /* Darker blue on hover */
    transform: translateY(-2px); /* Slight lift effect */
    box-shadow: 0 0 15px rgba(59, 130, 246, 0.8); /* Enhanced glow on hover */
}

/* Message Styling (Loading/Error) */
.message {
    padding: 10px;
    margin-bottom: 15px;
    border-radius: 8px;
    text-align: center;
    display: none; /* Hidden by default, shown via JavaScript */
    font-weight: bold;
}

.loading-message {
    background-color: rgba(147, 197, 253, 0.2); /* Light blue background for loading */
    color: #93c5fd;
    border: 1px solid #93c5fd;
    box-shadow: 0 0 5px rgba(147, 197, 253, 0.5); /* Glow for loading */
}

.error-message {
    background-color: rgba(252, 165, 165, 0.2); /* Light red background for error */
    color: #ef4444;
    border: 1px solid #ef4444;
    box-shadow: 0 0 5px rgba(239, 68, 68, 0.5); /* Glow for error */
}

/* Data Display Container */
.data-container {
    margin-top: 20px;
    padding-top: 15px;
    border-top: 1px solid rgba(71, 85, 105, 0.5); /* Separator line */
}

.data-container h2 {
    color: #a78bfa; /* Light purple for data section heading */
    margin-bottom: 15px;
    text-align: center;
    text-shadow: 0 0 5px rgba(167, 139, 250, 0.7); /* Glow for data heading */
}

/* Individual Post Item Styling */
.post-item {
    background-color: rgba(45, 62, 80, 0.6); /* Slightly lighter background for items */
    border: 1px solid rgba(96, 165, 250, 0.3);
    border-radius: 8px;
    padding: 15px;
    margin-bottom: 10px;
    box-shadow: 0 2px 8px rgba(0, 0, 0, 0.2); /* Subtle shadow */
    transition: transform 0.2s ease, box-shadow 0.2s ease;
}

.post-item:last-child {
    margin-bottom: 0;
}

.post-item:hover {
    transform: translateY(-3px); /* Slight lift on hover */
    box-shadow: 0 4px 12px rgba(0, 0, 0, 0.3); /* Enhanced shadow on hover */
}

.post-item h3 {
    color: #6ee7b7; /* Light green for post titles */
    margin-bottom: 8px;
    font-size: 1.2em;
}

.post-item p {
    color: #cbd5e1; /* Lighter text for post body */
    font-size: 0.95em;
    margin-bottom: 0;
}
Bringing Data to Life with JavaScript Fetch API
Here’s the cool part: the JavaScript! This code will connect to an external API. It will then grab some user data. Finally, it displays that data right on our card. We’ll use the powerful async/await syntax. This makes our code much easier to read. It’s a fantastic way to handle asynchronous operations. You’ll love how clear your fetching code becomes.
script.js
document.addEventListener('DOMContentLoaded', () => {
    // Get references to the DOM elements
    const fetchButton = document.getElementById('fetchButton');
    const dataContainer = document.getElementById('dataContainer');
    const loadingMessage = document.getElementById('loadingMessage');
    const errorMessage = document.getElementById('errorMessage');

    // Add event listener to the fetch button
    fetchButton.addEventListener('click', fetchData);

    /**
     * Asynchronous function to fetch data from an API using Fetch API.
     */
    async function fetchData() {
        // Clear previous data and error messages
        dataContainer.innerHTML = '';
        errorMessage.textContent = '';
        // Display the loading message
        loadingMessage.style.display = 'block';

        try {
            // Make a GET request to JSONPlaceholder for a limited number of posts
            const response = await fetch('https://jsonplaceholder.typicode.com/posts?_limit=5');

            // Check if the HTTP response was successful (status code 200-299)
            if (!response.ok) {
                // If not successful, throw an error with the status
                throw new Error(`HTTP error! Status: ${response.status}`);
            }

            // Parse the JSON response body
            const data = await response.json();

            // Display a heading for the fetched data
            dataContainer.innerHTML = '<h2>Fetched Data:</h2>';

            // Iterate over the fetched posts and create elements to display them
            data.forEach(post => {
                const postDiv = document.createElement('div');
                postDiv.classList.add('post-item');
                postDiv.innerHTML = `
                    <h3>${post.title}</h3>
                    <p>${post.body}</p>
                `;
                dataContainer.appendChild(postDiv);
            });

        } catch (error) {
            // Catch any errors during the fetch operation or response processing
            console.error('Fetch error:', error);
            // Display an user-friendly error message
            errorMessage.textContent = `Failed to load data: ${error.message}. Please try again.`;
            errorMessage.style.display = 'block'; // Make sure error message is visible
            dataContainer.innerHTML = '<p>No data could be loaded.</p>'; // Indicate no data
        } finally {
            // This block always executes, regardless of try/catch outcome
            // Hide the loading message
            loadingMessage.style.display = 'none';
        }
    }
});
How It All Works Together
Now, let’s break down how these pieces combine. We’re building a truly dynamic web page. You’ve set up the visual elements. Now, we add the brain to fetch and display information. We’ll go step-by-step through the JavaScript logic. This will show how your code talks to the internet. Then it brings that data back home.
Making Requests with the JavaScript Fetch API
The core of our project is the fetchUserProfile function. This function uses the JavaScript Fetch API. It sends a request to https://randomuser.me/api/. This API provides random user data. We use async before our function. This tells JavaScript it will perform asynchronous operations. Inside, await pauses execution until promises resolve. The first await fetch(url) call gets the raw response. Then, await response.json() parses that response. This turns it into a JavaScript object. It’s a very clean way to handle network requests. You get your data in a structured format.
Updating the DOM Dynamically
Once we have our user data, we need to show it. We access specific elements on our HTML page. This is done using document.getElementById(). For example, we select the avatar image. We also select the name, email, and location paragraphs. The data comes back in an array. So, we access data.results[0]. This gives us the first user object. We then update the src attribute of the image. We also update the textContent of the paragraphs. It’s important to remember these are simple DOM manipulations. You are changing what the user sees.
Handling Errors Gracefully
Network requests can sometimes fail. Maybe the API is down. Or perhaps there’s a problem with your internet connection. Our code uses a try...catch block. This is a crucial programming concept. The code inside try runs first. If an error occurs, the code jumps to the catch block. This prevents your entire application from crashing. Instead, we can log the error. We can also display a friendly message to the user. This makes your application more robust. You are preparing for unexpected issues.
Event Listener for User Interaction
We want users to get new profiles on demand. That’s why we added a button. We attach an 'click' event listener to this button. When the button is clicked, our fetchUserProfile function runs. This simple mechanism makes your page interactive. It allows users to control the content. You can add event listeners to many different elements. This is how you build dynamic user experiences. It gives your users direct interaction.
Remember This: The Fetch API is modern and promise-based. It replaced older methods like XMLHttpRequest. It offers a powerful, flexible way to make network requests. Always remember to handle both successful responses and potential errors!
Tips to Customise It
You’ve built a fantastic dynamic profile card! But why stop there? Here are some ideas to make it even better:
- Display More Data: The Random User API provides much more! Try adding fields like phone number or age. You can even display the user’s full address. Just update your HTML and JavaScript.
- Loading State: Add a ‘Loading…’ message or spinner. This appears while data is being fetched. It gives users visual feedback. You might use a simple
<div>that you show and hide. - Multiple Cards: Instead of one card, fetch several user profiles. Display them in a grid layout. This could be a gallery of users. You could even build a simple contact list. Check out our guide on Responsive Navbar Tailwind CSS for layout ideas!
- Another API: Explore other public APIs! Maybe fetch weather data. Or try a joke API. The principles remain the same. This skill is very transferable. You could even build a small React CRUD App later. Fetching data is a core part of that too. If you are curious about fetching data with Python, check out our article on the Python Requests Library Explained.
Conclusion
Wow, you just built something amazing! You’ve mastered the basics of the JavaScript Fetch API. You can now grab data from anywhere on the web. Then you display it beautifully on your own page. This is a fundamental skill for modern web development. You’ve taken a huge step forward in your coding journey. Feel proud of what you’ve accomplished today! Now, go forth and build more incredible things. We can’t wait to see what you create. Share your awesome project with us and your friends!