React Debounced Search Input with Hooks – JSX Tutorial
Hey there, fellow coders! If you’ve ever wanted to build a powerful React Debounced Search input but felt a bit lost, you are in the perfect place. We’re going to create a smooth, efficient search component using React Hooks. This will truly upgrade your user’s experience and your app’s performance. It is a fantastic skill to add to your toolkit, and we will build it step by step!
What We Are Building
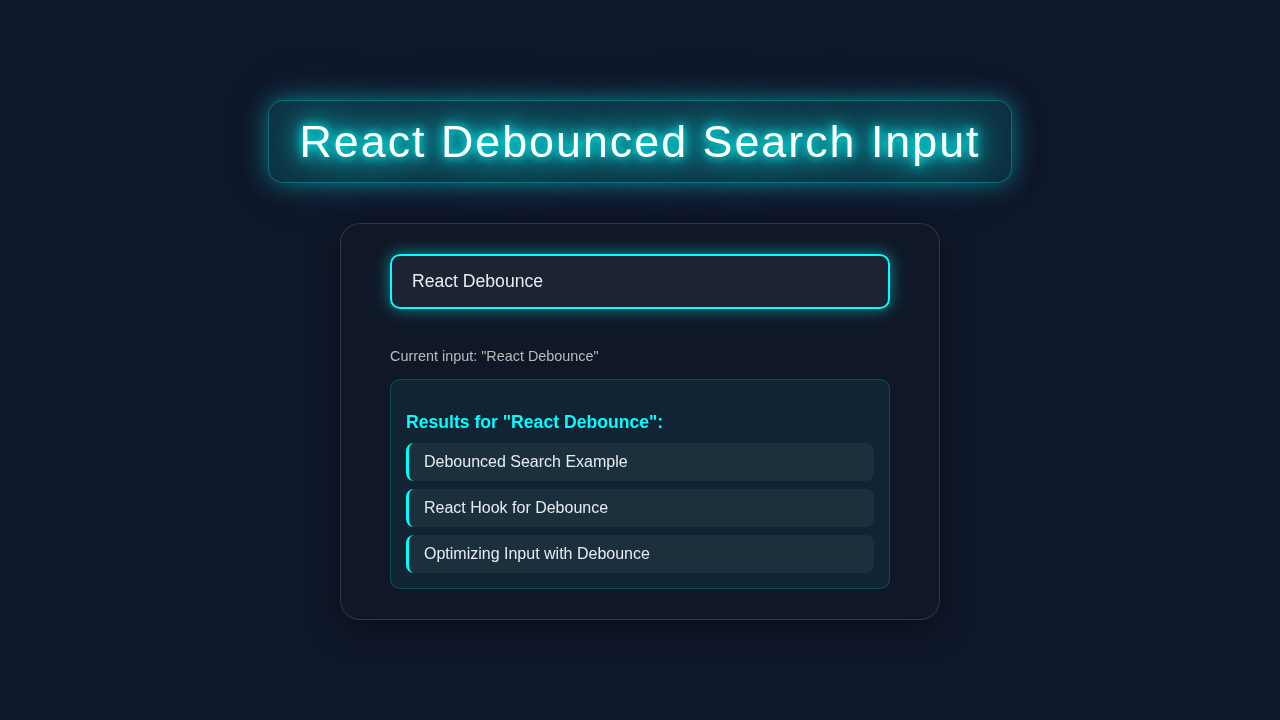
Today, we are building a sleek search input field. Imagine typing into a search box. Normally, every single keystroke triggers a search request. This can be very inefficient. Our solution will wait a moment after you stop typing. Only then will it send your search query. This ‘pause’ makes your application much faster. It reduces unnecessary network requests. It gives your users a super responsive feel. This component is useful in almost any app with a search feature!
HTML Structure
First, we need a simple base for our search component. It will be a basic div element to wrap everything. Inside, we will have our input field. This input is where users will type their search terms. We will also include a paragraph to show the current search term. This helps us visualize the debouncing in action.
public/index.html
<!DOCTYPE html>
<html lang="en">
<head>
  <meta charset="UTF-8" />
  <meta name="viewport" content="width=device-width, initial-scale=1.0" />
  <meta name="description" content="Learn how to create a debounced search input in React with custom hooks for performance optimization." />
  <title>React Debounced Search Input Tutorial</title>
</head>
<body>
  <noscript>You need to enable JavaScript to run this app.</noscript>
  <div id="root"></div>
  <!--
    This HTML file is a template for a React application.
    If you are using Create React App or a similar bundler (like Vite),
    this file typically resides in the 'public' directory.
    The React application is injected into the <div id="root"></div> by your build system.
    No direct <script> import for React components is typically needed here;
    the bundler handles that via your main entry point file (e.g., src/main.jsx).
  -->
</body>
</html>
CSS Styling
Next, let’s make our search input look good. Good styling enhances the user experience. We will add some clean, modern CSS to our component. This will make it easy to read and pleasant to use. Don’t worry, the styles are straightforward. They just add a bit of polish to our functional component.
src/styles.css
/* Global styles for the body and base typography */
body {
  margin: 0;
  font-family: Arial, Helvetica, sans-serif; /* Safe, standard fonts */
  -webkit-font-smoothing: antialiased;
  -moz-osx-font-smoothing: grayscale;
  background-color: #0d1117; /* Dark background color */
  color: #e6edf3; /* Light text color for contrast */
  display: flex;
  justify-content: center; /* Center content horizontally */
  align-items: center; /* Center content vertically */
  min-height: 100vh; /* Full viewport height */
  box-sizing: border-box; /* Include padding and border in the element's total width and height */
  overflow: hidden; /* Prevent scrollbars from appearing */
}

/* Main application container styling */
.app-container {
  display: flex;
  flex-direction: column;
  align-items: center;
  max-width: 90%; /* Responsive max width */
  width: 600px; /* Fixed width for larger screens */
  padding: 30px;
  /* Glassmorphism effect */
  background: rgba(17, 25, 40, 0.75); /* Semi-transparent dark background */
  border-radius: 20px;
  border: 1px solid rgba(255, 255, 255, 0.125); /* Subtle white border */
  box-shadow: 0 8px 32px 0 rgba(0, 0, 0, 0.37); /* Shadow for depth */
  backdrop-filter: blur(10px);
  -webkit-backdrop-filter: blur(10px);
  text-align: center;
  box-sizing: border-box;
}

.main-title {
  font-size: 2.5em;
  color: #fff;
  /* Neon glow effect for the title */
  text-shadow: 0 0 10px #0ff, 0 0 20px #0ff, 0 0 30px #0ff;
  margin-bottom: 30px;
  letter-spacing: 1px;
}

.search-widget {
  width: 100%;
  max-width: 500px;
  display: flex;
  flex-direction: column;
  align-items: center;
}

.search-input {
  width: 100%;
  padding: 15px 20px;
  font-size: 1.1em;
  border: 2px solid #333; /* Default border color */
  border-radius: 10px;
  background-color: rgba(255, 255, 255, 0.05); /* Very subtle white background */
  color: #e6edf3;
  outline: none; /* Remove default outline */
  transition: border-color 0.3s ease, box-shadow 0.3s ease;
  box-sizing: border-box;
}

.search-input::placeholder {
  color: #a0a0a0; /* Placeholder text color */
}

.search-input:focus {
  border-color: #0ff; /* Neon blue focus border */
  box-shadow: 0 0 15px rgba(0, 255, 255, 0.5); /* Neon glow on focus */
}

.search-info {
  margin-top: 25px;
  width: 100%;
  text-align: left;
  min-height: 150px; /* Ensure consistent height even with no results */
}

.current-term {
  font-size: 0.9em;
  color: #bbb;
  margin-bottom: 15px;
}

.status-message {
  font-size: 1.1em;
  margin-bottom: 10px;
}

.status-message.searching {
  color: #ffcc00; /* Yellow color for searching state */
  font-style: italic;
  text-shadow: 0 0 5px rgba(255, 204, 0, 0.3); /* Subtle glow for searching */
}

.status-message.initial-message {
  color: #888; /* Muted color for initial message */
}

.status-message.found-results {
  color: #0ff; /* Neon blue for results found status */
  font-weight: bold;
}

.results-container {
  margin-top: 15px;
  padding: 15px;
  background: rgba(0, 255, 255, 0.05); /* Light neon background for the results box */
  border-radius: 10px;
  border: 1px solid rgba(0, 255, 255, 0.2); /* Subtle neon border */
  backdrop-filter: blur(5px);
  -webkit-backdrop-filter: blur(5px);
}

.results-list {
  list-style: none;
  padding: 0;
  margin: 10px 0 0 0;
}

.result-item {
  background-color: rgba(255, 255, 255, 0.05);
  padding: 10px 15px;
  margin-bottom: 8px;
  border-radius: 8px;
  border-left: 3px solid #0ff; /* Accent border on results */
  transition: background-color 0.2s ease; /* Smooth hover effect */
}

.result-item:last-child {
  margin-bottom: 0;
}

.result-item:hover {
  background-color: rgba(255, 255, 255, 0.1); /* Slightly brighter on hover */
}

.no-results {
  color: #f00; /* Red color for no results message */
  font-style: italic;
  margin-top: 10px;
}

/* Visually hidden utility class for screen readers */
.sr-only {
  position: absolute;
  width: 1px;
  height: 1px;
  padding: 0;
  margin: -1px;
  overflow: hidden;
  clip: rect(0, 0, 0, 0);
  white-space: nowrap;
  border-width: 0;
}
JavaScript (The React Component)
Now for the cool part: the React JavaScript! We will use functional components and Hooks. Specifically, we will use useState to manage our input value. We will also use useEffect to implement the debouncing logic. This is where the magic happens. We will make sure our React Debounced Search is both functional and efficient.
src/main.jsx
import React from 'react';
import ReactDOM from 'react-dom/client';
import App from './App.jsx'; // Import the main application component
import './styles.css'; // Import the global styles for the application

// Get the root DOM element where the React application will be mounted
const root = ReactDOM.createRoot(document.getElementById('root'));

// Render the main App component into the root element.
// React.StrictMode helps identify potential problems in an application.
// It activates additional checks and warnings for its descendants.
root.render(
  <React.StrictMode>
    <App />
  </React.StrictMode>
);
src/useDebounce.js
import { useState, useEffect } from 'react';

/**
 * A custom React hook that debounces a value.
 * Useful for delaying state updates, like search inputs, to reduce API calls or expensive computations.
 *
 * @param {any} value - The value to debounce. This is typically a state variable that changes frequently.
 * @param {number} delay - The delay in milliseconds after which the value will be updated.
 * @returns {any} The debounced value, which only updates after the specified delay has passed without the original 'value' changing.
 */
export function useDebounce(value, delay) {
  // State to store the debounced value
  const [debouncedValue, setDebouncedValue] = useState(value);

  useEffect(() => {
    // Set a timeout to update the debounced value after the specified delay.
    // This timeout will be cleared and reset if 'value' changes before the delay passes.
    const handler = setTimeout(() => {
      setDebouncedValue(value);
    }, delay);

    // Cleanup function: This runs if the 'value' changes (re-rendering the effect)
    // or if the component unmounts. It clears the previous timeout,
    // ensuring that the debounced value is only updated once the input has settled.
    return () => {
      clearTimeout(handler);
    };
  }, [value, delay]); // Only re-run if 'value' or 'delay' changes

  return debouncedValue;
}
src/App.jsx
import React, { useState } from 'react';
import { useDebounce } from './useDebounce'; // Import our custom debounce hook

/**
 * App component demonstrating a debounced search input.
 * It allows users to type, but the actual 'search' operation (simulated API call)
 * only triggers after a short delay of inactivity, thanks to the useDebounce hook.
 */
function App() {
  const [searchTerm, setSearchTerm] = useState(''); // State for the immediate input value
  // Debounce the searchTerm with a 500ms delay. `debouncedSearchTerm` will update
  // only after 500ms of inactivity in `searchTerm`.
  const debouncedSearchTerm = useDebounce(searchTerm, 500);

  const [results, setResults] = useState([]); // State to store search results
  const [isSearching, setIsSearching] = useState(false); // State to indicate if a search is in progress

  // Effect to perform the search whenever the debouncedSearchTerm changes.
  // This effect effectively acts as the 'API call' or heavy computation trigger.
  React.useEffect(() => {
    // Only trigger search if debouncedSearchTerm is not empty
    if (debouncedSearchTerm) {
      setIsSearching(true);
      // Simulate an API call with a brief network delay (e.g., 300ms)
      const simulateApiCall = setTimeout(() => {
        console.log(`Performing search for: "${debouncedSearchTerm}"`);
        // In a real application, you would make an actual `fetch` or `axios` call here.
        // For demonstration, we'll just return a mock array of results.
        const mockResults = [
          `Result 1 for "${debouncedSearchTerm}" - Item A`,
          `Result 2 for "${debouncedSearchTerm}" - Item B`,
          `Result 3 for "${debouncedSearchTerm}" - Item C`,
        ];
        setResults(mockResults);
        setIsSearching(false);
      }, 300); // Simulate network latency

      // Cleanup function: if `debouncedSearchTerm` changes again before the simulated
      // API call finishes, clear the previous timeout to avoid outdated results.
      return () => clearTimeout(simulateApiCall);
    } else {
      // If debouncedSearchTerm is empty (input cleared), reset results and search status
      setResults([]);
      setIsSearching(false);
    }
  }, [debouncedSearchTerm]); // Depend on debouncedSearchTerm; effect runs only when it changes

  // Handler for the input change event. Updates `searchTerm` immediately.
  const handleInputChange = (event) => {
    setSearchTerm(event.target.value);
  };

  return (
    <div className="app-container">
      <h1 className="main-title">React Debounced Search Input</h1>

      <div className="search-widget">
        {/* Accessible label for the search input */}
        <label htmlFor="search-input" className="sr-only">Search</label>
        <input
          id="search-input"
          type="text"
          placeholder="Type to search..."
          value={searchTerm} // Binds directly to the immediate searchTerm state
          onChange={handleInputChange}
          className="search-input"
          aria-label="Search input field"
        />

        <div className="search-info">
          {/* Display current immediate input value */}
          {searchTerm && <p className="current-term">Current input: "{searchTerm}"</p>}

          {/* Display status messages based on search state */}
          {isSearching && debouncedSearchTerm ? (
            // Show searching status if debounced term exists and is searching
            <p className="status-message searching">Searching for "{debouncedSearchTerm}"...</p>
          ) : debouncedSearchTerm ? (
            // Show results if debounced term exists and search is not active
            <div className="results-container">
              <p className="status-message found-results">Results for "{debouncedSearchTerm}":</p>
              {results.length > 0 ? (
                <ul className="results-list">
                  {results.map((result, index) => (
                    <li key={index} className="result-item">{result}</li>
                  ))}
                </ul>
              ) : (
                <p className="no-results">No results found.</p>
              )}
            </div>
          ) : (
            // Initial message when input is empty or not yet debounced
            <p className="status-message initial-message">Start typing to see debounced search in action.</p>
          )}
        </div>
      </div>
    </div>
  );
}

export default App;
How It All Works Together
Let’s break down the different pieces of our application. We have built an interactive search component. It cleverly handles user input. It also optimizes data fetching. This section will guide you through each important step. You will understand the ‘why’ behind every line of code.
The Search Input Component
Our main component is called DebouncedSearchInput. It takes a single prop: onSearch. This prop is a function. It gets called when the debounced search term is ready. Inside, we use useState for two things. First, inputValue holds the text currently in the input field. Second, debouncedSearchTerm stores the value after our debounce delay. This separation is important. It allows us to show immediate input feedback. At the same time, we wait to trigger the actual search. When the input changes, we update inputValue right away. We use e.target.value for this. This keeps the UI responsive. It gives the user instant visual feedback as they type.
Introducing Debouncing
Debouncing is the heart of our performance improvement. It delays an action until a certain amount of time has passed. This time is counted since the last event. We implement this using the useEffect Hook. Specifically, we set a timer using setTimeout. This timer is cleared every time inputValue changes. So, the search function only runs if the user pauses typing for a set duration. Our delay is 500 milliseconds (half a second). You can adjust this value easily. Read more about setTimeout on MDN if you are curious. This approach prevents a flood of search requests. It makes your app much more efficient.
Pro Tip: Debouncing is not just for search inputs! You can use it for many other frequent events. Think about resizing windows, scrolling, or even validating forms. It’s a powerful pattern for optimizing performance in web applications.
Handling State and Side Effects
The useEffect Hook is crucial here. It manages our side effects. When inputValue changes, our useEffect runs. It first clears any existing timer. Then, it sets a new timer. If the timer completes without being cleared, debouncedSearchTerm gets updated. This then triggers the onSearch prop. This prop is what your parent component uses. It usually fetches real data. If you are interested in how state updates in React, check out our React Reconciliation Explained – Visual UI/UX Guide. Remember, cleaning up the timer is vital. It prevents memory leaks. It also ensures the correct behavior of the debounce. This pattern is often used in building components like our React Todo App Tutorial: Build with Functional Components & Hooks.
Fetching Data Efficiently
The parent component, App, demonstrates how to use DebouncedSearchInput. It also uses useState to hold the actualSearchTerm. This is the term we would send to an API. When onSearch is called from our input component, we update this state. This setup is flexible. It separates our search logic from data fetching. The App component then displays the current search term. In a real application, you would make an API call here. You could fetch relevant results based on actualSearchTerm. This efficient approach makes your app snappy. It avoids overwhelming your backend with too many requests. This is a big win for performance!
You Got This! Building complex components like this can feel challenging at first. But by breaking it down, you see how each small piece contributes to the overall solution. Keep experimenting and building – that’s how you truly learn!
Tips to Customise Your React Debounced Search
You have built a solid foundation. Now, let’s think about how you can make this component even better. Here are some ideas to customize your React Debounced Search input:
- Add Loading State: You could add a visual indicator. Show a spinner while the debounced search is active and awaiting results.
- Implement Error Handling: What if your API call fails? Add logic to display error messages to the user.
- Customizable Delay: Pass the
delayas a prop to yourDebouncedSearchInput. This makes it more flexible for different use cases. - Search Suggestions: Integrate a feature to display a dropdown of search suggestions as the user types. This often uses an API call based on the debounced term.
- Styling Enhancements: Explore more advanced CSS. You can add focus styles or a clear button. CSS-Tricks has great input styling examples.
Conclusion
Wow, you just built a high-performance React Debounced Search input! You’ve learned how to harness React Hooks. You also optimized an essential UI component. This skill is incredibly valuable. It will make your web applications faster and more user-friendly. You should feel very proud of this accomplishment. Go ahead and integrate this into your next project. Share what you built on social media. Tag us so we can celebrate your success! Keep coding and keep learning!