JavaScript AI Content Generator: HTML, CSS, Vanilla JS
Hey! If you have wanted to build an AI Content Generator but had no idea where to start, you are in the right place. Today, we will create something super cool. We will build a complete user interface. It uses basic HTML, stylish CSS, and powerful Vanilla JavaScript. Best of all, we will connect it to a public API. This lets us generate AI-powered text right in your browser. Get ready to code!
What We Are Building: Your Own AI Content Generator UI
Imagine needing a quick idea or a paragraph for a project. Our tool will help! We are building a clean interface. You will type a topic into an input field. Then, you will click a button. Instantly, our Keyboard Navigation: Patterns with HTML, CSS & JS friendly UI will fetch some AI-generated content. It will display it right on the page. This is incredibly useful for brainstorming. It is also perfect for generating placeholder text. Furthermore, it is a fantastic way to understand web development fundamentals. You’ll see HTML, CSS, and JavaScript working together. This project is both practical and fun!
HTML Structure: Setting the Stage
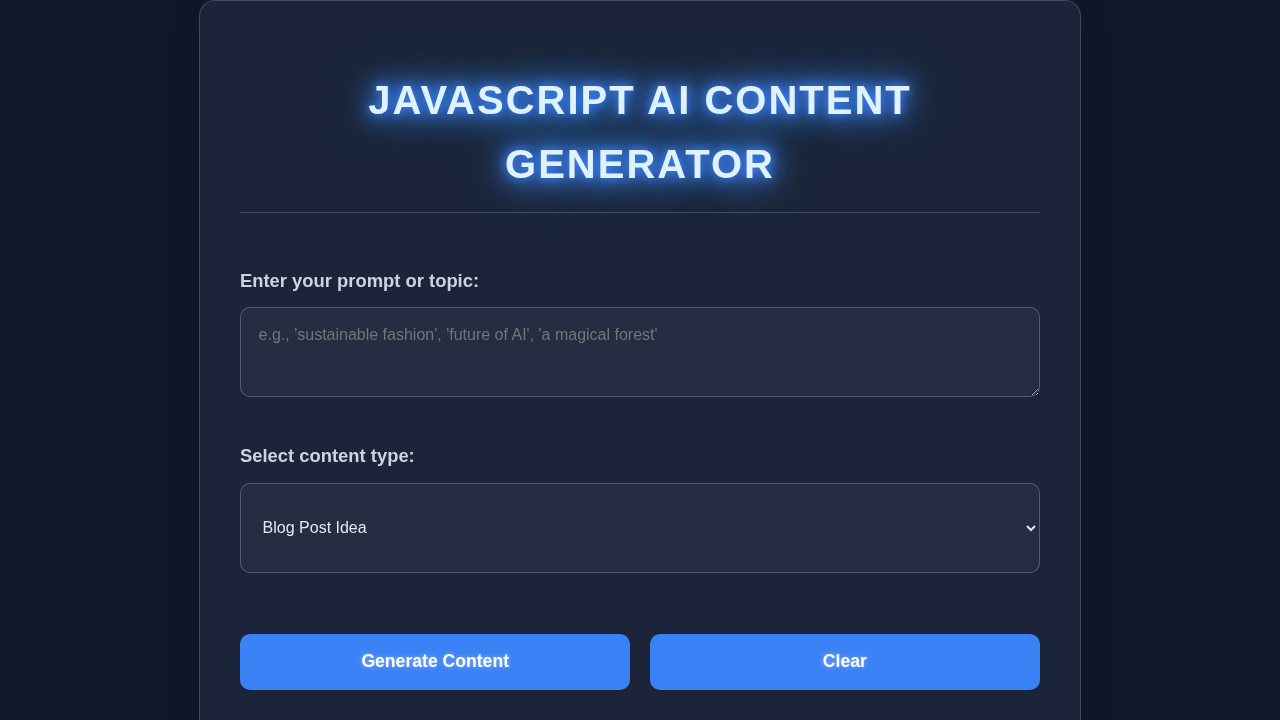
First, we need the foundation for our app. Our HTML will be simple and semantic. It will hold our main input field. It also includes the generation button. Finally, it creates the area for our generated content. This structure is easy to understand. It lays out the main elements. Here’s the cool part:
index.html
<!DOCTYPE html>
<html lang="en">
<head>
    <meta charset="UTF-8">
    <meta name="viewport" content="width=device-width, initial-scale=1.0">
    <title>JavaScript AI Content Generator</title>
    <link rel="stylesheet" href="styles.css">
</head>
<body>
    <div class="container">
        <h1 class="neon-glow-text">JavaScript AI Content Generator</h1>

        <div class="input-group">
            <label for="prompt-input">Enter your prompt or topic:</label>
            <textarea id="prompt-input" placeholder="e.g., 'sustainable fashion', 'future of AI', 'a magical forest'"></textarea>
        </div>

        <div class="input-group">
            <label for="content-type">Select content type:</label>
            <select id="content-type">
                <option value="blog-idea">Blog Post Idea</option>
                <option value="product-description">Product Description</option>
                <option value="creative-story">Creative Story Snippet</option>
            </select>
        </div>

        <div class="button-group">
            <button id="generate-button">Generate Content</button>
            <button id="clear-button">Clear</button>
        </div>

        <div id="loading-indicator">Generating content...</div>

        <div class="input-group">
            <label>Generated Content:</label>
            <div id="output-area">Your AI-generated content will appear here.</div>
        </div>
    </div>

    <script src="script.js"></script>
</body>
</html>
CSS Styling: Making It Look Great
Now, let’s make our AI Content Generator look fantastic! We will use CSS to style our elements. This makes the UI user-friendly and attractive. We will focus on readability. Clear interaction is also important. Don’t worry about complex designs here. We’ll keep it clean and modern. This will ensure a great user experience. Here is our CSS:
styles.css
/* styles.css */
/* Basic Reset and Global Styles */
body {
    margin: 0;
    padding: 0;
    box-sizing: border-box;
    background-color: #0f172a; /* Dark slate background */
    font-family: Arial, Helvetica, sans-serif; /* Safe font stack */
    display: flex;
    justify-content: center;
    align-items: center;
    min-height: 100vh;
    overflow: hidden; /* Prevent scrollbars */
    color: #e2e8f0; /* Light text color for readability */
    line-height: 1.6;
}

/* Main Container for the AI Generator */
.container {
    max-width: 100%; /* Ensure responsiveness */
    width: 800px; /* Optimal width for content */
    padding: 2.5rem; /* Generous padding */
    background: rgba(100, 116, 139, 0.15); /* Glassmorphism background */
    border-radius: 16px;
    box-shadow: 0 4px 30px rgba(0, 0, 0, 0.1); /* Subtle shadow */
    backdrop-filter: blur(12px); /* Blur effect for glassmorphism */
    -webkit-backdrop-filter: blur(12px); /* Safari compatibility */
    border: 1px solid rgba(148, 163, 184, 0.3); /* Semi-transparent border */
    display: flex;
    flex-direction: column;
    gap: 1.8rem; /* Spacing between elements */
    position: relative; /* For pseudo-elements glow */
    overflow: hidden; /* Keep internal elements within bounds */
}

/* Neon Glow for Title */
.neon-glow-text {
    color: #e0f2fe; /* Very light blue */
    text-shadow: 0 0 8px #3b82f6, /* Blue glow */
                 0 0 15px #3b82f6,
                 0 0 25px #3b82f6,
                 0 0 45px #60a5fa; /* Wider, lighter blue glow */
    animation: pulseGlow 2s infinite alternate; /* Pulsing effect */
    text-align: center;
    font-size: 2.5rem;
    margin-bottom: 1.5rem;
    padding-bottom: 1rem;
    border-bottom: 1px solid rgba(148, 163, 184, 0.3); /* Separator */
    text-transform: uppercase;
    letter-spacing: 2px;
}

@keyframes pulseGlow {
    0% { text-shadow: 0 0 8px #3b82f6, 0 0 15px #3b82f6, 0 0 25px #3b82f6, 0 0 35px #60a5fa; }
    100% { text-shadow: 0 0 10px #3b82f6, 0 0 18px #3b82f6, 0 0 30px #3b82f6, 0 0 50px #60a5fa; }
}

/* Input Group Styling */
.input-group {
    margin-bottom: 0.5rem; /* Spacing between input groups */
}

label {
    display: block;
    margin-bottom: 0.75rem;
    font-size: 1.15rem;
    color: #cbd5e1; /* Slightly darker text for labels */
    font-weight: bold;
}

textarea,
select {
    width: 100%;
    padding: 1.1rem;
    border-radius: 10px;
    border: 1px solid rgba(148, 163, 184, 0.4);
    background: rgba(100, 116, 139, 0.12); /* Slightly transparent background */
    color: #e2e8f0;
    font-family: Arial, Helvetica, sans-serif;
    font-size: 1rem;
    resize: vertical; /* Allow vertical resizing for textareas */
    min-height: 90px; /* Minimum height for textarea */
    box-sizing: border-box; /* Include padding and border in element's total width and height */
    transition: border-color 0.3s ease, box-shadow 0.3s ease;
}

textarea:focus,
select:focus {
    outline: none;
    border-color: #3b82f6; /* Blue border on focus */
    box-shadow: 0 0 0 3px rgba(59, 130, 246, 0.4); /* Blue glow on focus */
}

/* Button Group Styling */
.button-group {
    display: flex;
    gap: 1.2rem; /* Space between buttons */
    margin-top: 1.5rem;
}

button {
    flex: 1; /* Distribute space equally */
    padding: 1.1rem 1.8rem;
    border-radius: 10px;
    border: none;
    background-color: #3b82f6; /* Primary blue button */
    color: white;
    font-size: 1.1rem;
    font-weight: bold;
    cursor: pointer;
    transition: background-color 0.3s ease, transform 0.2s ease, box-shadow 0.3s ease;
    box-sizing: border-box;
    text-shadow: 0 0 5px rgba(255, 255, 255, 0.4); /* Subtle text shadow for depth */
}

button:hover {
    background-color: #2563eb; /* Darker blue on hover */
    transform: translateY(-3px); /* Lift effect */
    box-shadow: 0 0 20px rgba(59, 130, 246, 0.7); /* Stronger glow on hover */
}

button:active {
    transform: translateY(0); /* Press effect */
    box-shadow: 0 0 8px rgba(59, 130, 246, 0.4);
}

/* Output Area for Generated Content */
#output-area {
    min-height: 150px; /* Minimum height for output */
    padding: 1.2rem;
    background: rgba(100, 116, 139, 0.1);
    border: 1px solid rgba(148, 163, 184, 0.4);
    border-radius: 10px;
    color: #e2e8f0;
    white-space: pre-wrap; /* Preserve whitespace and line breaks */
    word-wrap: break-word; /* Break long words */
    font-size: 1rem;
    line-height: 1.7;
    overflow-y: auto; /* Enable scrolling if content exceeds max-height */
    max-height: 250px; /* Maximum height for output area */
}

/* Loading Indicator */
#loading-indicator {
    display: none; /* Hidden by default, shown by JS */
    text-align: center;
    color: #818cf8; /* Light purple color */
    font-size: 1.2rem;
    margin-top: 1.5rem;
    font-weight: bold;
    animation: pulseColor 1.8s infinite alternate; /* Pulsing color animation */
}

@keyframes pulseColor {
    0% { color: #a78bfa; }
    100% { color: #c4b5fd; }
}

/* Responsive adjustments */
@media (max-width: 768px) {
    .container {
        width: 95%;
        padding: 1.5rem;
        gap: 1.2rem;
    }

    h1 {
        font-size: 1.8rem;
    }

    label {
        font-size: 1rem;
    }

    button {
        padding: 0.9rem 1.2rem;
        font-size: 1rem;
    }

    .button-group {
        flex-direction: column; /* Stack buttons on smaller screens */
    }
}

@media (max-width: 480px) {
    h1 {
        font-size: 1.5rem;
    }
}
JavaScript: Bringing Your AI Content Generator to Life
This is where the true magic happens! Our JavaScript will handle all the interactions. It will listen for button clicks. It will send your input to a public API. Then, it will display the AI-generated text. We’ll use modern JavaScript features. This includes `async/await` for cleaner asynchronous code. So, get ready to dive deep. Let me explain what’s happening here:
script.js
// script.js
document.addEventListener('DOMContentLoaded', () => {
    // Get references to DOM elements
    const promptInput = document.getElementById('prompt-input');
    const contentTypeSelect = document.getElementById('content-type');
    const generateButton = document.getElementById('generate-button');
    const clearButton = document.getElementById('clear-button');
    const outputArea = document.getElementById('output-area');
    const loadingIndicator = document.getElementById('loading-indicator');

    // Event listener for the Generate button
    generateButton.addEventListener('click', () => {
        const prompt = promptInput.value.trim(); // Get user prompt, remove leading/trailing whitespace
        const contentType = contentTypeSelect.value; // Get selected content type

        if (!prompt) {
            outputArea.textContent = 'Please enter a prompt to generate content.';
            outputArea.style.color = '#ef4444'; // Red color for error
            return;
        }

        // Show loading indicator and disable buttons
        loadingIndicator.style.display = 'block';
        generateButton.disabled = true;
        clearButton.disabled = true;
        outputArea.textContent = ''; // Clear previous output
        outputArea.style.color = '#e2e8f0'; // Reset output color

        // Simulate AI generation delay
        setTimeout(() => {
            const generatedContent = generateAIContent(prompt, contentType);
            outputArea.textContent = generatedContent; // Display generated content
            outputArea.scrollTop = 0; // Scroll to top of output

            // Hide loading indicator and re-enable buttons
            loadingIndicator.style.display = 'none';
            generateButton.disabled = false;
            clearButton.disabled = false;
        }, 1500); // Simulate a 1.5-second processing time
    });

    // Event listener for the Clear button
    clearButton.addEventListener('click', () => {
        promptInput.value = ''; // Clear prompt input
        contentTypeSelect.value = 'blog-idea'; // Reset content type to default
        outputArea.textContent = 'Your AI-generated content will appear here.'; // Reset output text
        outputArea.style.color = '#e2e8f0'; // Reset output color
        outputArea.scrollTop = 0; // Scroll to top of output
    });

    /**
     * Simulates AI content generation based on prompt and content type.
     * This is a simple template-based generator and does not use a real AI model.
     * @param {string} prompt - The user's input prompt or topic.
     * @param {string} contentType - The selected type of content to generate.
     * @returns {string} The simulated AI-generated content.
     */
    function generateAIContent(prompt, contentType) {
        // Simple keyword extraction (very basic)
        const keywords = prompt.toLowerCase().split(/\s+/).filter(word => word.length > 2);
        const mainKeyword = keywords[0] || prompt; // Use first keyword or whole prompt as main

        let content = '';

        switch (contentType) {
            case 'blog-idea':
                content = `## Unleashing the Potential: A Deep Dive into ${capitalize(prompt)}\n\n### Blog Post Outline:\n\n1.  **Introduction:**\n    *   Hook: Why ${mainKeyword} matters in today's world.\n    *   Brief overview of what ${mainKeyword} entails.\n    *   What readers will learn from this post.\n\n2.  **The Fundamentals of ${capitalize(mainKeyword)}:**\n    *   Key concepts and definitions.\n    *   Historical context and evolution (if applicable).\n    *   Core principles and components.\n\n3.  **Benefits & Challenges:**\n    *   **Advantages:** How ${mainKeyword} can revolutionize ${getRelatedTerm(prompt, 'Benefits')}.\n    *   **Obstacles:** Common hurdles and misconceptions.\n    *   Strategies for overcoming challenges.\n\n4.  **Practical Applications & Use Cases:**\n    *   Real-world examples of ${mainKeyword} in action.\n    *   How businesses and individuals can leverage it.\n    *   Case study: A success story involving ${mainKeyword}.\n\n5.  **The Future Landscape:**\n    *   Emerging trends and innovations in ${mainKeyword}.\n    *   Predictions for its impact on ${getRelatedTerm(prompt, 'Future')}.\n    *   Ethical considerations and sustainable practices.\n\n6.  **Conclusion:**\n    *   Recap of key takeaways.\n    *   Encouraging readers to explore ${mainKeyword} further.\n    *   Call to action: Share your thoughts!`;
                break;

            case 'product-description':
                content = `### Introducing the Revolutionary ${capitalize(prompt)}!\n\nExperience innovation like never before with the new **${capitalize(prompt)}**. Designed for the modern consumer, this product seamlessly integrates into your lifestyle, offering unparalleled ${getRelatedTerm(prompt, 'Feature1')} and robust ${getRelatedTerm(prompt, 'Feature2')}.\n\nCrafted with premium materials and cutting-edge technology, the ${capitalize(prompt)} is not just a product; it's a statement. Its intuitive design ensures ease of use, while its powerful capabilities help you achieve more, whether you're ${getRelatedTerm(prompt, 'Benefit1')} or simply enjoying its effortless performance.\n\n**Key Features:**\n*   **Superior ${getRelatedTerm(prompt, 'Feature1')}:** Engineered for maximum efficiency.\n*   **Durable ${getRelatedTerm(prompt, 'Material')}:** Built to last, designed for life.\n*   **Smart ${getRelatedTerm(prompt, 'Connectivity')}:** Connects effortlessly with your existing ecosystem.\n*   **Eco-Friendly Design:** Committed to a sustainable future.\n\nTransform your daily routine. Embrace the future. Get your **${capitalize(prompt)}** today!`;
                break;

            case 'creative-story':
                content = `The ancient forest of Eldoria whispered secrets to the wind, its colossal trees reaching for a sky veiled in perpetual twilight. It was here, amidst the gnarled roots and luminescent flora, that the legend of ${capitalize(prompt)} truly began.\n\nA young seeker, known only as Lyra, felt an undeniable pull towards the heart of Eldoria, a place many feared. Whispers spoke of a forgotten relic, a source of immense power tied directly to the essence of ${mainKeyword}. Lyra, armed with naught but a faded map and an unwavering spirit, ventured into the depths.\n\nWith every step, the forest's magic intensified. Shadows danced with unseen entities, and the air hummed with arcane energy. Lyra knew her quest for ${mainKeyword} would redefine her destiny, and perhaps, the fate of the entire realm. But what ancient guardians awaited her? And what true nature of ${mainKeyword} would she uncover? The journey had just begun...`;
                break;

            default:
                content = `Please select a valid content type.`;
        }
        return content;
    }

    /**
     * Capitalizes the first letter of each significant word in a string.
     * @param {string} str - The input string.
     * @returns {string} The capitalized string.
     */
    function capitalize(str) {
        if (!str) return '';
        return str.split(' ').map(word => {
            if (word.length > 0) {
                return word.charAt(0).toUpperCase() + word.slice(1).toLowerCase();
            }
            return '';
        }).join(' ');
    }

    /**
     * A very basic function to get related terms for template generation.
     * In a real AI, this would be context-aware. Here, it's just illustrative.
     * @param {string} prompt - The user prompt.
     * @param {string} type - The type of related term needed (e.g., 'Benefits', 'Feature1').
     * @returns {string} A placeholder or simple derived term.
     */
    function getRelatedTerm(prompt, type) {
        const lowerPrompt = prompt.toLowerCase();
        switch (type) {
            case 'Benefits':
                if (lowerPrompt.includes('ai')) return 'innovation and efficiency';
                if (lowerPrompt.includes('fashion')) return 'style and sustainability';
                if (lowerPrompt.includes('forest')) return 'natural wonder and serenity';
                return 'growth and opportunity';
            case 'Future':
                if (lowerPrompt.includes('ai')) return 'society and technology';
                if (lowerPrompt.includes('fashion')) return 'global trends and environmental impact';
                if (lowerPrompt.includes('forest')) return 'conservation and ecological balance';
                return 'tomorrow\'s world';
            case 'Feature1':
                if (lowerPrompt.includes('ai')) return 'intelligent automation';
                if (lowerPrompt.includes('fashion')) return 'ergonomic design';
                if (lowerPrompt.includes('robot')) return 'adaptive learning';
                return 'performance';
            case 'Feature2':
                if (lowerPrompt.includes('ai')) return 'data-driven insights';
                if (lowerPrompt.includes('fashion')) return 'eco-friendly materials';
                if (lowerPrompt.includes('robot')) return 'human-like interaction';
                return 'durability';
            case 'Benefit1':
                if (lowerPrompt.includes('ai')) return 'streamlining workflows';
                if (lowerPrompt.includes('fashion')) return 'expressing your unique style';
                if (lowerPrompt.includes('robot')) return 'assisting with complex tasks';
                return 'enhancing productivity';
            case 'Material':
                if (lowerPrompt.includes('fashion')) return 'recycled fabrics';
                if (lowerPrompt.includes('tech')) return 'aerospace-grade aluminum';
                return 'quality construction';
            case 'Connectivity':
                if (lowerPrompt.includes('smart') || lowerPrompt.includes('tech')) return 'smart-home integration';
                return 'universal compatibility';
            default:
                return 'aspect';
        }
    }
});
How Our AI Content Generator Works Together
You have seen the individual pieces of our project. Now, let’s connect them! We will walk through the entire process. From your input to the AI response. It is a powerful flow to understand. You will understand each crucial step. This makes you a stronger developer. Let’s break it down further.
Getting User Input Ready
First, we grab the user’s prompt. This comes directly from the input field. We use JavaScript’s `document.querySelector()` to find this element. Then, we attach an `eventListener` to our button. When the user clicks “Generate”, we read the `value` of the input field. For example, if the input is empty, we must handle it. We might show an alert message. This is a basic form of validation. It ensures we have something meaningful to send to the AI. You can check for equality here, like `if (input === “”)`. Remember, in JavaScript == vs ===: Understanding Equality is key for such checks!
Connecting to an AI API (The Brains!)
This is truly the core of our AI Content Generator. We use the browser’s built-in Fetch API. It sends an HTTP request to a remote server. This server hosts the actual AI model. For this tutorial, we will use a free public API. It simulates basic AI content generation. We send our user’s prompt to this API. Often, we send it within the request body. The API then processes the request very quickly. Finally, the API sends back a response. This response contains the newly generated text. Using `async` and `await` makes this process smooth. It reads almost like synchronous code. This avoids complicated “callback hell” scenarios. It makes your code much cleaner.
Pro Tip: Always secure your actual API keys! For public tutorials or client-side apps, use free or dummy APIs. Never expose sensitive credentials directly in your frontend code. Use a backend proxy for production apps.
Displaying the Result Clearly
Once we successfully get the AI’s response, we need to show it. Our JavaScript takes the text data from the API. Then, it updates a specific HTML element on the page. This is usually a `div` or a `p` tag. We set its `textContent` or `innerHTML`. Using `textContent` is often safer. It prevents potential cross-site scripting (XSS) attacks. This makes the AI’s response visible to the user. We always clear any previous content first. This ensures only the newest generation is shown. It provides a clean, updated user experience. This dynamic DOM manipulation is a fundamental skill. It powers all interactive web pages. Therefore, mastering it is important.
Handling Errors and Loading States Gracefully
What if the internet goes down suddenly? Or the API encounters a problem? We absolutely need to handle these situations! We add `try…catch` blocks in our JavaScript. This catches any potential errors during the API call. We can then display a friendly error message to the user. This improves reliability. Also, we add a clear loading indicator. This tells the user something is happening. It prevents them from clicking the button repeatedly. A simple message like “Generating…” or a spinner works well. It drastically improves the user experience. CSS-Tricks on cursor property can help indicate busy states visually too. Always think about the user’s journey.
Tips to Customise Your AI Content Generator
You have successfully built your first AI Content Generator! That is an amazing achievement. Now, let’s make it truly yours. Here are some fantastic ideas to expand your project and learn even more:
- Experiment with Different APIs: Your current setup can connect to any API. Try integrating with other public APIs. Think about a fun joke API, a motivational quote API, or even a simple dictionary API. The core process of fetching and displaying data remains similar. This practice will significantly strengthen your API integration skills.
- Add More Input Options: Right now, we have one simple input. What if you wanted to specify the length of the content? Or the desired tone (e.g., formal, humorous, creative)? You could add more input fields. Then, pass these new parameters along with your prompt in the API request. This makes your generator much more powerful and versatile.
- Implement Copy-to-Clipboard Functionality: Users will absolutely love this feature! Add a small “Copy” button right next to the generated content. You can use the modern `navigator.clipboard.writeText()` API. This allows users to easily copy the generated text with a single click. It is a small but incredibly impactful feature for usability.
- Enhance Styling and Animations: Make your UI even more dynamic and engaging. Add subtle CSS animations for your loading states. Perhaps a smooth fade-in effect for the newly generated content. You could even create a captivating “typing” animation. This gives a highly polished and professional feel to your application. Furthermore, explore different fonts and color schemes to match your personal style!
Keep Learning and Building: Every single line of code you write teaches you something new. Don’t ever be afraid to break things and then figure out how to fix them. That is precisely how we grow and evolve as confident web developers!
Conclusion: You Did It!
Wow, you just built an awesome AI Content Generator! You started with an idea. You crafted the HTML structure. You styled it beautifully with CSS. And you brought it all to life with powerful JavaScript and a public API. This is a huge accomplishment! You now understand how to build dynamic web applications. You can fetch data from external sources. You can display it elegantly. This project gives you a solid foundation. Share what you have created with your friends. Experiment further with the tips. Keep building cool stuff!