Hey there, future React wizard!
If you’ve ever wanted to build a simple yet powerful Zustand To-Do List but felt a bit lost, you are absolutely in the right place. Today, we’re diving deep into creating a sleek to-do application. We’ll use React and Zustand for super efficient global state management. Get ready to simplify your state like never before!
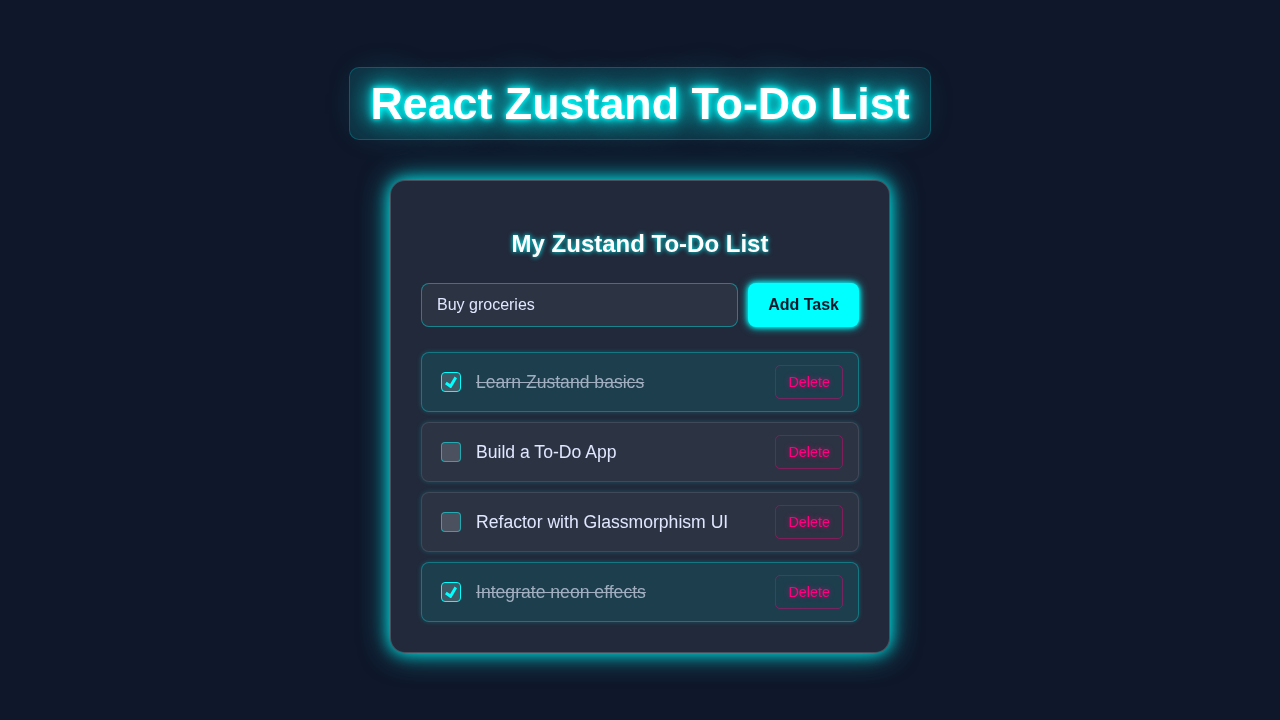
What We Are Building: Your Next-Level To-Do List
Imagine having a clean, fast app where you can easily jot down tasks. You can then mark them as complete or even delete them when they’re done! That’s precisely what we are building today. We are creating a user-friendly interface powered by React. But the real magic happens behind the scenes with Zustand.
Why Zustand? It’s incredibly lightweight, super fast, and surprisingly easy to learn. It helps us avoid tricky “prop drilling,” which makes your React components much cleaner and easier to manage. This approach is absolutely crucial for improving React Performance in larger applications. You will love how simple it makes state management!
Setting Up the HTML Structure for Our App
First things first, we need a basic foundation for our app. This will just be a simple container. It will hold our input field for new tasks and the list where all our to-dos will appear. Don’t worry, it’s quite straightforward!
index.html
<!DOCTYPE html>
<html lang="en">
<head>
    <meta charset="UTF-8" />
    <meta name="viewport" content="width=device-width, initial-scale=1.0" />
    <title>React Zustand To-Do List</title>
    <!-- Link to global styles -->
    <link rel="stylesheet" href="styles.css" />
</head>
<body>
    <div id="root"></div>
    <!-- The main React application will be mounted here -->
    <script type="module" src="/src/main.jsx"></script>
</body>
</html>
Bringing It to Life with CSS Styling
Now, let’s make our to-do list look amazing! We’ll add some friendly CSS to give it a clean, modern feel. We’ll focus on readability and a smooth user experience. We’ll use Flexbox for easy layout, too. It makes aligning elements a breeze.
styles.css
/* Basic Reset & Global Styles */
* {
    margin: 0;
    padding: 0;
    box-sizing: border-box;
}

body {
    font-family: Arial, Helvetica, sans-serif; /* Safe font */
    background-color: #0f172a; /* Dark background */
    color: #e0e7ff; /* Light text color */
    display: flex;
    justify-content: center;
    align-items: center;
    min-height: 100vh;
    padding: 20px; /* Some padding for smaller screens */
    overflow-x: hidden; /* Prevent horizontal scroll */
}

/* Main Container for the To-Do List */
.todo-container {
    width: clamp(300px, 90%, 500px); /* Responsive width */
    background: rgba(255, 255, 255, 0.08); /* Glassmorphism background */
    border-radius: 15px;
    border: 1px solid rgba(255, 255, 255, 0.18);
    box-shadow: 0 8px 32px 0 rgba(31, 38, 135, 0.37); /* Glassmorphism shadow */
    backdrop-filter: blur(12px);
    -webkit-backdrop-filter: blur(12px);
    padding: 30px;
    box-sizing: border-box;
    /* Subtle neon border glow */
    animation: neon-glow-border 1.5s infinite alternate;
}

/* Neon Border Animation */
@keyframes neon-glow-border {
    from {
        box-shadow: 0 0 10px rgba(0, 255, 255, 0.6), 0 0 20px rgba(0, 255, 255, 0.4);
    }
    to {
        box-shadow: 0 0 15px rgba(0, 255, 255, 0.8), 0 0 30px rgba(0, 255, 255, 0.6);
    }
}

h1 {
    color: #fff;
    text-align: center;
    margin-bottom: 25px;
    text-shadow: 0 0 5px #0ff; /* Subtle glow for heading */
}

/* To-Do Add Form Styles */
.add-todo-form {
    display: flex;
    gap: 10px;
    margin-bottom: 25px;
}

.add-todo-form input[type="text"] {
    flex-grow: 1;
    padding: 12px 15px;
    border: 1px solid rgba(0, 255, 255, 0.4);
    border-radius: 8px;
    background: rgba(255, 255, 255, 0.05);
    color: #e0e7ff;
    font-size: 1em;
    outline: none;
    transition: all 0.3s ease;
}

.add-todo-form input[type="text"]::placeholder {
    color: #a0aec0;
}

.add-todo-form input[type="text"]:focus {
    border-color: #0ff; /* Neon cyan focus */
    box-shadow: 0 0 8px rgba(0, 255, 255, 0.6);
    background: rgba(255, 255, 255, 0.1);
}

.add-todo-form button {
    padding: 12px 20px;
    background-color: #0ff; /* Neon cyan */
    color: #0f172a; /* Dark text for contrast */
    border: none;
    border-radius: 8px;
    cursor: pointer;
    font-size: 1em;
    font-weight: bold;
    transition: all 0.3s ease;
    box-shadow: 0 0 5px #0ff, 0 0 10px #0ff; /* Neon button glow */
}

.add-todo-form button:hover {
    background-color: #33ffff;
    box-shadow: 0 0 8px #33ffff, 0 0 15px #33ffff;
    transform: translateY(-2px); /* Slight lift effect */
}

/* To-Do List Styles */
.todo-list {
    list-style: none;
    padding: 0;
    margin: 0;
}

.todo-item {
    display: flex;
    align-items: center;
    justify-content: space-between;
    background: rgba(255, 255, 255, 0.05);
    border: 1px solid rgba(255, 255, 255, 0.1);
    border-radius: 8px;
    padding: 12px 15px;
    margin-bottom: 10px;
    transition: all 0.3s ease;
    box-shadow: 0 0 5px rgba(0, 255, 255, 0.2); /* Subtle glow per item */
}

.todo-item:last-child {
    margin-bottom: 0;
}

/* Styles for completed To-Do items */
.todo-item.completed {
    background: rgba(0, 255, 255, 0.1); /* Slightly different background for completed */
    border-color: rgba(0, 255, 255, 0.3);
}

.todo-item-content {
    display: flex;
    align-items: center;
    flex-grow: 1;
    cursor: pointer; /* Indicate interactivity */
    user-select: none; /* Prevent text selection */
}

/* Custom Checkbox Styling */
.todo-item-content input[type="checkbox"] {
    margin-right: 15px;
    width: 20px;
    height: 20px;
    accent-color: #0ff; /* Default neon color for native checkboxes */
    cursor: pointer;
    /* Custom styling for consistency across browsers */
    appearance: none;
    background-color: rgba(255, 255, 255, 0.15);
    border: 1px solid rgba(0, 255, 255, 0.5);
    border-radius: 4px;
    display: grid;
    place-content: center;
    transition: all 0.2s ease;
    flex-shrink: 0; /* Prevent shrinking */
}

.todo-item-content input[type="checkbox"]::before {
    content: "";
    width: 12px;
    height: 12px;
    transform: scale(0);
    transition: 120ms transform ease-in-out;
    box-shadow: inset 1em 1em #0ff; /* Neon fill for checked state */
    transform-origin: bottom left;
    clip-path: polygon(14% 44%, 0 65%, 50% 100%, 100% 16%, 80% 0%, 43% 62%); /* Checkmark shape */
}

.todo-item-content input[type="checkbox"]:checked::before {
    transform: scale(1);
}
.todo-item-content input[type="checkbox"]:checked {
    border-color: #0ff; /* Neon border when checked */
}

.todo-text {
    color: #e0e7ff;
    font-size: 1.1em;
    word-break: break-word; /* Handle long text */
    transition: color 0.3s ease;
}

/* Text style for completed tasks */
.todo-item.completed .todo-text {
    text-decoration: line-through;
    color: #a0aec0; /* Dimmer color for completed text */
}

/* Delete Button Styles */
.delete-button {
    background-color: transparent;
    border: 1px solid rgba(255, 0, 128, 0.4); /* Neon pink/red border */
    color: #ff0080; /* Neon pink/red text */
    padding: 8px 12px;
    border-radius: 5px;
    cursor: pointer;
    font-size: 0.9em;
    margin-left: 15px;
    transition: all 0.3s ease;
    text-shadow: 0 0 5px rgba(255, 0, 128, 0.6); /* Text glow */
    flex-shrink: 0; /* Prevent shrinking */
}

.delete-button:hover {
    background-color: rgba(255, 0, 128, 0.2);
    box-shadow: 0 0 10px rgba(255, 0, 128, 0.8);
    transform: scale(1.05); /* Slight scale effect */
}
Powering Our Zustand To-Do List with React and Zustand
This is where the real coding magic begins! We’ll build our React components to handle the UI. We will also create our powerful Zustand store. This store will hold all our to-do data and manage state updates efficiently. It’s truly amazing how quickly Zustand gets you up and running!
src/main.jsx
// src/main.jsx
import React from 'react';
import ReactDOM from 'react-dom/client';
import App from './App.jsx';
// Import global styles, this ensures CSS is applied throughout the application
import '../styles.css';

// Mount the React application to the DOM
ReactDOM.createRoot(document.getElementById('root')).render(
    // React.StrictMode helps identify potential problems in an application.
    // It activates additional checks and warnings for its descendants.
    <React.StrictMode>
        <App />
    </React.StrictMode>,
);
src/store/useTodoStore.js
// src/store/useTodoStore.js
import { create } from 'zustand';
import { devtools, persist } from 'zustand/middleware'; // For enhanced debugging and persistence

/**
 * Zustand Store for managing To-Do items.
 *
 * This store provides the state and actions for a simple To-Do list:
 * - `todos`: An array of To-Do objects ({ id, text, completed }).
 * - `addTodo`: Function to add a new To-Do item.
 * - `toggleTodo`: Function to toggle the completion status of a To-Do item.
 * - `removeTodo`: Function to delete a To-Do item.
 *
 * It uses `devtools` for Redux DevTools integration and `persist` to save
 * the state in local storage, making To-Dos persistent across sessions.
 */
const useTodoStore = create(
    devtools( // Enable Redux DevTools integration for easier debugging
        persist( // Persist state to local storage to keep To-Dos after page refresh
            (set) => ({
                // Initial state
                todos: [], // An array to hold all To-Do objects

                /**
                 * Adds a new To-Do item to the list.
                 * Generates a unique ID using Date.now() and sets default completed status to false.
                 * @param {string} text - The description of the new To-Do.
                 */
                addTodo: (text) =>
                    set((state) => ({
                        todos: [
                            ...state.todos,
                            { id: Date.now(), text, completed: false }, // Create new To-Do object
                        ],
                    })),

                /**
                 * Toggles the 'completed' status of a To-Do item by its ID.
                 * Maps over the todos array to find and update the specific item.
                 * @param {number} id - The unique ID of the To-Do item to toggle.
                 */
                toggleTodo: (id) =>
                    set((state) => ({
                        todos: state.todos.map((todo) =>
                            todo.id === id ? { ...todo, completed: !todo.completed } : todo
                        ),
                    })),

                /**
                 * Removes a To-Do item from the list by its ID.
                 * Filters out the To-Do item that matches the given ID.
                 * @param {number} id - The unique ID of the To-Do item to remove.
                 */
                removeTodo: (id) =>
                    set((state) => ({
                        todos: state.todos.filter((todo) => todo.id !== id),
                    })),
            }),
            {
                name: 'zustand-todo-storage', // Name for the key in local storage
            }
        ),
        { name: 'Zustand To-Do Store' } // Name shown in Redux DevTools
    )
);

export default useTodoStore;
src/App.jsx
// src/App.jsx
import React, { useState } from 'react';
import useTodoStore from './store/useTodoStore'; // Import the Zustand store

/**
 * Main application component for the React Zustand To-Do List.
 *
 * This component renders the To-Do list UI, including an input for
 * adding new tasks, and displays the list of existing tasks.
 * It interacts with the `useTodoStore` to manage the To-Do state.
 */
function App() {
    // State to hold the value of the new To-Do input field
    const [newTodoText, setNewTodoText] = useState('');

    // Destructure actions and state from the Zustand store.
    // Zustand hooks automatically re-render the component when selected state changes.
    const { todos, addTodo, toggleTodo, removeTodo } = useTodoStore();

    /**
     * Handles the addition of a new To-Do item.
     * Prevents default form submission behavior (page reload).
     * Adds the new To-Do using the `addTodo` store action if text is not empty.
     * Clears the input field after adding a task.
     * @param {React.FormEvent} e - The form submission event.
     */
    const handleAddTodo = (e) => {
        e.preventDefault(); // Prevent page reload on form submission
        if (newTodoText.trim()) { // Ensure the input is not empty or just whitespace
            addTodo(newTodoText.trim()); // Call the addTodo action from the store
            setNewTodoText(''); // Clear the input field
        }
    };

    return (
        <div className="todo-container">
            <h1>My Zustand To-Do List</h1>

            {/* Form for adding new To-Do items */}
            <form className="add-todo-form" onSubmit={handleAddTodo}>
                <input
                    type="text"
                    placeholder="Add a new task..."
                    value={newTodoText}
                    onChange={(e) => setNewTodoText(e.target.value)} // Update input state on change
                    aria-label="New todo text input"
                />
                <button type="submit">Add Task</button>
            </form>

            {/* Conditional rendering for empty list or display of tasks */}
            {todos.length === 0 ? (
                <p style={{ textAlign: 'center', color: '#a0aec0', marginTop: '20px' }}>
                    No tasks yet! Add one above.
                </p>
            ) : (
                <ul className="todo-list">
                    {/* Map through the todos array to render each To-Do item */}
                    {todos.map((todo) => (
                        <li key={todo.id} className={`todo-item ${todo.completed ? 'completed' : ''}`}>
                            <div
                                className="todo-item-content"
                                onClick={() => toggleTodo(todo.id)} // Toggle completion on click of the item content
                            >
                                <input
                                    type="checkbox"
                                    checked={todo.completed}
                                    onChange={() => toggleTodo(todo.id)} // Toggle completion on checkbox change
                                    aria-label={`Mark "${todo.text}" as ${todo.completed ? 'incomplete' : 'complete'}`}
                                />
                                <span className="todo-text">{todo.text}</span>
                            </div>
                            <button
                                className="delete-button"
                                onClick={() => removeTodo(todo.id)} // Remove task on button click
                                aria-label={`Delete "${todo.text}"`}
                            >
                                Delete
                            </button>
                        </li>
                    ))}
                </ul>
            )}
        </div>
    );
}

export default App;
How Our Zustand To-Do List All Works Together
Now that we have all the pieces, let’s explore how they fit together. Understanding the flow is key to mastering state management. We will break down each crucial step, from setting up the store to interacting with our UI.
Getting Started with Zustand
Zustand is a small, fast, and highly scalable state-management solution for React. To start, we use the create function from Zustand. This function helps us define our global store. Think of it as a central bucket holding all your app’s important data. It’s like regular React State, but it’s accessible anywhere in your component tree, not just locally. You can access the store’s state and actions from any component, which makes sharing data super simple.
Pro Tip: Zustand’s strength lies in its simplicity. It has a tiny bundle size and uses minimal boilerplate. This means you can focus more on building features and less on complex state setup!
Designing Our To-Do Store
Our Zustand store holds an array of todos. Each todo is an object with an id, text, and completed status. Importantly, our store also includes actions: addTodo, toggleTodo, and deleteTodo. These actions are functions that modify the todos array. We use Zustand’s set function inside these actions. The set function updates the store’s state immutably. This ensures your state changes are predictable and easy to track.
Building the Main App Component
Our main App component connects directly to the Zustand store. We use the useStore hook provided by Zustand to access our todos array and our action functions. This hook makes it incredibly easy to consume parts of your global state. It feels very similar to using other React Hooks like useState or useEffect. Your component automatically re-renders whenever the relevant parts of the store’s state change. This keeps your UI always in sync.
Adding New Tasks
When you type a new task into the input field and hit ‘Add To-Do’, here’s what happens. The input’s current value is captured. Then, our addTodo action from the Zustand store is called with this new task text. This action adds a new todo object to our global todos array. Consequently, because our React components are connected to the store, the UI immediately updates. Your new task magically appears in the list without any manual re-renders!
Marking Tasks as Complete
Each to-do item has a checkbox. When you click it, we trigger the toggleTodo action. This action takes the id of the specific todo item. It then finds that todo in the array and flips its completed status. For instance, if it was false, it becomes true. The visual representation (like a strikethrough) instantly reflects this change on the screen. It’s an elegant way to manage task status.
Deleting Tasks
Similarly, each to-do item has a ‘Delete’ button. Clicking this button calls our deleteTodo action. This action also takes the id of the task you want to remove. It then filters the todos array, effectively removing that specific item. Consequently, the to-do list updates visually. The deleted item disappears from your screen. This creates a smooth and responsive user experience.
Tips to Customise Your To-Do List
You’ve built a solid foundation! Now, how about making it uniquely yours? Here are a few ideas to extend your project:
- Add Categories: Introduce different categories for your tasks (e.g., ‘Work’, ‘Personal’, ‘Shopping’). You could filter tasks by category.
- Persistence: Make your to-dos stick even after a refresh! Use localStorage to save and load your Zustand store state.
- Filtering Options: Add buttons to filter tasks. Show ‘All’, ‘Active’, or ‘Completed’ tasks. This is a great way to practice conditional rendering.
- Animations: Introduce some subtle CSS animations for adding or deleting tasks. This can make the user experience even more delightful.
- Dark Mode: Implement a toggle for a dark theme. It’s a popular feature and a good CSS challenge!
Keep Experimenting: The best way to learn is by doing! Don’t be afraid to break things and try new features. Every mistake is a learning opportunity on your coding journey!
Conclusion: You Did It!
Wow, you’ve just built a fantastic Zustand To-Do List application from scratch! You’ve learned how to leverage Zustand for efficient global state management in React. You’ve seen firsthand how a lightweight library can simplify complex state flows. This is a huge step in your development journey!
You now have a solid understanding of how to build interactive web applications. You also know how to manage their state effectively. Feel incredibly proud of what you’ve accomplished. Share your creation with friends, tweak it further, and keep building amazing things! Happy coding!