Master Python Requests Library: HTTP for Humans
Okay, real talk — have you ever felt like your Python programs were stuck in a silent room, wanting to chat with the outside world but not knowing how? You’re not alone. The internet is a vast place, full of data and services just waiting for you to interact with them. But how do you, as a budding developer, get your Python script to actually talk to a website?
That’s where the awesome Python Requests Library steps in. It’s like a super-friendly diplomat for your code, designed to make web interactions incredibly simple and intuitive. Before Requests, making your Python speak HTTP — the language of the web — was a bit like trying to assemble IKEA furniture with only pictograms. Confusing, right? This library transforms that into a smooth, straightforward conversation. You can grab information, send data, and truly bring your applications to life.
Understanding the Core: Your Digital Messenger for the Web
Think of your web browser as a postal service. When you type a URL, you’re essentially sending a letter to a specific address, asking for information. Websites then reply with the content you see. This entire process, behind the scenes, relies on something called HTTP, or Hypertext Transfer Protocol. It’s the fundamental set of rules that defines how messages are formatted and transmitted over the internet. When you use the Python Requests Library, your Python script becomes that postal service, expertly crafting and sending these HTTP messages.
The library simplifies complex network tasks into a few easy-to-understand commands. You don’t need to worry about the nitty-gritty details of sockets or encodings. Requests handles all that heavy lifting for you. It’s built for human beings, making your journey into web interactions much smoother and more enjoyable. Let’s dive into how this powerful tool actually works its magic, one simple step at a time!
-
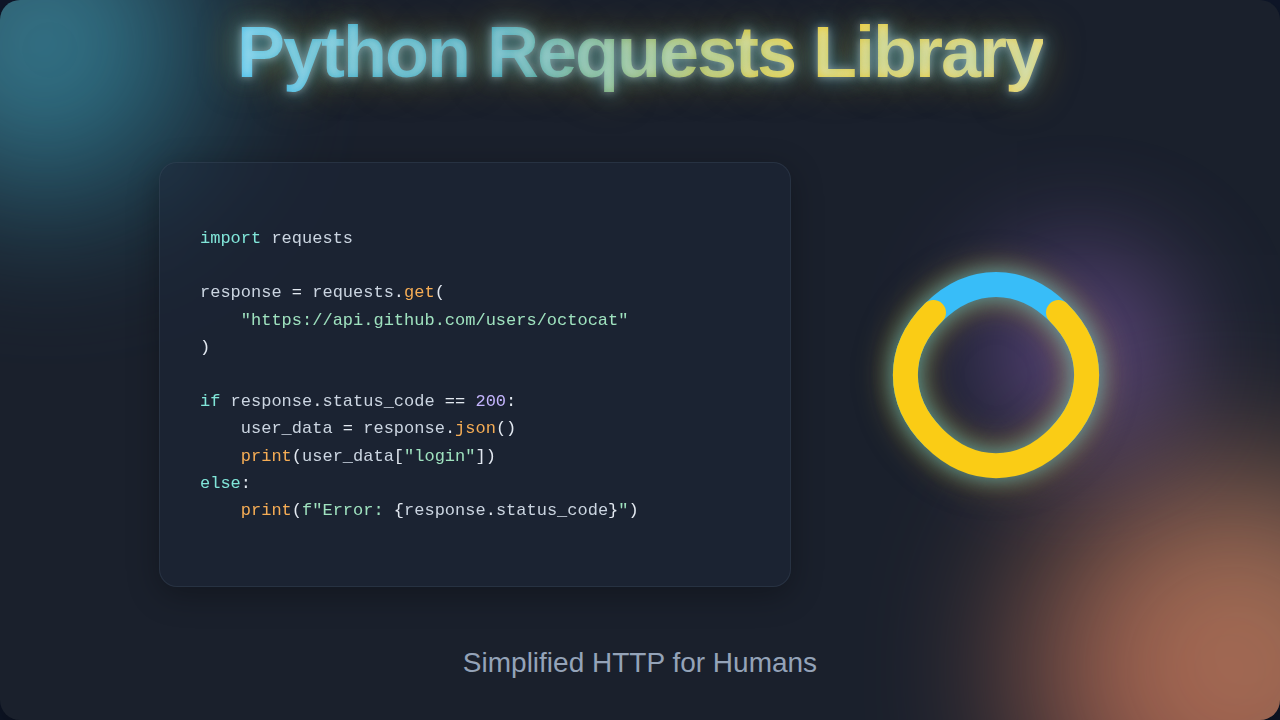
Tip 1: Sending Out the Call with GET Requests
Imagine you’re standing in front of a giant library. You want to read a specific book. You don’t want to add new books or change anything; you just want to retrieve existing information. This is exactly what an HTTP GET request does. When your script uses a GET command, it’s essentially asking a web server, "Hey, can you please send me the data at this address?"
The server then looks up that address and sends back whatever it finds. This could be an HTML page, a JSON file with weather data, or even an image. You simply tell the library what URL you want, and it fetches the content. For example, if you wanted to see the latest news headlines from an API, your Requests call would go fetch that data for you to then process in your script. It’s your first step to pulling data from anywhere online!
-
Tip 2: Your Turn to Speak: Crafting Data with POST Requests
Sometimes you don’t just want to get information; you need to send it. Think about filling out an online form – like signing up for a newsletter or submitting a comment on a blog. You’re creating new data or updating existing information on the server. This is where an HTTP POST request comes into play. It’s like sending a package with new contents to the server’s address.
When you use a POST command with the Python Requests Library, you package up your data – perhaps a dictionary in Python – and send it along with your request. The server then takes this data and processes it. Maybe it saves your new comment to a database, or it registers your new user account. It’s how your script contributes actively to the web, rather than just passively observing. You build the data, and Requests delivers it.
-
Tip 3: Deciphering the Server’s Reply: HTTP Status Codes
After you send your request, the server always sends a response. Part of that response is a three-digit number called an HTTP status code. These codes are like secret signals, immediately telling you if your request was successful, if something went wrong, or if the server needs more information. Ever wondered why some pages say "404 Not Found"? That’s a status code!
A ‘200 OK’ code means everything worked perfectly. A ‘403 Forbidden’ means you don’t have permission to access that resource. Understanding these codes is super important for robust error handling in your applications. The Requests library makes it easy to check the status code of any response you receive. You can find a comprehensive list of these codes on MDN Web Docs: HTTP Status Codes. Your program can then make smart decisions based on what the server is telling it, perhaps trying again or alerting you to an issue. This connects well with how you’d use Python Loops & Conditionals: Master Control Flow to handle different scenarios!
A ‘200 OK’ is your digital high-five. Any ‘4xx’ or ‘5xx’ means it’s time to investigate what went wrong with your request or the server’s processing.
-
Tip 4: Setting the Rules: Headers and Authentication
HTTP requests aren’t just about the URL and the data. They also include "headers." Think of headers as extra notes attached to your postal package. These notes provide important meta-information about the request itself, or about the data being sent. For example, a header might tell the server what type of content your script expects back (like JSON), or what language you prefer.
Headers are also crucial for authentication. Many web services require you to prove who you are before they give you access to their data. You might send an API key or a token within a header to say, "Hey, it’s me, and I’m authorized!" The Requests library lets you easily add custom headers to your requests. This is how you secure your interactions and access protected resources. You can explore more about what kind of information headers carry on MDN Web Docs: HTTP Headers.
-
Tip 5: Building a Connection: Sessions for Ongoing Interactions
Normally, each request you send with Requests is independent. It’s like making a single phone call, hanging up, and then making another separate call. However, what if you need to have an ongoing conversation with a server? Maybe you log in, and then you want to browse several pages while remaining logged in. This is where Sessions come in handy.
A session object in Requests allows you to persist certain parameters across multiple requests. It automatically handles things like cookies, which are small bits of data that websites use to remember you. When you use a session, your script maintains a "connected" feeling with the server. It’s more efficient and much easier than manually managing cookies for every single request. Using sessions is key when you’re building something interactive, like an Flask OpenAI Chatbot: Python API Tutorial with Flask, where continuous interaction is the norm.
-
Tip 6: Filtering Your Fetch: Parameters and Query Strings
Imagine you’re searching an online store. You don’t want to see every product; you want to filter by price, brand, or category. When you do this in your browser, you often see extra bits added to the URL after a question mark, like
?price_max=100&brand=python. These are called query parameters or query strings.The Python Requests Library makes it incredibly simple to add these parameters to your GET requests. Instead of manually building a long, messy URL string, you pass a Python dictionary of key-value pairs to the
paramsargument. Requests then takes care of correctly formatting the URL for you. This means you can easily customize your requests, asking for exactly the data you need without complicated string manipulation. It makes your requests much cleaner and easier to read.
Bonus Tip: Handling Unexpected Silence: Exceptions and Timeouts
The internet isn’t always perfect. Sometimes, a server might not respond, or your network connection might drop. Without proper handling, your Python script could crash. The Requests library includes robust ways to handle these "exceptions," which are errors that interrupt the normal flow of your program. You can set timeouts, for instance, telling Requests to give up if a server doesn’t respond within a certain number of seconds. This prevents your program from freezing indefinitely, waiting for a server that will never answer.
Always expect the unexpected when dealing with the web. Implement timeouts and catch exceptions to keep your applications resilient and user-friendly.
Learning to gracefully handle network errors is a hallmark of a professional developer. It ensures your applications are robust, even when the internet throws a curveball. Just like you’d look to Optimize Django: Fix N+1 Queries & Boost Performance for database efficiency, handling network errors efficiently is key for web interaction performance.
Wrapping Up Your Web Conversation Skills
You’ve now peeked behind the curtain of the Python Requests Library! You understand how it acts as your script’s voice, sending requests and interpreting responses. You can fetch data, send data, and even maintain ongoing conversations. This library truly makes interacting with web services feel natural and intuitive, stripping away the complexity of raw HTTP.
With these tips, you’re not just using a library; you’re understanding the fundamental mechanics of how your Python programs communicate with the vast, interconnected world of the internet. Keep experimenting, keep building, and watch your applications come alive with data and interactions. You’ve got this!