Fetch API Project: JavaScript Data Fetching with HTML & CSS
Hey there, pro-coder-to-be! If you’ve ever wanted to build a dynamic web app but felt a bit lost, you are in the perfect place. This exciting Fetch API Project will show you how. We are building a fun joke generator. It fetches fresh jokes from an online database. Then it displays them right on your web page. This project teaches data fetching and DOM updating. Get ready to add serious sparkle to your coding skills!
What We Are Building
Imagine always having a fresh, hilarious joke at your fingertips. Just click a button, and boom! A new laugh appears. That’s exactly the magic we are creating. This project is more than just a giggle. It teaches you to connect your website to external data. We use JavaScript for requests. Then we update our page without full reloads. This is a core skill for web developers. You will feel incredibly proud!
HTML Structure: The Joke’s Foundation
Every great project needs a solid foundation. Our joke generator is no different. This HTML provides the essential structure. It sets up a place for the joke text. Plus, it includes a button to get new jokes. It’s straightforward but crucial.
index.html
<!DOCTYPE html>
<html lang="en">
<head>
<meta charset="UTF-8">
<meta name="viewport" content="width=device-width, initial-scale=1.0">
<title>Fetch API Project</title>
<!-- Link to our stylesheet -->
<link rel="stylesheet" href="styles.css">
</head>
<body>
<div class="container">
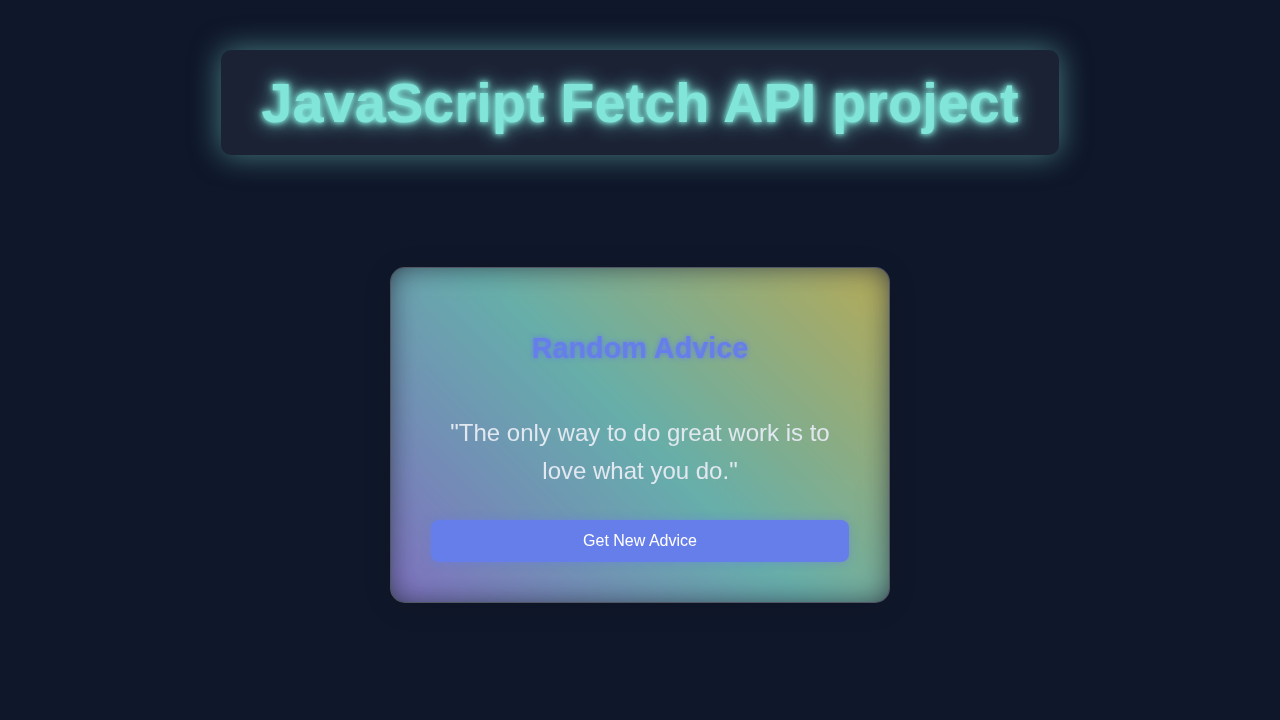
<h1>Random Advice Generator</h1>
<div class="advice-card">
<p id="adviceText" class="advice-text">Click the button to get some advice!</p>
<button id="newAdviceBtn" class="advice-button">Get New Advice</button>
<div id="loadingIndicator" class="loading-indicator">Fetching...</div>
<div id="errorDisplay" class="error-display"></div>
</div>
</div>
<!-- Link to our JavaScript file -->
<script src="script.js"></script>
</body>
</html>This simple markup defines our main content area. Inside, you’ll find a heading and a div. This div will hold our jokes. There’s also an interactive button at the bottom. Each element has a clear ID or class. This makes styling and scripting easy. We are laying awesome groundwork!
CSS Styling: Making It Pop!
Next, let’s make our joke generator eye-catching. We want it inviting and fun for everyone. This CSS styling adds flair. It perfectly centers everything. Moreover, it gives our joke card a sleek, modern look. Don’t worry, styles are easy to understand. They add tons of personality!
styles.css
/* General Styling */
body {
    margin: 0;
    padding: 0;
    font-family: Arial, Helvetica, sans-serif; /* Safe font stack */
    background-color: #1a202c; /* Dark background color */
    color: #e2e8f0; /* Light text color */
    display: flex;
    justify-content: center;
    align-items: center;
    min-height: 100vh; /* Full viewport height */
    overflow: hidden; /* Prevent scrollbars */
    box-sizing: border-box; /* Include padding and border in the element's total width and height */
}

.container {
    display: flex;
    flex-direction: column;
    align-items: center;
    padding: 20px;
    max-width: 90%; /* Ensure responsiveness */
    box-sizing: border-box;
}

h1 {
    font-size: 2.5em;
    margin-bottom: 30px;
    color: #81e6d9; /* Neon accent color */
    text-shadow: 0 0 10px #81e6d9, 0 0 20px #81e6d9; /* Glowing effect */
}

/* Advice Card Styling - Glassmorphism */
.advice-card {
    background: rgba(255, 255, 255, 0.1); /* Transparent white background */
    border-radius: 15px;
    border: 1px solid rgba(255, 255, 255, 0.2); /* Subtle border */
    box-shadow: 0 4px 30px rgba(0, 0, 0, 0.1); /* Soft shadow */
    backdrop-filter: blur(10px); /* Glassmorphism blur effect */
    -webkit-backdrop-filter: blur(10px); /* Safari support for backdrop-filter */
    padding: 40px;
    text-align: center;
    max-width: 500px;
    width: 100%;
    position: relative; /* Needed for pseudo-element glow */
    display: flex;
    flex-direction: column;
    justify-content: space-between;
    min-height: 200px; /* Ensure card has some height */
    box-sizing: border-box;
    overflow: hidden; /* Good practice for contained elements */
}

/* Neon border glow effect */
.advice-card::before {
    content: '';
    position: absolute;
    top: -5px;
    left: -5px;
    right: -5px;
    bottom: -5px;
    background: linear-gradient(45deg, #a78bfa, #81e6d9, #f6e05e); /* Gradient for the glow */
    z-index: -1;
    filter: blur(15px); /* Blur the gradient to create glow */
    border-radius: 20px; /* Slightly larger than card radius for the glow */
    opacity: 0.7;
    transition: opacity 0.3s ease;
}

.advice-card:hover::before {
    opacity: 1; /* Intensify glow on hover */
}

.advice-text {
    font-size: 1.5em;
    margin-bottom: 30px;
    color: #e2e8f0;
    line-height: 1.6;
    flex-grow: 1; /* Allow text to take available space */
    display: flex; /* For centering text vertically */
    align-items: center;
    justify-content: center;
}

/* Button Styling */
.advice-button {
    background-color: #667eea; /* A vibrant purple */
    color: #ffffff;
    border: none;
    border-radius: 8px;
    padding: 12px 25px;
    font-size: 1em;
    cursor: pointer;
    transition: background-color 0.3s ease, box-shadow 0.3s ease, transform 0.1s ease;
    box-shadow: 0 0 8px rgba(102, 126, 234, 0.5); /* Subtle glow */
}

.advice-button:hover {
    background-color: #5a67d8;
    box-shadow: 0 0 15px rgba(102, 126, 234, 0.8); /* More pronounced glow on hover */
}

.advice-button:active {
    background-color: #4c51bf;
    transform: translateY(1px); /* Slight press effect */
}

.advice-button:disabled {
    background-color: #4a5568;
    cursor: not-allowed;
    box-shadow: none;
    transform: none;
}

/* Loading and Error Indicators */
.loading-indicator, .error-display {
    position: absolute;
    bottom: 10px;
    left: 50%;
    transform: translateX(-50%);
    font-size: 0.9em;
    padding: 5px 10px;
    border-radius: 5px;
    opacity: 0;
    transition: opacity 0.3s ease;
    pointer-events: none; /* Make sure it doesn't block clicks on the button */
    white-space: nowrap; /* Prevent text wrapping */
}

.loading-indicator {
    background-color: rgba(129, 230, 217, 0.2); /* Light teal background */
    color: #81e6d9;
    border: 1px solid #81e6d9;
}

.error-display {
    background-color: rgba(252, 129, 129, 0.2); /* Light red background */
    color: #fc8181;
    border: 1px solid #fc8181;
}

.loading-indicator.visible, .error-display.visible {
    opacity: 1;
}
Here’s the cool part! We use Flexbox to center our application. This makes arranging elements so much easier. We add padding, shadows, and rounded corners. This gives our joke card a polished touch. The button also gets a vibrant, clickable style. Text is clear and readable. You can change colors later! Make it yours.
Pro Tip: Flexbox is your friend for modern, responsive layouts! Dive deeper into its capabilities and become a layout master with CSS-Tricks. Your designs will thank you!
Building Your Fetch API Project: The JavaScript Magic
Now, for the real enchantment: JavaScript! This is where our dynamic joke generator truly comes to life. We write code to reach out to an external API. It grabs fresh joke data. Then, it dynamically displays that joke on our web page. This creates a seamlessly interactive experience. It’s the core of any modern web application.
script.js
// script.js

// Select DOM elements using their IDs
const adviceTextElement = document.getElementById('adviceText');
const newAdviceBtn = document.getElementById('newAdviceBtn');
const loadingIndicator = document.getElementById('loadingIndicator');
const errorDisplay = document.getElementById('errorDisplay');

/**
 * Fetches a random piece of advice from the Advice Slip API.
 * This is an asynchronous function to handle network requests.
 */
async function fetchAdvice() {
    // 1. Show loading indicator, hide any previous errors, and disable the button
    loadingIndicator.classList.add('visible');
    errorDisplay.classList.remove('visible'); // Ensure error message is hidden
    newAdviceBtn.disabled = true; // Prevent multiple requests
    adviceTextElement.textContent = 'Fetching new advice...'; // Provide immediate feedback

    try {
        // 2. Make the API request using the Fetch API
        // The 'await' keyword pauses the execution until the promise settles (resolved or rejected)
        const response = await fetch('https://api.adviceslip.com/advice');

        // 3. Check if the network request was successful (status code 200-299)
        if (!response.ok) {
            // If response is not OK, throw an error with the status
            throw new Error(`HTTP error! Status: ${response.status}`);
        }

        // 4. Parse the JSON response body
        // 'await' again to wait for the JSON parsing to complete
        const data = await response.json();

        // 5. Check if data contains an advice slip and update the UI
        if (data && data.slip && data.slip.advice) {
            adviceTextElement.textContent = `"${data.slip.advice}"`; // Display the advice
        } else {
            // Handle cases where API returns unexpected structure
            throw new Error('Could not parse advice from response or no advice found.');
        }

    } catch (error) {
        // 6. Catch and handle any errors that occurred during the fetch operation
        console.error('Failed to fetch advice:', error); // Log the error to console
        adviceTextElement.textContent = 'Oops! Failed to load advice.'; // Display a user-friendly message
        errorDisplay.textContent = `Error: ${error.message}`; // Show specific error message
        errorDisplay.classList.add('visible'); // Make error message visible
    } finally {
        // 7. This block always executes, regardless of try/catch outcome
        // Hide loading indicator and re-enable the button
        loadingIndicator.classList.remove('visible');
        newAdviceBtn.disabled = false;
    }
}

// Add an event listener to the button to trigger fetchAdvice on click
newAdviceBtn.addEventListener('click', fetchAdvice);

// Fetch advice automatically when the page loads initially
document.addEventListener('DOMContentLoaded', fetchAdvice);
Let me explain what’s happening. This powerful script connects to a joke API. It retrieves new joke data. After that, it updates our HTML on the fly. This makes our page interactive and dynamic. This is the absolute heart of engaging web interfaces. You are doing amazing work!
How It All Works Together
Let’s explore our JavaScript code step-by-step. Understanding each part is crucial. You’ll see Fetch API and DOM manipulation combine. This brings our joke generator to life.
Getting Our Elements
First, we ‘talk’ to our HTML. We select elements using document.getElementById(). We grab joke-display for jokes. We also select our joke-button. This button triggers new jokes. It gives us precise control.
The Fetch API: Your Data Superpower
The Fetch API fetches data from other servers. It’s like asking for information. Calling fetch() returns a Promise. This represents a future value. You might recall promises from JavaScript Closures. We use await to pause our code. It waits for the Promise to resolve. This keeps asynchronous code clean.
Handling the Response
After fetching, we get a response object. This holds request info, not raw data. We need to convert it. We call response.json() for this. This also returns a Promise. So, we use await again. Now, our joke data is perfectly parsed. It’s ready for JavaScript use. This is a critical step.
Displaying the Joke
With parsed joke data, it’s time to display! We extract the joke text from our JSON. Then, we update the HTML. We set the textContent of our joke-display. This instantly changes what the user sees. It replaces old text with the new joke! This is DOM manipulation. It makes our page dynamic. You’re controlling the UI!
Event Listeners: Making It Interactive
Our button needs to react to clicks. We attach an event listener to it. We use addEventListener() for a 'click' event. When clicked, our getJoke function runs. Every button press gets a new joke. This creates a dynamic, interactive experience. It directly responds to user actions.
Initial Load and Error Handling
We want a joke immediately. So, we call getJoke() right away. This happens when the page loads. But what if the API is down? Or a network glitch? Error handling is vital. We wrap our code in a try...catch. If an error occurs, our code ‘catches’ it. We display a friendly error message. This makes our app more stable. Understanding asynchronous operations is key. Frameworks use concepts like the React useEffect Hook for side effects.
Tips to Customise It
You built a working joke generator! But the fun doesn’t stop here. Here are some ideas to extend your project. Each will push your skills further!
- Try a different API: Explore public APIs for quotes, facts, or images. Integrate those instead. Imagine a daily cat fact generator!
- Add a loading state: Show “Loading joke…” while fetching data. This improves user experience significantly.
- Implement a “copy to clipboard” button: Let users easily share their favorite jokes. A single click copies the text.
- Add social sharing buttons: Allow users to share jokes directly on Twitter or Facebook. Spread the laughter widely!
- Style it further: Experiment with animations, different fonts, or a dark mode toggle. Make it truly yours!
- Explore advanced state management: For complex data flows, consider how state might be managed. Techniques like the React Context API are great for larger applications.
Conclusion: Your Fetch API Project Success!
Congratulations! You just built your very own dynamic joke generator. This incredible Fetch API Project taught you so much. You mastered data fetching, response handling, and DOM manipulation. These are cornerstone skills in web development. You are well-prepared to build amazing things! Share your creation. Keep experimenting with new APIs. The web is your playground!
Keep Learning: Every single line of code you write adds to your expertise. Don’t be afraid to try new things and sometimes break them. That’s how we truly grow!