Hey there, fellow coder! If you’ve wanted dynamic web pages but felt stuck, you’re in the right place. Today, we’re diving deep into Vanilla JS Interaction. We’ll build something super fun: an interactive “Festa Junina” web page. It will feature a lively counter. This counter celebrates Brazilian June festivals. This project is a fantastic way to sharpen your front-end skills!
What We Are Building: A Lively Festa Junina Counter
Imagine a vibrant web page, full of the festive spirit of Festa Junina! Our project will be a simple yet engaging counter. This counter will track virtual “fireworks” or “balões” released. You click a button, and the number goes up. Plus, we’ll add a reset button to start the fun again. It’s a perfect example of how small interactions make a big impact. This interactive element showcases the power of plain JavaScript. You will love seeing your page respond to user actions!
HTML Structure: Setting Up Our Festa Junina Stage
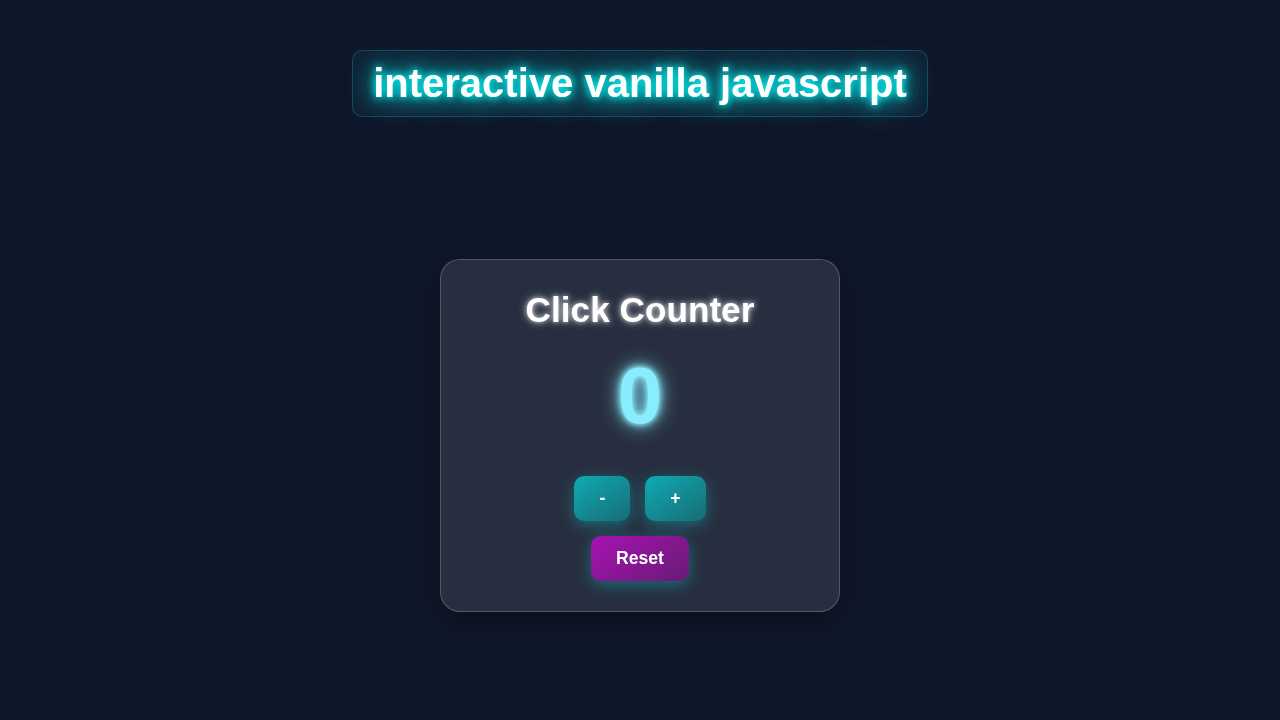
Our HTML will create the basic layout for our interactive counter. We need a main container. Inside, we’ll have a title, the counter display, and our interactive buttons. Keep it clean and semantic. We want our page to be easy to understand. Here’s the cool part: simple HTML forms our foundation.
index.html
<!DOCTYPE html>
<html lang="en">
<head>
    <meta charset="UTF-8">
    <meta name="viewport" content="width=device-width, initial-scale=1.0">
    <title>Interactive Vanilla JS Counter</title>
    <!-- Link to the external CSS file -->
    <link rel="stylesheet" href="styles.css">
</head>
<body>
    <div class="container">
        <h1>Interactive Click Counter</h1>
        <div class="counter-card">
            <p class="count-label">Current Count:</p>
            <!-- This span will display the current count -->
            <span id="countDisplay" class="count-display">0</span>
            <div class="button-group">
                <!-- Button to decrement the count -->
                <button id="decrementButton" class="counter-button control-button">-</button>
                <!-- Button to increment the count -->
                <button id="incrementButton" class="counter-button control-button">+</button>
            </div>
            <!-- Button to reset the count -->
            <button id="resetButton" class="counter-button reset-button">Reset</button>
        </div>
    </div>

    <!-- Link to the external JavaScript file, defer execution until HTML is parsed -->
    <script src="script.js" defer></script>
</body>
</html>
CSS Styling: Bringing the Festa to Life
Now for the visual magic! Our CSS will transform plain HTML into a festive celebration. We’ll use bright colors, fun fonts, and responsive design principles. This will make our counter look amazing on any device. Styling is where your creativity truly shines. Don’t worry if CSS feels tricky; we will walk through it. It’s all about making your elements pop!
styles.css
/* Global Box Model Reset */
*, *::before, *::after {
    box-sizing: border-box;
}

/* Basic Body and Root Styles */
body {
    font-family: Arial, Helvetica, sans-serif; /* Safe fonts */
    margin: 0;
    padding: 0;
    background-color: #f0f2f5; /* Light background for main code */
    color: #333;
    display: flex;
    justify-content: center;
    align-items: center;
    min-height: 100vh; /* Full viewport height */
    overflow: hidden; /* Prevent scrollbars */
}

.container {
    text-align: center;
    max-width: 90%; /* Ensure responsiveness */
    width: 500px;
    padding: 20px;
}

h1 {
    color: #2c3e50;
    margin-bottom: 30px;
    font-size: 2.5em;
}

/* Counter Card Styling */
.counter-card {
    background-color: #ffffff;
    border-radius: 15px;
    box-shadow: 0 10px 30px rgba(0, 0, 0, 0.1);
    padding: 40px 30px;
    display: flex;
    flex-direction: column;
    align-items: center;
    gap: 20px;
}

.count-label {
    font-size: 1.2em;
    color: #666;
    margin-bottom: -10px; /* Adjust spacing */
}

.count-display {
    font-size: 4em;
    font-weight: bold;
    color: #3498db; /* Default display color, will be overridden by JS for dynamic effect */
    min-width: 1.5em; /* Prevent size changes affecting layout too much */
    text-align: center;
    transition: color 0.3s ease-in-out, transform 0.1s ease-out; /* Smooth transitions */
}

/* Button Group for +/- */
.button-group {
    display: flex;
    gap: 15px;
    margin-top: 10px; /* Space from count display */
}

/* Common Button Styles */
.counter-button {
    background-color: #007bff; /* Primary blue */
    color: #fff;
    border: none;
    border-radius: 8px;
    padding: 12px 25px;
    font-size: 1.1em;
    font-weight: bold;
    cursor: pointer;
    transition: background-color 0.2s ease, transform 0.1s ease, box-shadow 0.2s ease;
    outline: none;
    -webkit-tap-highlight-color: transparent; /* Remove tap highlight on mobile */
}

.counter-button:hover {
    background-color: #0056b3; /* Darker blue on hover */
    transform: translateY(-2px);
    box-shadow: 0 4px 10px rgba(0, 0, 0, 0.2);
}

.counter-button:active {
    transform: translateY(0);
    background-color: #004085; /* Even darker blue on active */
    box-shadow: 0 2px 5px rgba(0, 0, 0, 0.2);
}

/* Specific Button Styles */
.control-button {
    background-color: #6c757d; /* Grey for control buttons */
}

.control-button:hover {
    background-color: #5a6268;
}

.control-button:active {
    background-color: #494f54;
}

.reset-button {
    background-color: #dc3545; /* Red for reset button */
    padding: 10px 30px;
    font-size: 1em;
}

.reset-button:hover {
    background-color: #c82333;
}

.reset-button:active {
    background-color: #bd2130;
}
JavaScript: The Brains Behind the Buttons for Vanilla JS Interaction
This is where the real interaction happens! Our JavaScript code will handle all the logic. It will listen for button clicks. Then, it will update our counter display. We will use plain, “Vanilla” JavaScript. No fancy frameworks are needed here. This approach helps you deeply understand core web development concepts. Let’s make our page truly dynamic!
script.js
// script.js

/**
 * This script provides interactive functionality for a simple click counter.
 * It increments, decrements, and resets a count, dynamically updating the
 * display and applying stylistic changes based on the count's value.
 */

// 1. Get DOM elements
// Select the span element where the count will be displayed
const countDisplay = document.getElementById('countDisplay');
// Select the button to increment the count
const incrementButton = document.getElementById('incrementButton');
// Select the button to decrement the count
const decrementButton = document.getElementById('decrementButton');
// Select the button to reset the count
const resetButton = document.getElementById('resetButton');

// 2. Initialize count variable
// Start the counter at 0
let count = 0;

// 3. Define an array of colors for dynamic styling (optional, but demonstrates interaction)
// These colors will cycle as the count changes, adding a visual flair.
const dynamicColors = [
    '#3498db', // Blue (starts here)
    '#2ecc71', // Green
    '#e67e22', // Orange
    '#9b59b6', // Purple
    '#1abc9c', // Turquoise
    '#e74c3c', // Red
    '#f1c40f'  // Yellow
];

// 4. Function to update the display and apply dynamic styling
function updateDisplay() {
    // Update the text content of the count display element
    countDisplay.textContent = count;

    // Apply a dynamic color from the `dynamicColors` array based on the absolute count.
    // Using Math.abs() ensures we cycle through colors regardless of positive/negative count.
    // The modulo operator (%) ensures the index stays within the bounds of the array length.
    const colorIndex = Math.abs(count) % dynamicColors.length;
    countDisplay.style.color = dynamicColors[colorIndex];

    // Optional: Add a subtle 'pop' effect on update for visual feedback
    countDisplay.style.transform = 'scale(1.1)';
    setTimeout(() => {
        countDisplay.style.transform = 'scale(1)';
    }, 100); // Reset scale after a short delay
}

// 5. Add Event Listeners to buttons

// Event listener for the increment button
incrementButton.addEventListener('click', () => {
    // Increment the count
    count++;
    // Call updateDisplay to refresh the UI
    updateDisplay();
});

// Event listener for the decrement button
decrementButton.addEventListener('click', () => {
    // Decrement the count
    count--;
    // Call updateDisplay to refresh the UI
    updateDisplay();
});

// Event listener for the reset button
resetButton.addEventListener('click', () => {
    // Reset the count to 0
    count = 0;
    // Call updateDisplay to refresh the UI
    updateDisplay();
});

// 6. Initial display update
// Call updateDisplay once when the script loads to show the initial count (0)
updateDisplay();
How It All Works Together: Unraveling the Vanilla JS Interaction Magic
You’ve laid down the structure. You’ve applied the styles. Now, let’s connect everything. Our HTML provides the elements. Our CSS makes them pretty. Finally, JavaScript brings them to life. Understanding this flow is key. It’s the core of interactive web development. We’ll break down each step in detail.
The HTML Foundation: Your Digital Canvas
First, our HTML provides the content. Think of it as the skeleton of our page. We have a div with the ID app. This holds everything together. Inside, there’s an h1 for our festive title. A div with ID counterDisplay shows the current count. Remember, clear IDs are helpful. They allow JavaScript to easily find elements. We also have two button elements. One increases the count. The other resets it. These buttons have specific IDs as well. This setup is crucial for our interactive elements. It ensures JavaScript can interact with them directly. You are defining the elements that users will see and click.
Pro Tip: Always use semantic HTML. Elements like
<button>,<header>, and<footer>give meaning to your content. This helps with accessibility and SEO. It makes your code easier to read for other developers too. Check out MDN Web Docs for a comprehensive list of HTML elements.
CSS Styling: Making It Pop with Festa Junina Flair
Next, CSS takes over. It adds visual appeal. We’re setting background colors. We’re choosing playful fonts. The counter display will be large and clear. This makes it easy to read. Buttons get a fun, clickable style. Hover effects add a nice touch. They show the user that buttons are interactive. We use Flexbox for layout. This keeps our elements centered and tidy. You can learn more about Flexbox from CSS-Tricks. Responsive design is also built in. This ensures our page looks good on phones and desktops. A good design keeps users engaged. It makes the interaction even more enjoyable. Experiment with colors that remind you of a vibrant Festa Junina celebration!
JavaScript Logic: Responding to User Actions
Finally, JavaScript brings the interactivity. It’s the star of our Vanilla JS Interaction. We start by getting references to our HTML elements. We use document.getElementById() for this. For example, const counterDisplay = document.getElementById('counterDisplay'); grabs our counter element. We also define a variable, count. This stores the current number. Initially, it’s set to 0. Then, we add event listeners to our buttons. An event listener “listens” for specific actions. In our case, it’s a “click” event. When the “Increase” button is clicked, a function runs. This function increments the count variable. It then updates the textContent of counterDisplay. Similarly, the “Reset” button sets count back to 0. This is a fundamental concept in JS Array Methods and event handling. It’s how web pages respond to you! This simple logic forms the backbone of many interactive features. You are essentially teaching your web page how to react.
Bringing It All Together: A Cohesive Experience
When the page loads, your browser first renders the HTML. It then applies the CSS styles. This gives you a visually appealing, static page. But as soon as the JavaScript loads, it becomes active. It’s ready to listen. Clicking the “Increase” button triggers the JavaScript function. The count goes up. The display updates immediately. The same happens with the “Reset” button. This seamless flow creates a dynamic user experience. It shows the true power of front-end development. You’ve created a complete, interactive module. It works flawlessly using just HTML, CSS, and Vanilla JavaScript. Isn’t that amazing? You are now a web magician!
Tips to Customise It: Make Your Festa Junina Page Unique!
You’ve built a solid foundation! Now, let’s make it truly yours. Here are some ideas to extend this project. Personalisation is a huge part of learning.
- Add a Decrement Button: Just like increasing, add a button to decrease the count. This adds another layer of Vanilla JS Interaction. It’s a great exercise to practice your event listeners.
- Implement a Max/Min Limit: Make the counter stop at a certain number. Or prevent it from going below zero. You can use simple
ifstatements for this. It introduces basic control flow. - Change Themes Dynamically: Add a button to switch between different Festa Junina color palettes. You can toggle CSS classes with JavaScript. This creates a really cool visual effect.
- Animate the Counter Update: When the count changes, make the number smoothly transition. Or maybe add a little “pop” animation! CSS transitions or simple JavaScript animations can achieve this. You might even explore concepts like those in our React Cart Drawer with Hooks: Modern UI/UX Tutorial for more advanced animations, though the principles are universal.
Conclusion: You’re a Vanilla JS Interaction Master!
Wow, you did it! You just built an interactive Festa Junina counter. All with pure HTML, CSS, and Vanilla JavaScript. You mastered the basics of DOM manipulation. You also grasped event handling. This project shows that powerful web features don’t always need complex libraries. Sometimes, plain old JavaScript is all you need. You’ve taken a significant step. You are now truly bringing your web pages to life. We encourage you to share your creation! Show off your new skills on social media. Tag us at @procoder09. Keep building, keep learning, and keep creating amazing things!
Keep Learning: Every line of code you write makes you a better developer. Don’t be afraid to experiment. Break things, fix them, and learn from every challenge. Your journey as a self-taught coder is just beginning!