When users create accounts, Password Strength indicators are incredibly helpful. They offer instant feedback, guiding users to craft secure passwords without frustrating trial-and-error. As web developers, we constantly seek ways to improve user experience and bolster application security. Implementing a robust password strength indicator using just HTML, CSS, and JavaScript is a fantastic way to achieve both.
What We Are Building
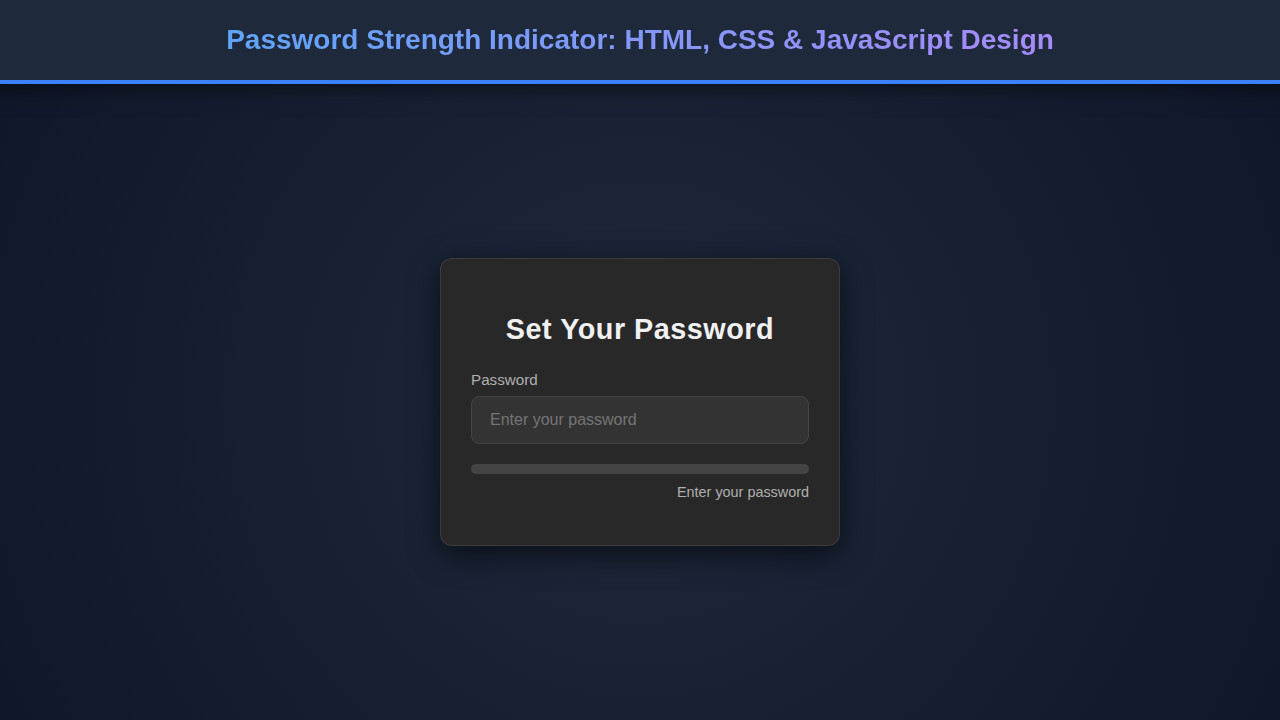
Imagine a sleek input field for a password. As you type, a visual bar beneath it dynamically changes color and text, evolving from ‘Weak’ (red) to ‘Medium’ (orange) and finally to ‘Strong’ (green). This isn’t just a fancy animation; it’s a crucial piece of UI that empowers users to protect their data more effectively. Our design inspiration comes from modern login forms found on popular secure websites, where clarity and immediate feedback are paramount.
These indicators are trending because cybersecurity threats are more sophisticated than ever. Weak passwords remain a primary vulnerability for many users. Providing real-time guidance helps mitigate this risk significantly. You can integrate this component into any signup or password reset form across e-commerce platforms, social media sites, enterprise applications, or personal dashboards. Essentially, anywhere a user sets a password, this indicator will add immense value.
By building this tool, we’re not just coding; we’re actively contributing to a safer digital environment. This project will sharpen your frontend skills and demonstrate how simple visual cues can have a profound impact on user security habits.
HTML Structure
Our HTML provides the basic input field for the password and a container for our strength indicator. We’ll keep it clean and semantic, laying the groundwork for our styling and JavaScript functionality.
index.html
<!DOCTYPE html>
<html lang="en">
<head>
    <meta charset="UTF-8">
    <meta name="viewport" content="width=device-width, initial-scale=1.0">
    <title>Password Strength Indicator</title>
    <link rel="stylesheet" href="styles.css">
</head>
<body>
    <div class="password-strength-container">
        <h2>Set Your Password</h2>
        <div class="form-group">
            <label for="password">Password</label>
            <input type="password" id="password" placeholder="Enter your password">
        </div>
        <div class="strength-indicator-wrapper">
            <div class="strength-indicator-bar"></div>
        </div>
        <p class="strength-text" id="strengthText">Enter your password</p>
    </div>

    <script src="script.js"></script>
</body>
</html>
script.js
document.addEventListener('DOMContentLoaded', () => {
    const passwordInput = document.getElementById('password');
    const strengthBar = document.querySelector('.strength-indicator-bar');
    const strengthText = document.getElementById('strengthText');

    passwordInput.addEventListener('input', updatePasswordStrength);

    function updatePasswordStrength() {
        const password = passwordInput.value;
        let feedback = 'Enter your password';
        let barClassName = ''; // Class for the strength bar
        let textClassName = ''; // Class for the strength text

        // Clear all existing strength classes from both elements
        strengthBar.classList.remove('strength-weak', 'strength-moderate', 'strength-good', 'strength-strong');
        strengthText.classList.remove('weak', 'moderate', 'good', 'strong');

        if (password.length === 0) {
            strengthText.textContent = feedback;
            strengthBar.style.width = '0%'; // Ensure bar is empty
            return;
        }

        // Criteria checks
        const hasLowercase = /[a-z]/.test(password);
        const hasUppercase = /[A-Z]/.test(password);
        const hasNumber = /[0-9]/.test(password);
        const hasSpecial = /[!@#$%^&*()_+\-=\[\]{};':"\\|,.<>\/?]/.test(password);

        let criteriaMet = 0;
        if (hasLowercase) criteriaMet++;
        if (hasUppercase) criteriaMet++;
        if (hasNumber) criteriaMet++;
        if (hasSpecial) criteriaMet++;

        // Strength level determination
        if (password.length < 8) {
            feedback = 'Weak (min 8 chars)';
            barClassName = 'strength-weak';
            textClassName = 'weak';
        } else if (criteriaMet < 2) { // 8+ chars, but very few criteria
            feedback = 'Weak';
            barClassName = 'strength-weak';
            textClassName = 'weak';
        } else if (criteriaMet === 2) { // 8+ chars, 2 criteria met
            feedback = 'Moderate';
            barClassName = 'strength-moderate';
            textClassName = 'moderate';
        } else if (criteriaMet === 3) { // 8+ chars, 3 criteria met
            feedback = 'Good';
            barClassName = 'strength-good';
            textClassName = 'good';
        } else { // 8+ chars, 4 criteria met
            feedback = 'Strong';
            barClassName = 'strength-strong';
            textClassName = 'strong';
        }

        // Update UI by adding the determined classes
        strengthText.textContent = feedback;
        strengthText.classList.add(textClassName);
        strengthBar.classList.add(barClassName);
    }
});
CSS Styling
The CSS will bring our indicator to life visually. We’ll style the input, the indicator bar itself, and define the different color states (weak, medium, strong) that JavaScript will toggle. This ensures a clear and intuitive visual representation of the password’s security level.
styles.css
body {
    margin: 0;
    display: flex;
    justify-content: center;
    align-items: center;
    min-height: 100vh;
    background-color: #1a1a1a;
    font-family: 'Arial', 'Helvetica', sans-serif;
    color: #e0e0e0;
    overflow: hidden;
    box-sizing: border-box;
}

.password-strength-container {
    background-color: #282828;
    padding: 30px;
    border-radius: 12px;
    box-shadow: 0 8px 30px rgba(0, 0, 0, 0.6);
    max-width: 400px;
    width: 90%;
    box-sizing: border-box;
    border: 1px solid rgba(255, 255, 255, 0.1);
}

h2 {
    text-align: center;
    color: #f0f0f0;
    margin-bottom: 25px;
    font-size: 1.8em;
    letter-spacing: 0.5px;
}

.form-group {
    margin-bottom: 20px;
}

label {
    display: block;
    margin-bottom: 8px;
    font-size: 0.95em;
    color: #b0b0b0;
}

input[type="password"] {
    width: 100%;
    padding: 14px 18px;
    border: 1px solid #444;
    border-radius: 8px;
    background-color: #333;
    color: #f8f8f8;
    font-size: 1em;
    outline: none;
    transition: border-color 0.3s ease, box-shadow 0.3s ease;
    box-sizing: border-box;
}

input[type="password"]:focus {
    border-color: #6a6a6a;
    box-shadow: 0 0 0 3px rgba(106, 106, 106, 0.3);
}

.strength-indicator-wrapper {
    margin-top: 15px;
    height: 10px;
    background-color: #444;
    border-radius: 5px;
    overflow: hidden;
    position: relative;
}

.strength-indicator-bar {
    height: 100%;
    width: 0%; /* Initial width */
    background-color: transparent; /* Default initial color, will be overridden by classes */
    border-radius: 5px;
    transition: width 0.4s ease-out, background-color 0.4s ease-out; /* Transition on width and background */
}

.strength-text {
    margin-top: 10px;
    font-size: 0.9em;
    text-align: right;
    color: #b0b0b0;
    min-height: 1.2em;
    transition: color 0.4s ease-out; /* Transition text color */
}

/* Strength colors & widths for the bar */
.strength-indicator-bar.strength-weak { background-color: #e74c3c; width: 25%; } /* Red */
.strength-indicator-bar.strength-moderate { background-color: #f39c12; width: 50%; } /* Orange */
.strength-indicator-bar.strength-good { background-color: #f1c40f; width: 75%; } /* Yellow */
.strength-indicator-bar.strength-strong { background-color: #27ae60; width: 100%; } /* Green */

/* Strength colors for the text */
.strength-text.weak { color: #e74c3c; }
.strength-text.moderate { color: #f39c12; }
.strength-text.good { color: #f1c40f; }
.strength-text.strong { color: #27ae60; }
Understanding Password Strength Logic: Step-by-Step Breakdown
Now for the real magic: JavaScript! This is where we define the rules for password strength, listen for user input, and update our HTML and CSS dynamically. We’ll break down the core logic into manageable pieces.
1. Grabbing Elements and Setting Up Listeners
First, we need to select our password input field and the strength indicator elements from the DOM. An event listener attached to the input field will constantly monitor what the user types. We’ll typically use the 'keyup' event to trigger our strength assessment every time a character is entered or removed.
Consider an example: when a user presses a key, our JavaScript immediately processes the new input value. This continuous feedback loop is essential for a good user experience. Furthermore, modularizing your JavaScript components makes them reusable and easier to maintain. Learn more about building modular JavaScript components for your projects.
2. Defining Password Strength Criteria
A strong password usually meets several conditions. We’ll define these criteria using regular expressions (regex). These patterns allow us to check for:
- Minimum length (e.g., 8 characters)
- Presence of uppercase letters
- Presence of lowercase letters
- Presence of numbers
- Presence of special characters (symbols)
Each met condition adds to the overall strength score. For instance, a password might gain a point for having an uppercase letter and another for including a number. This incremental scoring provides a nuanced assessment.
“Effective password strength indicators don’t just tell users their password is weak; they actively guide them towards making it strong.”
3. Calculating and Updating Strength
When the 'keyup' event fires, our function will:
- Get the current value of the password input.
- Initialize a strength score (e.g., 0).
- Test the password against each regex criterion. If a criterion is met, increment the score.
- Based on the final score, update the width, color, and text content of our strength indicator bar.
We’ll use a series of if/else if statements to determine the visual state. For example, if the score is low, the bar becomes red and displays “Weak.” A higher score might result in an orange bar and “Medium,” while a top score yields a green bar labeled “Strong.” This immediate visual feedback is critical.
Making Our Password Strength Indicator Responsive
In today’s multi-device world, responsive design is non-negotiable. Our password strength indicator needs to look great and function perfectly, whether viewed on a desktop monitor, a tablet, or a smartphone. We achieve this primarily through CSS media queries.
Applying media queries allows us to adjust styles based on screen size. For smaller screens, we might reduce padding, font sizes, or even simplify the layout of surrounding elements to ensure the indicator remains prominent and readable. A mobile-first approach is often beneficial here, styling for the smallest screen first and then progressively enhancing for larger devices. This workflow typically results in a more robust and scalable design.
For example, you might adjust the width of the password input field from a fixed pixel value to a percentage for better adaptability. Furthermore, ensuring that the text within the indicator doesn’t overflow on narrower screens is crucial for legibility. You can find comprehensive resources on responsive design techniques, including media query syntax and best practices, over at MDN Web Docs. It’s truly a fundamental aspect of modern web development.
Final Output
Once everything is wired up, you’ll have a fully functional and visually appealing password strength indicator. The input field will be clear, the strength bar will update in real-time, and the text feedback will be instantaneous. Users will appreciate the smooth transitions and the helpful guidance as they craft their passwords. The achieved visual elements include a smoothly animated progress bar, distinct color coding for different strength levels, and clear textual feedback.
“A well-designed password strength indicator transforms a security chore into an intuitive, guided experience for the user.”
Conclusion
Building a password strength indicator is more than just a coding exercise; it’s an investment in user experience and application security. We’ve covered the HTML structure for our elements, the CSS for visual appeal, and the JavaScript logic to make it all dynamic. This project showcases the power of combining these core web technologies to create interactive and useful components.
You can easily integrate this component into any user authentication flow. It’s a fundamental part of any robust signup or login system. Consider how it could enhance other form validation patterns you build. For advanced scenarios, think about integrating this with server-side checks for truly comprehensive security. This foundational knowledge is also crucial if you’re exploring complex topics like AI agent logic and explainable decisions in JavaScript, where clear feedback mechanisms are vital. Moreover, understanding how to coordinate different scripts and UI updates is essential for AI orchestration within JavaScript agent systems.
Keep experimenting with different strength criteria or visual designs. The goal is always to create interfaces that are intuitive, secure, and delightful to use. Happy coding!