React Infinite Scroll: Build Seamless Data Loading with JSX Hooks
Hey there, fellow coders! If you’ve ever wanted to build a React Infinite Scroll component but felt a bit lost, you are absolutely in the right place. Imagine a social media feed or a product listing page that just keeps loading new content as you scroll. That’s what we are building today! It’s a super cool feature that makes your web applications feel incredibly modern and user-friendly.
This tutorial will guide you step-by-step. We will use React hooks like useState and useEffect. Get ready to create something awesome!
What We Are Building: Your Own React Infinite Scroll
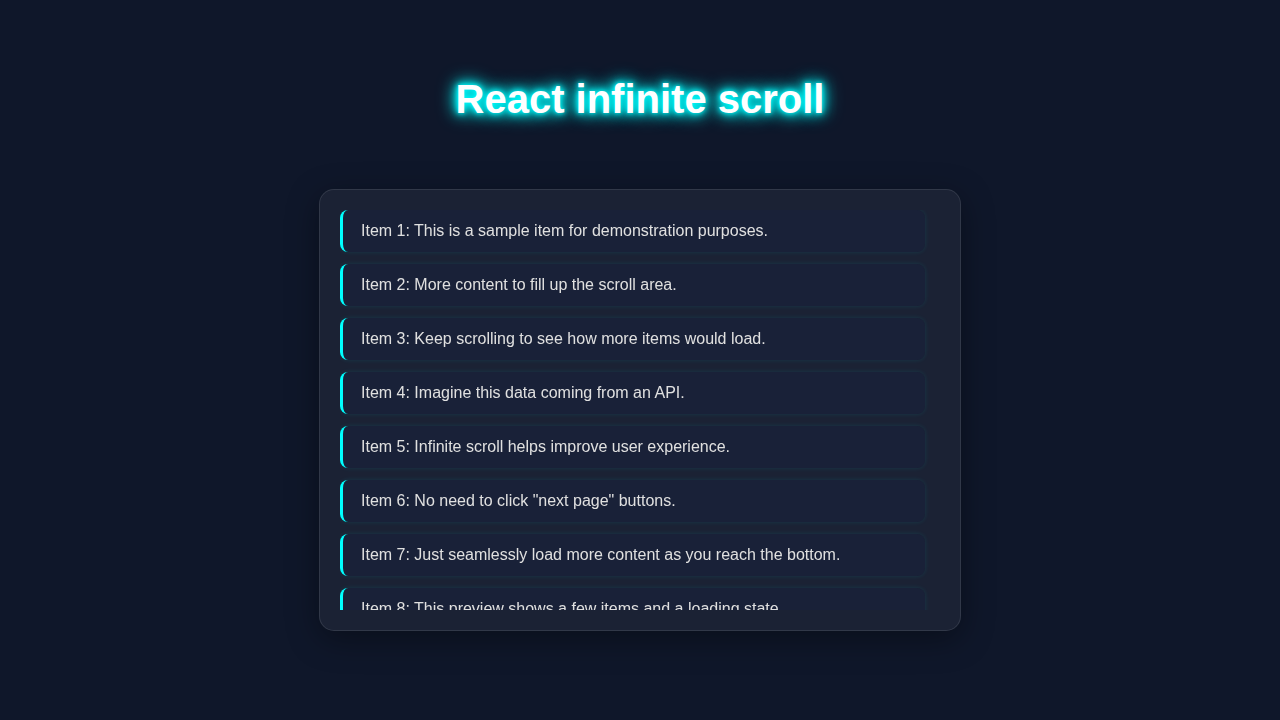
We are going to craft a simple yet powerful React component. It will display a list of items. As you scroll closer to the bottom, new items will magically appear! This mimics how real-world applications fetch more data from a server. We’ll even add a friendly “Loading…” message. This makes the user experience smooth and engaging. No more clicking “Load More” buttons. Your users will love the seamless flow!
HTML Structure
Our HTML structure is pretty straightforward. We need a main container to hold all our list items. Inside, each item will be a simple `div`. Finally, we’ll have a placeholder for our loading indicator. This keeps things semantic and easy to understand.
index.html
<!DOCTYPE html>
<html lang="en">
<head>
    <meta charset="utf-8" />
    <meta name="viewport" content="width=device-width, initial-scale=1" />
    <meta name="theme-color" content="#000000" />
    <meta
      name="description"
      content="React infinite scroll example using functional components and hooks."
    />
    <title>React Infinite Scroll App</title>
</head>
<body>
    <noscript>You need to enable JavaScript to run this app.</noscript>
    <div id="root"></div>
    <!--
      To run this code:
      1. Create a new React app: `npx create-react-app infinite-scroll-tutorial`
      2. Navigate into the folder: `cd infinite-scroll-tutorial`
      3. Replace `src/App.js` with the content of `App.js` below.
      4. Replace `src/App.css` with the content of `App.css` below.
      5. Replace `src/index.js` with the content of `index.js` below.
      6. This `index.html` file would typically go into the `public/` directory.
         It's the main entry point for the browser. React will automatically inject
         the bundled JavaScript into the `<body>` where `#root` is.
      7. Run the development server: `npm start` or `yarn start`.
    -->
</body>
</html>
CSS Styling
Now, let’s make our component look good! We’ll add some basic styling to make our list items visible. We will also style the loading message. These styles are minimal, but they help illustrate the concept clearly. Feel free to get creative with your own designs!
App.css
/* General Body and Root Styling */
body, #root {
    margin: 0;
    font-family: Arial, Helvetica, sans-serif; /* Safe font */
    -webkit-font-smoothing: antialiased;
    -moz-osx-font-smoothing: grayscale;
    background-color: #f0f2f5; /* Light background for the overall page */
    color: #333;
    box-sizing: border-box; /* Ensure padding/border don't affect element's total width/height */
    display: flex; /* Use flexbox for basic centering */
    justify-content: center;
    align-items: flex-start; /* Align to top, allowing for vertical scrolling if container is tall */
    min-height: 100vh;
    overflow-x: hidden; /* Prevent horizontal scrollbars */
}

/* Infinite Scroll Container Styling */
.infinite-scroll-container {
    width: 100%;
    max-width: 700px; /* Maximum width for better readability on large screens */
    padding: 20px;
    margin-top: 30px; /* Space from the top of the viewport */
    background-color: #fff;
    border-radius: 8px;
    box-shadow: 0 4px 12px rgba(0, 0, 0, 0.1); /* Subtle shadow for depth */
    box-sizing: border-box;
    overflow: hidden; /* Ensure inner content doesn't spill out */
}

.infinite-scroll-container h1 {
    text-align: center;
    color: #2c3e50;
    margin-bottom: 30px;
    font-size: 2em;
}

/* Items List Styling */
.items-list {
    display: flex;
    flex-direction: column;
    gap: 15px; /* Space between individual items */
    padding: 0 10px; /* Horizontal padding inside the list */
}

.list-item {
    background-color: #ffffff;
    border: 1px solid #e0e0e0;
    border-left: 5px solid #007bff; /* Vibrant accent color on the left */
    padding: 15px;
    border-radius: 6px;
    box-shadow: 0 2px 5px rgba(0, 0, 0, 0.05); /* Soft inner shadow */
    transition: transform 0.2s ease, box-shadow 0.2s ease; /* Smooth hover effects */
    cursor: pointer;
    max-width: 100%; /* Ensure items don't overflow their container */
    box-sizing: border-box;
}

.list-item:hover {
    transform: translateY(-2px); /* Slight lift effect on hover */
    box-shadow: 0 4px 8px rgba(0, 0, 0, 0.1); /* Enhanced shadow on hover */
}

/* Loading and No More Items Indicators */
.loading-indicator,
.no-more-indicator,
.no-items-found {
    text-align: center;
    padding: 20px;
    font-size: 1.1em;
    color: #666;
    font-weight: bold;
}

.loading-indicator {
    color: #007bff; /* Primary color for loading text */
}

.no-more-indicator {
    color: #888;
    font-style: italic;
}

.no-items-found {
    color: #dc3545; /* Red color for a 'no items found' message */
    font-style: normal;
}

/* Optional: Simple spinner for loading (using CSS animation) */
.loading-indicator::before {
    content: '';
    display: inline-block;
    width: 20px;
    height: 20px;
    border: 3px solid rgba(0, 123, 255, 0.3); /* Transparent blue border */
    border-radius: 50%;
    border-top-color: #007bff; /* Solid blue for the spinner part */
    animation: spin 1s ease-in-out infinite; /* Apply spin animation */
    -webkit-animation: spin 1s ease-in-out infinite;
    margin-right: 10px;
    vertical-align: middle;
}

@keyframes spin {
    to { -webkit-transform: rotate(360deg); }
}
@-webkit-keyframes spin {
    to { -webkit-transform: rotate(360deg); }
}

/* Responsive Adjustments */
@media (max-width: 768px) {
    .infinite-scroll-container {
        padding: 15px;
        margin-top: 15px;
        border-radius: 0; /* Full width on smaller screens, remove rounded corners */
    }

    .infinite-scroll-container h1 {
        font-size: 1.8em;
        margin-bottom: 20px;
    }

    .list-item {
        padding: 12px;
    }
}
JavaScript: The React Infinite Scroll Engine
This is where the magic truly happens! We’ll create our React component. It will manage the list data, loading state, and page numbers. We will use a few essential React hooks. This component will handle all the logic for fetching data and detecting when to load more. It’s super exciting!
App.js
import React, { useState, useEffect, useRef, useCallback } from 'react';
import './App.css'; // Import the CSS for styling

// --- Helper function to simulate API call ---
// In a real application, this would be an actual API fetch.
const fetchItems = (page, limit) => {
    return new Promise(resolve => {
        setTimeout(() => {
            const startIndex = (page - 1) * limit;
            const endIndex = startIndex + limit;
            // Simulate a total of 50 items available on the backend
            const allPossibleItems = Array.from({ length: 50 }, (_, i) => `Item ${i + 1}: This is a dynamically loaded piece of content.`);
            const itemsToLoad = allPossibleItems.slice(startIndex, endIndex);

            resolve({
                data: itemsToLoad,
                hasMore: endIndex < allPossibleItems.length // Check if there are more items beyond the current fetch
            });
        }, 800); // Simulate network delay (e.g., 0.8 seconds)
    });
};

function App() {
    // --- State Variables ---
    const [items, setItems] = useState([]);      // Stores the list of items to display
    const [page, setPage] = useState(1);         // Current page number for fetching data
    const [loading, setLoading] = useState(false); // Indicates if data is currently being fetched
    const [hasMore, setHasMore] = useState(true); // True if there's more data to load, false otherwise

    // --- useRef for IntersectionObserver ---
    // This ref will hold the IntersectionObserver instance.
    // IntersectionObserver is a modern browser API for efficiently detecting when an element
    // enters or exits the viewport (or another element).
    const observer = useRef();

    // --- Callback for the IntersectionObserver ---
    // This function is passed to the `ref` prop of the last item in the list.
    // When the last item is rendered and becomes a 'node', this callback is invoked.
    // We use `useCallback` to memoize this function. This prevents it from being
    // re-created on every render, which could cause the IntersectionObserver
    // to be disconnected and re-connected unnecessarily.
    const lastItemRef = useCallback(node => {
        // If data is already loading, or there are no more items, do nothing.
        if (loading || !hasMore) return;

        // Disconnect the previous observer if it exists.
        // This cleans up the old observer before creating a new one.
        if (observer.current) observer.current.disconnect();

        // Create a new IntersectionObserver instance.
        // It watches for changes in the intersection of a target element with its ancestor viewport.
        observer.current = new IntersectionObserver(entries => {
            // `entries[0].isIntersecting` is true when the target element (last item)
            // enters the viewport.
            if (entries[0].isIntersecting && hasMore) {
                setPage(prevPage => prevPage + 1); // Increment page to fetch the next batch of data
            }
        }, {
            root: null, // The viewport is the root (default).
            rootMargin: '0px', // No margin around the root.
            threshold: 0.1 // Trigger when 10% of the target is visible.
        });

        // If a valid DOM node is provided (meaning the last item has been rendered),
        // start observing it.
        if (node) observer.current.observe(node);
    }, [loading, hasMore]); // Dependencies: re-create the callback if `loading` or `hasMore` changes

    // --- useEffect for Data Fetching ---
    // This effect hook runs whenever the `page` state or `hasMore` state changes.
    // It encapsulates the logic for calling the simulated API and updating the component's state.
    useEffect(() => {
        // Prevent fetching if there are no more items and it's not the initial load (page 1).
        if (!hasMore && page !== 1) {
            setLoading(false);
            return;
        }
        // If we've just detected no more items after a fetch, we don't need to try again.
        if (!hasMore && page === 1 && items.length > 0) return;

        setLoading(true); // Set loading state to true before starting the fetch
        fetchItems(page, 10) // Call the simulated API to fetch 10 items per page
            .then(response => {
                // Append the newly fetched items to the existing list
                setItems(prevItems => [...prevItems, ...response.data]);
                // Update `hasMore` based on the API response
                setHasMore(response.hasMore);
            })
            .catch(error => {
                console.error("Failed to fetch items:", error);
                // In a real app, you might set an error state here to display a message to the user.
            })
            .finally(() => {
                setLoading(false); // Set loading state to false once the fetch completes (success or failure)
            });
    }, [page, hasMore]); // Dependency array: re-run this effect when `page` or `hasMore` changes

    return (
        <div className="infinite-scroll-container">
            <h1>React Infinite Scroll</h1>
            <div className="items-list">
                {items.map((item, index) => {
                    // If this is the very last item in the list, attach `lastItemRef` to it.
                    // This is the element the IntersectionObserver will watch.
                    if (items.length === index + 1) {
                        return (
                            <div ref={lastItemRef} key={index} className="list-item">
                                {item}
                            </div>
                        );
                    }
                    return (
                        <div key={index} className="list-item">
                            {item}
                        </div>
                    );
                })}

                {/* Show a loading indicator when data is being fetched */}
                {loading && <div className="loading-indicator">Loading more items...</div>}

                {/* Show 'No more items' message if all data has been loaded and not currently loading */}
                {!hasMore && !loading && items.length > 0 && (
                    <div className="no-more-indicator">No more items to load.</div>
                )}
                {/* Show 'No items found' if there were never any items */}
                 {!hasMore && !loading && items.length === 0 && (
                    <div className="no-items-found">No items found.</div>
                )}
            </div>
        </div>
    );
}

export default App;
index.js
import React from 'react';
import ReactDOM from 'react-dom/client'; // Use createRoot for React 18+ for better performance
// import './index.css'; // Optional: for global styles, but App.css handles most styling for this tutorial
import App from './App'; // Import the main App component that contains the infinite scroll logic

// Get the root DOM element where the React app will be mounted
const root = ReactDOM.createRoot(document.getElementById('root'));

// Render the App component into the root DOM element
// `React.StrictMode` is a tool for highlighting potential problems in an application.
// It activates additional checks and warnings for its descendants.
root.render(
    <React.StrictMode>
        <App />
    </React.StrictMode>
);

// To run this code locally, you would typically use Create React App:
// 1. Install Create React App: `npx create-react-app my-infinite-scroll-app`
// 2. Navigate into your project folder: `cd my-infinite-scroll-app`
// 3. Replace the contents of `src/App.js`, `src/App.css`, and `src/index.js`
//    with the provided code snippets.
// 4. Ensure `public/index.html` has `<div id="root"></div>` inside its `<body>` (Create React App does this by default).
// 5. Start the development server: `npm start` or `yarn start`.
How It All Works Together
Let’s break down the different pieces of our React Infinite Scroll component. Each part plays a crucial role. Together, they create a smooth and dynamic user experience. You’ll see how state, effects, and events cooperate.
Initial Data Load
When our component first appears on the screen, we need some data. We use the useEffect hook for this. It runs a function right after the component mounts. Our function fetches the very first batch of items. We then update our component’s state with this new data. This makes the initial items visible to the user. It gets the ball rolling beautifully.
The Scroll Event Listener
To detect when a user scrolls, we need an event listener. Again, useEffect comes to our rescue! We attach a 'scroll' event listener to the window object. This listener constantly monitors the user’s scroll position. Importantly, we also clean up this listener when the component unmounts. This prevents memory leaks and keeps your application performant. It’s a best practice for clean code.
Pro Tip: Always Clean Up Effects! Using a cleanup function in
useEffectis vital. It removes event listeners, clears timers, or cancels network requests. This keeps your app efficient and prevents unexpected behavior after a component is no longer visible.
Detecting the Bottom
This is the core logic for infinite scrolling. Inside our scroll handler, we check the user’s position. We compare the current scroll position with the total height of the scrollable content. When the user scrolls very close to the bottom, we trigger a data fetch. Specifically, we check if window.innerHeight + document.documentElement.scrollTop is greater than or equal to document.documentElement.offsetHeight - someThreshold. This tells us the user is near the end. We’re about to load new content!
Fetching More Data
Once we detect the user has reached the bottom, we fetch the next set of items. First, we increment our `page` number state. This helps us request subsequent data batches. Then, we simulate an API call. We set the `loading` state to `true`. After our simulated fetch, we append the new items to our existing `items` array. Finally, we set `loading` back to `false`. This prepares for the next scroll.
The useCallback Magic
You might notice we wrapped our handleScroll function in a useCallback hook. This is a performance optimization. When a component re-renders, functions inside it are usually recreated. This can cause our useEffect‘s dependency array to see a new function on every render. Then, it would re-attach the scroll listener unnecessarily. useCallback prevents this. It memoizes our `handleScroll` function. So, it only changes when its dependencies change. This keeps our scroll listener stable. It means fewer re-renders and a faster app!
Loading Indicator
The `loading` state is simple but effective. When `loading` is `true`, we display a helpful message like “Loading…”. This gives users visual feedback. They know more content is coming. When `loading` is `false`, the message disappears. This creates a polished user experience. It keeps users informed and engaged.
Tips to Customise It
You’ve built a fantastic infinite scroll! Now, let’s explore ways to make it even better. There are so many possibilities!
- Real API Integration: Replace our `fetchData` simulation with calls to a real backend API. This is the next logical step for your project.
- Error Handling: Implement `try…catch` blocks. Show meaningful error messages if an API call fails. This makes your app more robust.
- “No More Data” Message: Add logic to display a “You’ve reached the end!” message. This happens when there are no more items to fetch.
- Debounce the Scroll: Use a debounce function for your scroll handler. This limits how often the check runs. It improves performance on very fast scrolls.
- Intersection Observer API: For even better performance and cleaner code, consider using the Intersection Observer API. It can detect when a target element (like your loading indicator) enters or exits the viewport. This is often more efficient than manual scroll calculations.
- Further React Explorations: If you’re tackling more complex forms or server actions, check out our guide on React useActionState Form Submissions & Server Actions. It’s a great next step for advanced interactions!
Conclusion
Awesome work, procoder! You just built a fully functional React Infinite Scroll component. This is a powerful feature for any modern web application. You’ve mastered state management, effect hooks, and performance optimizations. That’s a huge achievement!
Take your new skill and apply it to your projects. Experiment with different styles and data sources. Share what you’ve built in the comments below! Keep coding, keep learning, and keep building amazing things. Happy scrolling!