
Chatbot UI Design is no longer a futuristic concept; it’s a vital component of modern web applications. From customer service to interactive learning platforms, AI chatbots are revolutionizing how users interact with digital services. Have you ever wondered how those smooth, conversational interfaces are built? Well, today, we’re diving deep into creating your very own, fully functional chatbot UI using the foundational trifecta of web development: HTML, CSS, and JavaScript. Get ready to transform your ideas into an engaging user experience!
What We Are Building: Your Interactive AI Companion
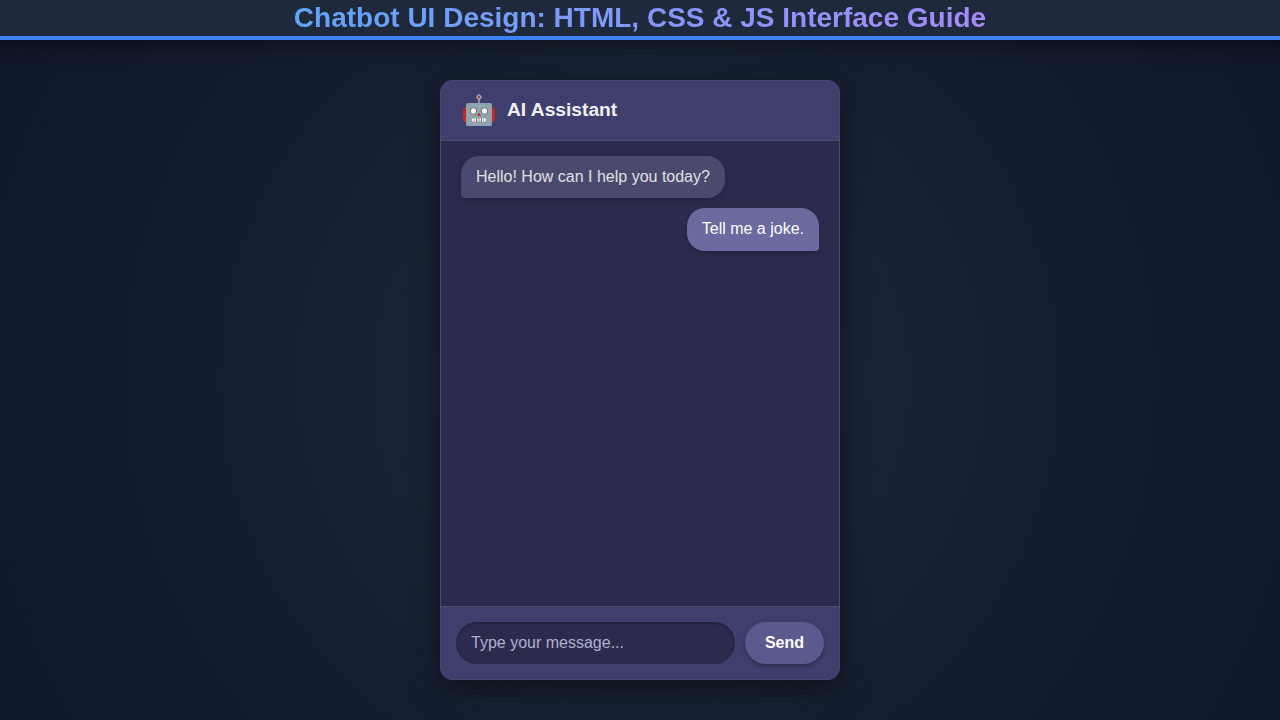
Imagine a sleek, intuitive chat interface that feels responsive and alive. That’s precisely what we’re going to construct today! Our goal is to build a modern chatbot interface, complete with message bubbles, a dynamic input field, and seamless scrolling. We’ll ensure it looks great and functions flawlessly across various devices.
Chatbots are trending for good reason. They offer instant support, personalized interactions, and streamline complex processes. They make user journeys much smoother. Think about e-commerce, educational portals, or personal productivity tools; a well-designed chatbot significantly enhances user engagement. This project is about crafting a positive user experience.
The beauty of this project lies in its versatility. Once you grasp these core principles of Chatbot UI Design, you can adapt this interface for many applications. Develop a support bot, an interactive guide, or a fun conversational assistant. This guide provides the foundational skills to bring any of those ideas to life.
Crafting the HTML for Your Chatbot UI Design
Our journey begins with HTML, the structural backbone of our chatbot. We’ll define the main container, the header, a dedicated area for messages, and the input section. This semantic markup will provide a clear, logical foundation for our Chatbot UI Design, allowing us to easily style and manipulate elements with CSS and JavaScript. Let’s lay down the essential elements.
<div class="chatbot-container">
    <div class="chat-header">
        <img src="https://via.placeholder.com/40" alt="Bot Avatar" class="bot-avatar">
        <h2 class="chat-title">AI Assistant</h2>
        <span class="chat-status">Online</span>
    </div>
    <div class="chat-messages" id="chat-messages">
        <!-- Initial bot message -->
        <div class="message bot-message">
            <p>Hello! How can I help you today?</p>
            <span class="message-time">10:00 AM</span>
        </div>
        <!-- Messages will be injected here by JavaScript -->
    </div>
    <div class="chat-input-container">
        <input type="text" id="chat-input" placeholder="Type your message..." autocomplete="off">
        <button id="send-button" aria-label="Send message">Send</button>
    </div>
</div>
Styling Your Chatbot UI Design with CSS
With our HTML structure in place, it’s time to bring our chatbot to life visually. CSS will transform raw elements into a polished, inviting interface. We’ll tackle everything from basic layout using Flexbox to custom message bubbles and subtle animations, ensuring our Chatbot UI Design is both beautiful and user-friendly. Here’s the styling that will make it shine.
@import url('https://fonts.googleapis.com/css2?family=Roboto:wght@300;400;500;700&display=swap');

body {
    font-family: 'Roboto', sans-serif;
    margin: 0;
    display: flex;
    justify-content: center;
    align-items: center;
    min-height: 100vh;
    background: linear-gradient(to right bottom, #6a11cb, #2575fc);
    color: #333;
    overflow: hidden; /* Prevent body scroll when chat overflows */
}

.chatbot-container {
    background-color: #ffffff;
    border-radius: 15px;
    box-shadow: 0 10px 30px rgba(0, 0, 0, 0.2);
    width: 90%;
    max-width: 400px;
    height: 80vh;
    max-height: 600px;
    display: flex;
    flex-direction: column;
    overflow: hidden; /* Important for internal scrolling */
    position: relative;
}

.chat-header {
    background: linear-gradient(to right, #6a11cb, #2575fc);
    color: white;
    padding: 15px 20px;
    display: flex;
    align-items: center;
    border-top-left-radius: 15px;
    border-top-right-radius: 15px;
    box-shadow: 0 2px 5px rgba(0, 0, 0, 0.1);
}

.bot-avatar {
    width: 40px;
    height: 40px;
    border-radius: 50%;
    margin-right: 10px;
    border: 2px solid rgba(255, 255, 255, 0.7);
}

.chat-title {
    margin: 0;
    font-size: 1.2em;
    font-weight: 500;
    flex-grow: 1;
}

.chat-status {
    font-size: 0.8em;
    opacity: 0.8;
}

.chat-messages {
    flex-grow: 1;
    padding: 15px 20px;
    overflow-y: auto; /* Enable scrolling for messages */
    display: flex;
    flex-direction: column;
    gap: 10px;
    background-color: #f8f8f8;
    scrollbar-width: thin; /* Firefox */
    scrollbar-color: #2575fc #f1f1f1; /* Firefox */
}

/* Custom scrollbar for Webkit browsers */
.chat-messages::-webkit-scrollbar {
    width: 8px;
}

.chat-messages::-webkit-scrollbar-track {
    background: #f1f1f1;
    border-radius: 10px;
}

.chat-messages::-webkit-scrollbar-thumb {
    background: #2575fc;
    border-radius: 10px;
}

.message {
    max-width: 75%;
    padding: 10px 15px;
    border-radius: 20px;
    line-height: 1.4;
    position: relative;
    box-shadow: 0 1px 2px rgba(0, 0, 0, 0.1);
}

.message p {
    margin: 0;
}

.message-time {
    font-size: 0.7em;
    color: #888;
    position: absolute;
    bottom: 5px; /* Adjust position as needed */
    right: 15px; /* For user messages */
    left: auto; /* Default */
    opacity: 0.8;
}

.user-message {
    align-self: flex-end; /* Align to the right */
    background-color: #e0f7fa; /* Light blue */
    color: #333;
    border-bottom-right-radius: 5px; /* Sharpen bottom right corner */
}

.user-message .message-time {
    right: 15px;
    left: auto;
}

.bot-message {
    align-self: flex-start; /* Align to the left */
    background-color: #f1f0f0; /* Light grey */
    color: #333;
    border-bottom-left-radius: 5px; /* Sharpen bottom left corner */
}

.bot-message .message-time {
    left: 15px;
    right: auto;
}

.chat-input-container {
    display: flex;
    padding: 15px 20px;
    border-top: 1px solid #eee;
    background-color: #ffffff;
    border-bottom-left-radius: 15px;
    border-bottom-right-radius: 15px;
    gap: 10px;
}

#chat-input {
    flex-grow: 1;
    border: 1px solid #ddd;
    border-radius: 25px;
    padding: 10px 15px;
    font-size: 1em;
    outline: none;
    transition: border-color 0.3s ease;
}

#chat-input:focus {
    border-color: #2575fc;
    box-shadow: 0 0 0 3px rgba(37, 117, 252, 0.2);
}

#send-button {
    background: linear-gradient(to right, #6a11cb, #2575fc);
    color: white;
    border: none;
    border-radius: 25px;
    padding: 10px 20px;
    font-size: 1em;
    cursor: pointer;
    transition: background 0.3s ease, transform 0.2s ease;
    outline: none;
}

#send-button:hover {
    background: linear-gradient(to right, #500a9e, #1c5fd6);
    transform: translateY(-1px);
}

#send-button:active {
    transform: translateY(0);
}
Step-by-Step Breakdown: Bringing Your Chatbot to Life
JavaScript injects dynamic functionality into our HTML and CSS. We’ll handle user input, display messages, simulate bot responses, and ensure a smooth user experience. Let’s walk through each crucial piece of our script.
Initializing the Chat Interface
First, we grab references to our key HTML elements. This practice allows JavaScript to interact with the DOM efficiently. We target the input field, the send button, and the message container. These connections are essential for our script to listen for events and update the UI.
const chatMessages = document.getElementById('chat-messages');
const chatInput = document.getElementById('chat-input');
const sendButton = document.getElementById('send-button');
To make our chatbot interactive, we listen for user actions. We attach event listeners to our sendButton for clicks and to chatInput for ‘Enter’ key presses. This setup ensures users can send messages using their preferred method. It’s similar to how you might set up interactions for an Accessible Tabs: HTML, CSS & JS Interface Design component, where listening for user input is paramount for a good experience.
Sending and Displaying Messages
The sendMessage function is central to user interaction. It first checks if the input field has text. If empty, we stop, preventing blank messages. Otherwise, we capture the user’s message, clear the input, and create a new message element.
function sendMessage() {
    const userMessage = chatInput.value.trim();
    if (userMessage === '') return; // Don't send empty messages

    appendMessage(userMessage, 'user');
    chatInput.value = ''; // Clear input

    // Simulate bot response after a short delay
    setTimeout(() => {
        getBotResponse(userMessage);
    }, 800);
}
The appendMessage function creates message HTML dynamically. It takes text and sender type (‘user’ or ‘bot’). This modular approach keeps code clean. It creates a div, assigns classes, and populates it with a paragraph and a timestamp.
function appendMessage(text, sender) {
    const messageElement = document.createElement('div');
    messageElement.classList.add('message', `${sender}-message`);
    const now = new Date();
    const timeString = now.toLocaleTimeString([], { hour: '2-digit', minute: '2-digit' });

    messageElement.innerHTML = `
        <p>${text}</p>
        <span class="message-time">${timeString}</span>
    `;
    chatMessages.appendChild(messageElement);
    scrollToBottom(); // Always scroll to the latest message
}
After appending the new message, we call scrollToBottom() to keep the latest message visible. This provides a natural, fluid conversation flow, crucial for a great user experience. Good accessibility practices often involve smooth, understandable dynamic content updates.
“The secret to an engaging chatbot isn’t just intelligent responses, but a seamless, intuitive UI that makes conversation feel natural.”
Simulating Intelligent Responses
Our getBotResponse function brings our “AI” to life. For this example, we simulate responses using simple conditional logic, avoiding complex backend integrations. You can easily expand upon this with sophisticated logic or external API calls later.
function getBotResponse(userMessage) {
    const lowerCaseMessage = userMessage.toLowerCase();
    let botReply = "I'm sorry, I don't understand that. Can you please rephrase?";

    if (lowerCaseMessage.includes('hello') || lowerCaseMessage.includes('hi')) {
        botReply = "Hello there! How can I assist you today?";
    } else if (lowerCaseMessage.includes('how are you')) {
        botReply = "I'm just a program, but I'm doing great! Thanks for asking.";
    } else if (lowerCaseMessage.includes('name')) {
        botReply = "I am ChatBot UI. Nice to meet you!";
    } else if (lowerCaseMessage.includes('services')) {
        botReply = "I can help with general questions about our platform. What are you looking for?";
    } else if (lowerCaseMessage.includes('bye') || lowerCaseMessage.includes('goodbye')) {
        botReply = "Goodbye! Have a great day!";
    }

    appendMessage(botReply, 'bot');
}
This function analyzes userMessage and selects a predefined response. In a real-world scenario, you might integrate with an NLP service. For now, our basic if/else structure perfectly illustrates a bot replying to user input. The response is then passed to appendMessage for display.
Dynamic Auto-Scrolling
Automatic scrolling is crucial for any chat application. Users shouldn’t manually scroll for new messages. Our scrollToBottom function handles this, making conversations natural and effortless.
function scrollToBottom() {
    chatMessages.scrollTop = chatMessages.scrollHeight;
}
This simple function sets the scrollTop property of chatMessages to its scrollHeight. The scrollHeight is the entire content height. By setting scrollTop to this value, we instantly snap to the bottom. This keeps the most recent message in view, significantly enhancing user experience. It creates an intuitive flow.
Making It Responsive: Adapting Your Chatbot UI Design
Effective web applications must look great on all screen sizes. That’s why making our Chatbot UI Design responsive is essential. We’ll use media queries to adjust layout and styling. This ensures a seamless experience across desktops, tablets, and smartphones. Our approach will be mobile-first.
@media (max-width: 768px) {
    .chatbot-container {
        width: 100%;
        height: 100vh; /* Full viewport height on mobile */
        max-width: none;
        max-height: none;
        border-radius: 0;
        box-shadow: none;
    }

    .chat-header {
        border-radius: 0;
    }

    .chat-input-container {
        border-bottom-left-radius: 0;
        border-bottom-right-radius: 0;
    }
}

@media (max-height: 500px) {
    .chatbot-container {
        height: 100vh;
        max-height: none;
    }
}
For smaller screens, our chatbot will occupy the full viewport width and height. Our media query targets screens with a max-width of 768 pixels. Inside, we remove fixed max-width and max-height constraints on .chatbot-container. We set width: 100% and height: 100vh, expanding it to fill the entire screen. This provides an immersive mobile experience. We also zero out border-radii for a full-screen look.
Think how a Custom Select Dropdown: HTML, CSS & JS Tutorial needs careful styling to be touch-friendly. A chatbot is similar. Inputs must be large enough, and interactions feel natural. Design for the user’s environment. Explore more about responsive images and layouts on CSS-Tricks to deepen your responsive practices.
“Responsiveness isn’t an afterthought; it’s a fundamental principle for any modern web interface, especially one designed for interaction.”
Final Output: A Polished Conversation Interface
By combining HTML, CSS, and JavaScript, we’ve built a beautiful, functional chatbot interface. We started with HTML structure, then used CSS to style every component. This included the elegant header, avatar, and distinct message bubbles. Smooth scrolling ensures a delightful reading experience, keeping the latest messages in view.
JavaScript breathed life into our design. It handled message sending, simulated responses, and ensured dynamic updates. The result is a clean, modern, and interactive conversation window. You now have a solid foundation for any AI-driven project, demonstrating a strong grasp of core frontend development principles.
Conclusion: Your Next Steps in Interactive Design
Congratulations! You’ve built a robust and engaging Chatbot UI Design using standard web technologies. We covered HTML structure, sophisticated CSS styling, and dynamic JavaScript functionality. This project showcases the power of combining these core languages for interactive web experiences.
These skills are incredibly valuable. Apply this knowledge to enhance customer support, create educational tools, or develop interactive guides. Principles of dynamic content injection, event handling, and responsive design are universally applicable. Understanding how to fetch data from APIs, as seen in GraphQL Fetching: JavaScript Data with `fetch` API, could further empower your chatbot to pull real-time information.
Keep experimenting and building. Don’t hesitate to push boundaries. The world of web development evolves constantly. Mastering these fundamental UI design techniques puts you in an excellent position to innovate.
hello world
hello world