Your visitors won’t wait forever — every extra second your website takes to load can mean lost users, lower SEO rankings, and missed opportunities. Let’s change that.
Introduction
Improving web performance is one of the most direct ways to boost user satisfaction, SEO, and business results. A fast, efficient website not only delights users but also reduces bandwidth costs and improves engagement metrics. When your site loads quickly, visitors stay longer, interact more, and convert better.

In this guide, we’ll walk through five actionable steps to optimize your site’s loading speed and overall performance. Whether you’re a frontend developer fine-tuning assets or a full-stack engineer managing infrastructure, these techniques will help you deliver lightning-fast experiences without sacrificing functionality or design.
⚙️ H2 #1 — Audit and Measure Current Performance
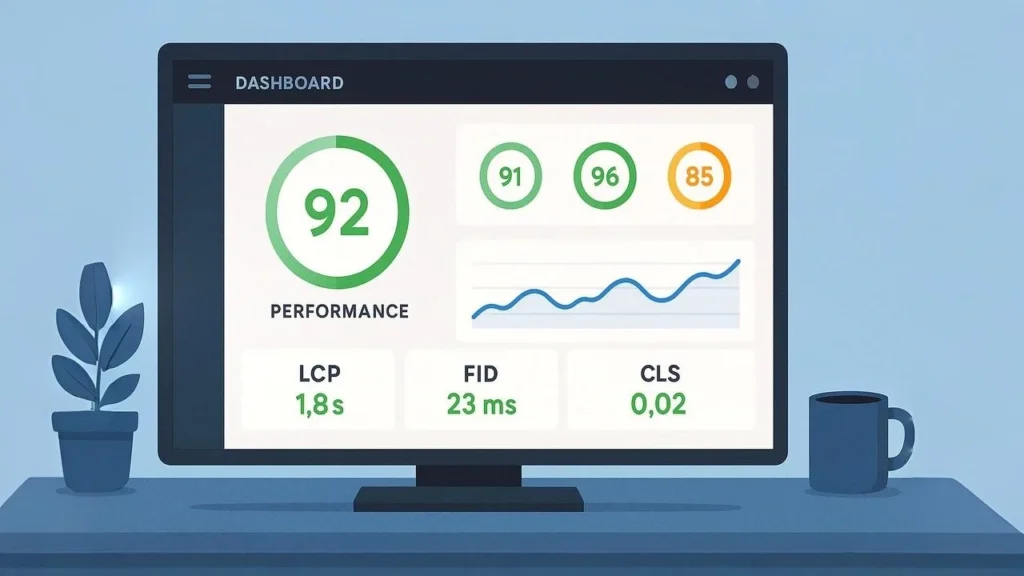
Before you can optimize anything, you need to understand your starting point. A proper performance audit shows what’s slowing your site down and gives you measurable metrics to improve.
H3 — Use the Right Tools
Start by running your site through Google Lighthouse, PageSpeed Insights, and WebPageTest. These tools measure critical web performance metrics such as:
- Largest Contentful Paint (LCP) – measures loading performance
- First Input Delay (FID) – measures interactivity
- Cumulative Layout Shift (CLS) – measures visual stability
Each report identifies slow resources, blocking scripts, or unoptimized media. Lighthouse even gives actionable suggestions and scoring breakdowns for mobile and desktop.
# Example: run Lighthouse from CLI
npm install -g lighthouse
lighthouse https://example.com --view
H3 — Set Baselines and Goals
After running the audit, record your key scores and define your targets:
- LCP: under 2.5 seconds
- FID: under 100 milliseconds
- CLS: below 0.1
Keep these numbers as your performance baseline. Schedule re-tests after every major update so you can monitor improvements over time.
🖼️ H2 #2 — Optimize Images and Media
Images and videos are often the largest assets on a page — and a primary cause of slow loading. Optimizing them can reduce total page weight by 50% or more.
H3 — Choose Modern Formats
Switch to next-generation formats like WebP or AVIF. They provide excellent compression and quality compared to older JPEG and PNG formats.
Example conversion:
cwebp input.jpg -o output.webp -q 80
This converts your image to WebP with 80% quality — visually similar but significantly smaller in size.
H3 — Implement Responsive and Lazy Loading
Always serve images sized appropriately for the user’s device. The <picture> element makes this easy:
<picture>
  <source srcset="hero.avif" type="image/avif">
  <img src="hero.webp" alt="optimized web performance hero image" loading="lazy">
</picture>
The loading="lazy" attribute tells browsers to delay loading images until they appear in the viewport, dramatically improving initial load time.
H3 — Compress and Cache
Use tools like Imagemin, Squoosh, or TinyPNG to compress images without losing noticeable quality. For videos, host them on platforms like YouTube or a CDN instead of self-hosting heavy MP4 files.
Then cache your media on a Content Delivery Network (CDN) to serve it quickly from the nearest geographic location.
🧩 H2 #3 — Minify and Bundle Resources
JavaScript, CSS, and HTML files are often filled with whitespace, comments, and redundant code that bloat file size. Minifying and bundling reduces transfer time and improves parsing efficiency.
- Minify CSS/JS with Terser, UglifyJS, or cssnano.
- Bundle intelligently using Webpack, Rollup, or Vite to combine multiple small files into one.
- Code-split dynamically so only the required modules are loaded per page.
Example using Terser:
import { minify } from "terser";
const result = await minify(code);
console.log(result.code);
Also, inline critical CSS in your <head> for faster rendering of above-the-fold content.
For additional speed gains, enable HTTP/2 or HTTP/3 on your server to allow parallel loading of assets.
💡 Pro tip: Monitor your bundle size using tools like
webpack-bundle-analyzerto avoid regressions after code changes.
🌍 H2 #4 — Use Caching and Content Delivery Networks (CDNs)
Caching ensures browsers and servers don’t repeatedly fetch unchanged files. Combined with CDNs, it reduces latency and drastically improves repeat visit performance.
H3 — Browser Caching
Leverage HTTP headers like Cache-Control and ETag to store static assets locally on the client’s browser. Example configuration (Apache):
<FilesMatch "\.(js|css|png|jpg|webp)$">
  Header set Cache-Control "max-age=31536000, public"
</FilesMatch>
This keeps static files cached for a year, reducing redundant network requests.
H3 — Server and Edge Caching
Use Redis, Varnish, or your framework’s built-in caching to store rendered pages or API responses. Pair it with a CDN (Cloudflare, Fastly, Akamai) to cache content geographically closer to users.
H3 — Service Workers for Offline Access
For advanced caching, implement service workers that intercept network requests and serve assets from local cache, enabling offline or near-instant loading for repeat visitors.
⚡ H2 #5 — Prioritize Critical Rendering Path and Code Efficiency
Once assets are optimized, focus on how the browser processes and renders them. The goal is to make meaningful content appear as soon as possible.
H3 — Defer and Async Scripts
Scripts that block rendering delay First Paint. Add defer or async attributes to non-critical scripts so the browser can render the page first:
<script src="analytics.js" async></script>
<script src="main.js" defer></script>
H3 — Eliminate Render-Blocking Resources
Use the preload and preconnect directives to hint browsers about critical assets early. For example:
<link rel="preconnect" href="https://fonts.googleapis.com">
<link rel="preload" href="/css/styles.css" as="style">
Load web fonts efficiently using font-display: swap to prevent invisible text.
H3 — Optimize Code and Reduce DOM Operations
- Remove unused libraries and polyfills.
- Optimize loops and selectors.
- Reduce deep DOM nesting to simplify rendering.
Smaller code = faster execution = better web performance.
🧠 Bonus: Monitor and Maintain Performance
Web performance optimization is not a one-time task — it’s an ongoing process. Use Performance APIs in browsers to monitor metrics like performance.timing and Core Web Vitals directly. Automate checks in your CI/CD pipeline with tools like Lighthouse CI or Calibre.
Set alerts when metrics degrade so you can react before users notice slowdowns.
🏁 Conclusion – Accelerate Your Success
By following these five steps to optimize web performance, you’ll dramatically improve your website’s loading speed, user experience, and SEO performance. Remember: speed is not just a technical metric — it’s a competitive edge.
Modern users expect instant responses. When your site feels lightning-fast, it communicates professionalism, builds trust, and improves conversions.