Introduction
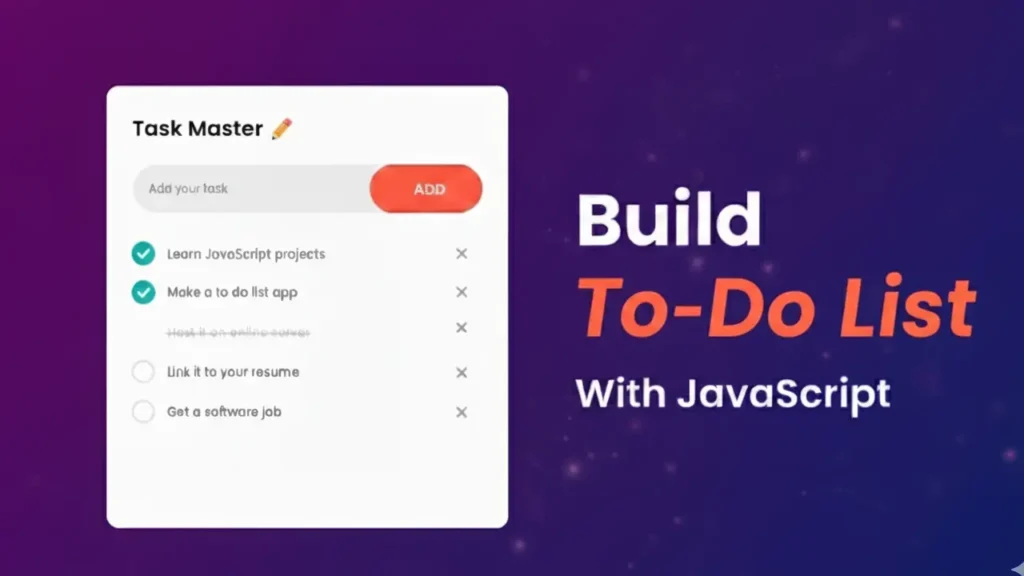
To-do list web app: In this tutorial you’ll build a simple, responsive to-do list web app using plain JavaScript, HTML, and CSS. This guide focuses on clear structure, accessibility, and saving tasks to localStorage so your app feels real and useful. Whether you’re learning DOM skills or preparing a demo project, this to-do list web app is an excellent starter.
What you’ll build
You’ll end up with a minimal, modern to-do list web app. It will let users add tasks, mark them done, delete tasks, and persist them across reloads. The UI will be responsive and accessible. Along the way you’ll learn event handling, DOM updates, and storage techniques. The same patterns scale when you add features like editing, priorities, or syncing.
Features at a glance
- Add tasks with a simple form.
- Toggle completion status with a button or keyboard action.
- Remove tasks with a delete control.
- Persist tasks with localStorage so items survive reloads.
- Accessible controls with ARIA attributes and clear focus states.
- Small JavaScript footprint; no frameworks required.
Project setup
Start a folder named todo-app and create three files: index.html, styles.css, and app.js. Open the folder in your code editor and serve it with a basic static server or open index.html directly in your browser. For version control, initialize a Git repo and make your first commit.
Folder structure
todo-app/
├─ index.html
├─ styles.css
└─ app.js
HTML skeleton and semantics
Create the minimal HTML structure. Semantic markup improves accessibility and SEO. Use landmarks like <main> and use a form for input to preserve built-in keyboard behavior.
<!-- index.html -->
<!doctype html>
<html lang="en">
<head>
  <meta charset="utf-8" />
  <meta name="viewport" content="width=device-width,initial-scale=1" />
  <title>To-Do List Web App</title>
  <link rel="stylesheet" href="styles.css" />
</head>
<body>
  <main class="container" role="main">
    <header>
      <h1>To-Do List</h1>
      <p class="lead">A lightweight to-do list web app with JavaScript and localStorage.</p>
    </header>

    <section aria-labelledby="add-task">
      <h2 id="add-task">Add a task</h2>
      <form id="task-form" aria-label="Add new task">
        <input id="task-input" type="text" placeholder="Add a task" aria-label="Task" required />
        <button id="add-btn" type="submit" aria-label="Add task">Add</button>
      </form>
    </section>

    <section aria-labelledby="tasks">
      <h2 id="tasks">Your tasks</h2>
      <ul id="task-list" aria-live="polite"></ul>
    </section>
  </main>
  <script src="app.js"></script>
</body>
</html>
Styling basics (CSS)
Keep styles simple and responsive. Use CSS variables for easy theming. Add keyboard focus styles and ensure sufficient color contrast.
/* styles.css - core */
:root{
  --bg:#ffffff; --muted:#f6f6f6; --accent:#2b6cb0; --text:#111827;
}
*{box-sizing:border-box}
body{font-family:system-ui,-apple-system,Segoe UI,Roboto,"Helvetica Neue",Arial; background:var(--muted); color:var(--text); padding:24px;}
.container{max-width:720px;margin:0 auto;background:var(--bg);padding:20px;border-radius:8px;box-shadow:0 6px 18px rgba(0,0,0,0.06);}
form{display:flex;gap:8px;margin-bottom:12px;}
input[type="text"]{flex:1;padding:10px;border:1px solid #ddd;border-radius:6px;}
button{padding:10px 14px;border-radius:6px;border:none;background:var(--accent);color:white;cursor:pointer;}
button:focus{outline:3px solid rgba(43,108,176,0.25);}
ul{list-style:none;padding:0;margin:0;}
li{display:flex;justify-content:space-between;align-items:center;padding:8px;border-bottom:1px solid #eee;}
li.completed{opacity:0.7;text-decoration:line-through;}
You can check out CSS Grid Modern layout as well.
Adding JavaScript — step by step
Now wire up the app. The script will handle adding, toggling, deleting, and persisting tasks. Each snippet is small and explainable.
Initialize and load
// app.js - initialize
const form = document.getElementById('task-form');
const input = document.getElementById('task-input');
const list = document.getElementById('task-list');

let tasks = JSON.parse(localStorage.getItem('tasks') || '[]');
render(); // initial render
Render function
The render function maps tasks into DOM nodes and attaches controls. Keep rendering deterministic and idempotent.
function render(){
  list.innerHTML = '';
  tasks.forEach((t, i) => {
    const li = document.createElement('li');
    li.className = t.done ? 'completed' : '';
    li.innerHTML = `
      <span>${escapeHtml(t.text)}</span>
      <span>
        <button data-action="toggle" data-index="${i}" aria-label="Toggle task ${i}">✓</button>
        <button data-action="delete" data-index="${i}" aria-label="Delete task ${i}">✕</button>
      </span>`;
    list.appendChild(li);
  });
}
Forms and events
form.addEventListener('submit', e => {
  e.preventDefault();
  const val = input.value.trim();
  if(!val) return;
  tasks.push({ text: val, done: false });
  input.value = '';
  saveTasks();
  render();
});
Delegated click handler
list.addEventListener('click', e => {
  const btn = e.target.closest('button');
  if(!btn) return;
  const i = Number(btn.dataset.index);
  const action = btn.dataset.action;
  if(action === 'toggle'){ tasks[i].done = !tasks[i].done; saveTasks(); render(); }
  if(action === 'delete'){ tasks.splice(i,1); saveTasks(); render(); }
});
Persistence
function saveTasks(){ localStorage.setItem('tasks', JSON.stringify(tasks)); }
function escapeHtml(str){ return str.replace(/[&<>'"]/g, c => ({'&':'&','<':'<','>':'>','\\'':''','"':'"'}[c])); }How the to-do list web app works (explainers)
- The to-do list web app stores tasks in a local
tasksarray. render()rebuilds the visible list fromtasksevery time state changes.localStoragekeeps a stringified copy so items persist across page reloads.- Event delegation on the task list keeps listeners minimal and performant.
LocalStorage deep-dive
localStorage stores strings only. In this to-do list web app we stringify the tasks array and parse it on load. Keep versioning in mind: if you change the task shape later, migrate old data safely.
// Example: migrating old tasks
const raw = localStorage.getItem('tasks');
if(raw){
  const parsed = JSON.parse(raw);
  // if items missing 'createdAt', add it
  tasks = parsed.map(t => ({ createdAt: t.createdAt || Date.now(), ...t }));
} else {
  tasks = [];
}
This snippet prevents corrupted data and makes your to-do list web app resilient.
Add edit-in-place
Editing tasks makes the to-do list web app more practical. A simple approach toggles a text input in the list item.
function enableEdit(index){
  const li = list.children[index];
  const span = li.querySelector('span');
  const old = tasks[index].text;
  const input = document.createElement('input');
  input.value = old;
  li.replaceChild(input, span);
  input.focus();
  input.addEventListener('blur', () => {
    tasks[index].text = input.value.trim() || old;
    saveTasks(); render();
  });
}
Keyboard accessibility examples
Make the app keyboard-friendly. Allow Enter to add, Arrow keys to move between tasks, and Delete to remove a focused task. Example pattern:
list.addEventListener('keydown', e => {
  const li = document.activeElement.closest('li');
  if(!li) return;
  const idx = Array.from(list.children).indexOf(li);
  if(e.key === 'Delete'){ tasks.splice(idx,1); saveTasks(); render(); }
  if(e.key === 'ArrowUp' && idx>0){ list.children[idx-1].focus(); }
  if(e.key === 'ArrowDown' && idx<list.children.length-1){ list.children[idx+1].focus(); }
});
Testing and debugging tips
Test in two browsers. Open DevTools console and watch for exceptions. Check localStorage in the Application tab. Use console.log() sparingly and remove logs before production.
Accessibility & ARIA tips
Use aria-label for buttons and inputs. Add aria-live="polite" to the task list so assistive tech announces changes. Ensure focus order makes sense and use visible focus outline for keyboard users.
Performance & deployment tips
Image optimize to WebP and lazy-load large screenshots. Minify CSS and JS for production. Deploy on GitHub Pages, Netlify, or Vercel for free hosting. Use HTTP cache headers for static assets.
Enhancements and feature ideas
Once the base to-do list web app works, you can add:
- Edit tasks inline for quick updates.
- Due dates, reminders, and push notifications.
- Categories or tags with filter UI.
- Drag-and-drop ordering using the HTML5 Drag API.
- A simple backend for multi-device sync.
Recommended assets and optimization
- Convert large PNGs to WebP and serve
image.webpwhere supported. - Max image width 1600px for hero, 800px for content screenshots.
- Use
loading="lazy"on non-critical images. - Compress images to ~70% quality for balance of clarity and size.
Semantic HTML notes
Use <main>, <section>, and <header> tags to group content. Buttons should have aria-labels. Use role="list" for custom lists only if necessary.
Deployment quick steps
- GitHub Pages: push to
gh-pagesbranch or enable Pages on the repo settings. - Netlify: drag-and-drop the
distfolder or connect the repo for continuous deploy. - Vercel: connect the repo and set the build command if using a bundler.
Finally, add a smallREADME.mdwith instructions to run locally:git clone ...,open index.htmlornpx serve .for a static server.
FAQ (short)
Why doesn’t my task save? Check localStorage quota and verify saveTasks() is called after mutations.
Why is my UI not accessible? Add aria-label attributes and test with a screen reader.
How can I add sync? Implement a backend API and save tasks per user with authentication.
Final checklist before publishing
- Proofread code and comments.
- Optimize and compress images.
- Add
loading="lazy"to screenshot images. - Confirm keyboard accessibility and test with at least one screen reader.
- Add a canonical URL and structured data for the tutorial page.
Conclusion & CTA
You now have a complete to-do list web app built with vanilla JavaScript. Fork the repo, test the edit and keyboard features, and push a live demo. If this tutorial helped, subscribe for more step-by-step builds, comment with your improvements, or watch the demo video.