Hey fellow developers! Ever wondered how those beautiful, easy-to-read code blocks on your favorite coding blogs or documentation sites get their vibrant colors and structured look? It’s all thanks to Syntax Highlighting. This fantastic feature isn’t just about making code look pretty; it’s about drastically improving readability, making it easier to parse code logic, and ultimately boosting comprehension for anyone staring at lines of text.
Today, we’re going to roll up our sleeves and build our own custom syntax highlighter using just HTML, CSS, and plain old JavaScript. No heavy libraries, just pure frontend magic!
What We Are Building: Elevating Code with Syntax Highlighting
Imagine showcasing your amazing JavaScript functions or elegant CSS snippets on your blog. Without proper styling, they look like a monotonous wall of text. Our goal is to transform those plain text blocks into visually distinct, color-coded masterpieces. We’ll create a robust system that automatically identifies different parts of code, such as keywords, strings, comments, and variables, then applies unique styles to each.
This isn’t just a trend; it’s a fundamental aspect of any modern technical content platform. Clear code presentation is vital whether you’re building a developer portfolio, writing a tutorial series, or documenting an open-source project. It ensures your readers grasp complex concepts quickly, making your content more effective and engaging. Plus, it just looks incredibly professional!
You can use this technique anywhere code needs to be displayed elegantly. Think about the documentation you’ve read or the interactive coding playgrounds you’ve seen. This foundational skill will empower you to create highly polished and developer-friendly content.
HTML Structure
Our HTML will be straightforward. We’ll use a `pre` element to contain our code, and a `code` element inside that to signify the actual code block. We’ll also include a simple button for a handy copy-to-clipboard feature.
index.html
<!DOCTYPE html>
<html lang="en">
<head>
    <meta charset="UTF-8">
    <meta name="viewport" content="width=device-width, initial-scale=1.0">
    <title>Code Block Syntax Highlighting</title>
    <link rel="stylesheet" href="styles.css">
</head>
<body>
    <div class="container">
        <h1>Code Block Syntax Highlighting</h1>

        <h2>JavaScript Example</h2>
        <div class="code-block-wrapper">
            <pre><code class="language-javascript">function greet(name) {
  // This is a single-line comment
  const message = "Hello, " + name + "!";
  /*
   * This is a multi-line
   * comment block.
   */
  if (name === "World") {
    console.log(message); // Log to console
  } else {
    return 12345.67;
  }
  return message;
}

const myName = "Alice";
greet(myName); // Call the function
</code></pre>
        </div>

        <h2>HTML Example</h2>
        <div class="code-block-wrapper">
            <pre><code class="language-html"><!DOCTYPE html>
<html lang="en">
<head>
    <meta charset="UTF-8">
    <meta name="viewport" content="width=device-width, initial-scale=1.0">
    <title>My Page</title>
</head>
<body data-theme="dark">
    <!-- Main content area -->
    <h1>Welcome to <span>My Website</span></h1>
    <p>This is a paragraph.</p>
</body>
</html>
</code></pre>
        </div>
    </div>

    <script src="script.js"></script>
</body>
</html>
script.js
document.addEventListener('DOMContentLoaded', () => {
    const codeBlocks = document.querySelectorAll('pre code');

    codeBlocks.forEach(codeBlock => {
        const languageClass = Array.from(codeBlock.classList).find(cls => cls.startsWith('language-'));
        if (!languageClass) return; // Skip if no language specified

        const language = languageClass.replace('language-', '');
        const originalCode = codeBlock.textContent; // Get the raw text content
        let highlightedCode = originalCode;

        // First, escape HTML entities from the original code to prevent browser misinterpretation
        // and to allow our highlighting regexes to work on a 'plain' string representation of the code.
        highlightedCode = escapeHtml(highlightedCode);

        // Apply language-specific highlighting
        if (language === 'javascript') {
            highlightedCode = highlightJavaScript(highlightedCode);
        } else if (language === 'html') {
            highlightedCode = highlightHTML(highlightedCode);
        }
        // For unsupported languages, it's already HTML-escaped, which is a safe fallback.

        codeBlock.innerHTML = highlightedCode;
    });

    /**
     * Escapes HTML entities in a string to prevent XSS and ensure proper display of code.
     * @param {string} text The input string.
     * @returns {string} The HTML-escaped string.
     */
    function escapeHtml(text) {
        const map = {
            '&': '&',
            '<': '<',
            '>': '>',
            '"': '"',
            "'": '''
        };
        return text.replace(/[&<>"]/g, (m) => map[m]);
    }

    /**
     * Highlights JavaScript code using regex-based tokenization.
     * The order of regex application is crucial to avoid conflicts and ensure correct highlighting.
     * @param {string} escapedCode The HTML-escaped JavaScript code string.
     * @returns {string} The HTML string with syntax highlighting spans.
     */
    function highlightJavaScript(escapedCode) {
        let code = escapedCode;

        // 1. Comments: Single-line (//) and multi-line (/* */)
        // Must be done first as they can contain any characters that might otherwise be highlighted.
        code = code.replace(/(\//.*?(\n|$))|(\/\*[\s\S]*?\*\/)/g, `<span class="token comment">$&</span>`);

        // 2. Strings: Double-quoted and single-quoted
        // Must be done before keywords/operators that might appear inside strings.
        code = code.replace(/("(?:[^"\\]|\\.)*"|'(?:[^'\\]|\\.)*')/g, `<span class="token string">$&</span>`);

        // 3. Keywords: Common JavaScript keywords
        // Using word boundaries (\b) to ensure whole words are matched.
        const keywords = [
            'function', 'var', 'let', 'const', 'if', 'else', 'return', 'for', 'while', 'do', 'switch',
            'case', 'break', 'continue', 'try', 'catch', 'finally', 'new', 'this', 'super', 'class',
            'extends', 'import', 'export', 'await', 'async', 'yield', 'debugger', 'typeof', 'instanceof',
            'in', 'delete', 'void', 'null', 'undefined', 'true', 'false'
        ];
        const keywordRegex = new RegExp(`\\b(${keywords.join('|')})\\b`, 'g');
        code = code.replace(keywordRegex, `<span class="token keyword">$&</span>`);

        // 4. Numbers: Integers, decimals, scientific notation
        code = code.replace(/\\b\\d+(\\.\\d+)?([eE][+-]?\\d+)?\\b/g, `<span class="token number">$&</span>`);

        // 5. Operators: Arithmetic, assignment, logical, comparison, etc.
        // Longer operators should come before shorter ones to prevent partial matches (e.g., '===' before '==').
        const operators = [
            '===', '!==', '++', '--', '>>>=', '>>=', '<<=', '=>',
            '==', '!=', '>=', '<=', '&&', '||', '+=', '-=', '*=', '/=', '%=', '&=', '|=', '^=', '**=',
            '/', '*', '+', '-', '%', '=', '&', '|', '^', '!', '~', '<', '>', '?', ':'
        ];
        // Escape operators for use in a regex constructor
        const escapedOperators = operators.map(op => op.replace(/[.*+?^${}()|[\]\\]/g, '\\$&'));
        const operatorRegex = new RegExp(`(${escapedOperators.join('|')})`, 'g');
        code = code.replace(operatorRegex, `<span class="token operator">$&</span>`);

        // 6. Punctuation: Braces, parentheses, brackets, semicolons, commas
        // This should be relatively safe after operators.
        code = code.replace(/([{}()[\\];,])/g, `<span class="token punctuation">$&</span>`);

        // 7. Function names: Identifiers immediately followed by '('
        // This pattern identifies what looks like a function call or declaration.
        code = code.replace(/\\b([a-zA-Z_$][0-9a-zA-Z_$]*)(?=\\s*\\()/g, `<span class="token function">$&</span>`);

        // 8. Variables: Any remaining word characters that aren't already highlighted as keywords or functions
        // This is a simplification. A truly robust solution requires a lexer/parser.
        // This regex attempts to find identifiers that are not preceded by '<span' (i.e., not already highlighted).
        // Note: Negative lookbehind (?<!...) might not be supported in older JS engines.
        // For simplicity and broad compatibility, we apply this last and accept potential imperfections.
        code = code.replace(/\\b([a-zA-Z_$][0-9a-zA-Z_$]*)\\b/g, (match) => {
            // Prevent re-highlighting if it's already a keyword or function
            if (keywords.includes(match)) return match;
            // Further checks to prevent re-highlighting already wrapped tokens would make this more complex
            return `<span class="token variable">${match}</span>`;
        });

        return code;
    }

    /**
     * Highlights HTML code using regex-based tokenization.
     * @param {string} escapedCode The HTML-escaped HTML code string.
     * @returns {string} The HTML string with syntax highlighting spans.
     */
    function highlightHTML(escapedCode) {
        let code = escapedCode;

        // 1. HTML Comments: <!-- ... -->
        code = code.replace(/(<!--[\s\S]*?-->)/g, `<span class="token comment">$&</span>`);

        // 2. HTML Tags, Attributes, and Attribute values
        // This complex regex captures a full tag (e.g., <div class="foo"> or </div>) and uses a replacer function
        // to process its internal parts (tag name, attributes, attribute values).
        code = code.replace(/(<\/?)([a-zA-Z0-9_-]+)([^&]*?)(>)/g, (match, prefix, tagName, innerContent, suffix) => {
            let highlightedInnerContent = innerContent;

            // Highlight attribute names and values within the inner content
            highlightedInnerContent = highlightedInnerContent.replace(/([a-zA-Z0-9_-]+)(=)("(?:[^"\\]|\\.)*"|'(?:[^'\\]|\\.)*')/g, (attrMatch, attrName, eq, attrValue) => {
                return `<span class="token attribute">${attrName}</span><span class="token operator">${eq}</span><span class="token string attr-value">${attrValue}</span>`;
            });

            // Handle boolean attributes (e.g., <input disabled>)
            highlightedInnerContent = highlightedInnerContent.replace(/(\s)([a-zA-Z0-9_-]+)(?=\s|>)/g, (spaceMatch, space, attrName) => {
                 // Ensure we don't accidentally highlight parts of already styled content (e.g., inside strings or comments)
                if (spaceMatch.includes('<span')) return spaceMatch; // Already highlighted
                return `${space}<span class="token attribute">${attrName}</span>`;
            });

            return `${prefix}<span class="token tag">${tagName}</span>${highlightedInnerContent}${suffix}`;
        });

        return code;
    }
});
CSS Styling
The CSS is where we’ll bring our code block to life, defining its overall appearance, scrollability, and, most importantly, the colors for different syntax elements. We’ll ensure it’s not just functional but also visually appealing and accessible.
styles.css
:root {
    --bg-color: #1a1a2e;
    --text-color: #e0e0e0;
    --code-bg-color: #24243a;
    --code-border-color: #3b3b5b;

    /* Token Colors */
    --keyword-color: #e9c46a; /* Yellowish */
    --string-color: #a7d97f;  /* Greenish */
    --comment-color: #8b96a9; /* Grayish blue */
    --number-color: #92b0f4;  /* Light blue */
    --operator-color: #ff9f75; /* Orangeish */
    --punctuation-color: #e0e0e0;
    --function-color: #c993d9; /* Purple */
    --variable-color: #7ce7e6; /* Cyan - used for generic identifiers */
    --tag-color: #fa8072; /* Salmon */
    --attribute-color: #ffd700; /* Gold */
}

/* Global styles */
* {
    box-sizing: border-box;
}

body {
    font-family: Arial, Helvetica, sans-serif;
    background-color: var(--bg-color);
    color: var(--text-color);
    margin: 0;
    padding: 20px;
    line-height: 1.6;
    display: flex;
    flex-direction: column;
    align-items: center;
    min-height: 100vh;
}

.container {
    max-width: 900px;
    width: 100%;
    padding: 0 15px;
}

h1 {
    color: var(--keyword-color);
    text-align: center;
    margin-bottom: 40px;
}

h2 {
    color: var(--text-color);
    margin-top: 30px;
    margin-bottom: 15px;
}

/* Code block container */
.code-block-wrapper {
    background-color: var(--code-bg-color);
    border-radius: 8px;
    border: 1px solid var(--code-border-color);
    margin-bottom: 20px;
    padding: 15px;
    max-width: 100%;
    box-shadow: 0 4px 8px rgba(0, 0, 0, 0.2);
}

pre {
    margin: 0;
    padding: 0;
    overflow-x: auto; /* Enable horizontal scrolling for long lines */
}

code {
    display: block; /* Ensures padding and line-height work correctly */
    font-family: 'Courier New', Courier, monospace;
    font-size: 0.95em;
    line-height: 1.5;
    white-space: pre; /* Maintain whitespace and line breaks */
    padding: 5px;
    color: var(--text-color); /* Default text color for code */
}

/* Syntax Highlighting Classes */
.token.comment {
    color: var(--comment-color);
    font-style: italic;
}

.token.string,
.token.attr-value {
    color: var(--string-color);
}

.token.keyword {
    color: var(--keyword-color);
    font-weight: bold;
}

.token.number {
    color: var(--number-color);
}

.token.operator {
    color: var(--operator-color);
}

.token.punctuation {
    color: var(--punctuation-color);
}

.token.function {
    color: var(--function-color);
}

.token.variable {
    color: var(--variable-color);
}

.token.tag {
    color: var(--tag-color);
    font-weight: bold;
}

.token.attribute {
    color: var(--attribute-color);
}
Step-by-Step Breakdown: Implementing Custom Syntax Highlighting
Now that we’ve set up the basic structure and styling, let’s dive into the JavaScript. This is where the real magic happens, as we dynamically parse and style our code blocks.
Setting Up the Basic Structure
Firstly, we need to create a simple HTML file. Inside the <body>, you’ll place your <pre> and <code> tags. The <pre> tag is essential because it preserves whitespace and line breaks, which are crucial for displaying code accurately. The <code> tag semantically indicates that its content is a piece of code. We’ll wrap our plain code string inside these. Additionally, we’ll add a button element adjacent to our code block for the copy functionality. We’ll link our CSS file in the <head> and our JavaScript file just before the closing </body> tag for optimal loading. You might even find it useful for creating something like an Interactive TOC: HTML, CSS & JS Table of Contents for your blog to help users navigate long code snippets!
“Effective code presentation isn’t just about aesthetics; it’s about accelerating understanding. A well-highlighted block can shave minutes off a developer’s comprehension time.”
The JavaScript Magic: Highlighting Logic
Our JavaScript will be responsible for finding all code blocks, splitting their content into individual lines, and then applying our custom highlighting rules. We’ll use regular expressions to identify different tokens within each line. This approach provides immense flexibility, allowing us to define precisely what constitutes a keyword, a string, or a comment. The process involves iterating through each line, applying regex patterns, and then wrapping the matched parts in <span> tags with specific classes. For example, a keyword like 'function' might get a 'keyword' class, while a string like "hello world" gets a 'string' class. This granular control is what gives us the power to style each part uniquely with CSS. Moreover, understanding how to manipulate the DOM and react to user interactions can be greatly enhanced by learning about CustomEvents JS: Explained with Vanilla JavaScript, which offers powerful ways to create more interactive web experiences.
Crafting Our Highlighting Rules
This is arguably the most creative part. We’ll define an array of objects, where each object contains a regular expression and the corresponding CSS class name. For instance, we’ll have a regex for JavaScript keywords ('function|var|const|let'), another for strings (/("|')(?:(?=(\\?))\2.)*?\1/g), and one for comments (/\/\/.*|\/\*[^]*\*\//g). Our script will loop through these rules, applying them sequentially. The order of application matters; more specific rules (like strings or comments) should generally be applied before broader rules (like general identifiers) to prevent over-matching. Each match will be replaced with a <span> tag, effectively injecting our styling hooks into the raw code text. This step transforms a plain text string into rich HTML, ready for CSS to style.
Adding the Copy-to-Clipboard Functionality
A good code block isn’t complete without an easy way to copy its content. We’ll add an event listener to our copy button. When clicked, this listener will grab the raw text content of the <code> block, use the browser’s navigator.clipboard.writeText() API to copy it to the user’s clipboard, and then provide some visual feedback (e.g., changing the button text to “Copied!”). This small addition significantly improves the user experience. You can learn more about browser APIs and their capabilities on MDN Web Docs, which is an invaluable resource for all things web development. It’s a simple yet powerful feature that prevents users from manually selecting and copying, which can be cumbersome, especially on mobile devices or for large code snippets. Remember, user convenience is paramount in web design.
Making It Responsive
Code blocks can be quite wide, especially with long lines. Responsiveness is key to ensure our highlighted code looks great on any screen size. We’ll use CSS media queries to adjust font sizes, padding, and potentially scroll behavior for smaller screens. For instance, on mobile, we might reduce the font size and ensure the `pre` element has `overflow-x: auto;` to allow horizontal scrolling without breaking the layout. This ensures that even on the smallest devices, the code remains readable and all its elements are accessible without forcing awkward page overflows. A mobile-first approach here is always a good idea, designing for the smallest screen and then progressively enhancing for larger viewports. Techniques for robust layouts can be further explored on resources like CSS-Tricks, a treasure trove of front-end wisdom.
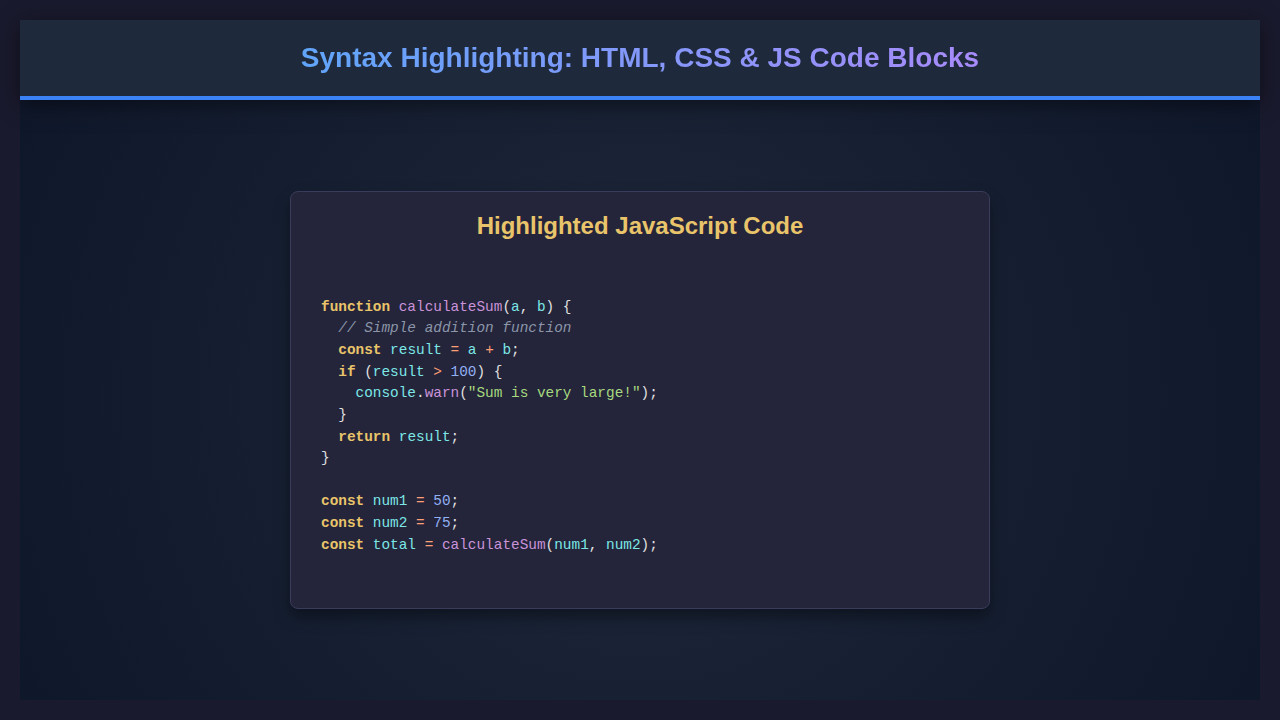
Final Output
After integrating all these pieces, our code blocks will transform from plain text into beautifully formatted, color-coded snippets. You’ll see distinct colors for keywords, strings, comments, numbers, and more. The block will be scrollable if its content exceeds the width, and a functional copy button will sit nearby, ready to transfer the code to the clipboard. The visual difference is stark, making your technical content significantly more professional and user-friendly. It truly changes the way code is presented.
“The beauty of web development lies in turning complex functionality into an intuitive user experience. Syntax highlighting is a prime example.”
Conclusion
There you have it! We’ve successfully built a custom Syntax Highlighting system using fundamental web technologies. You’ve learned how to structure your HTML, style with CSS, and apply dynamic parsing with JavaScript and regular expressions. This knowledge empowers you to create engaging and accessible technical content, making your articles and documentation a joy to read.
The principles we’ve covered can be extended to support more languages, add line numbering, or even create interactive elements within your code blocks. This is just the beginning of what you can achieve with a solid grasp of vanilla JavaScript. Keep experimenting, keep building, and always strive to make the web a better place for developers and users alike. If you’re interested in ensuring the reliability of your advanced JavaScript projects, consider exploring topics like Playwright E2E: End-to-End Testing with JavaScript to ensure your dynamic content functions flawlessly.