Have you ever been knee-deep in a complex JavaScript application, making a tiny CSS tweak or a small change to a component’s logic, only to watch your entire page refresh, losing all your precious application state? It’s a frustrating dance we’ve all done countless times. But what if I told you there’s a magical solution that lets you update modules on-the-fly without a full reload? Enter HMR JavaScript, or Hot Module Replacement, a game-changer for developer experience. This incredible technology allows your application to swap out individual modules at runtime, preserving your application’s state and dramatically speeding up your development loop. Get ready to supercharge your workflow!
What We Are Building: A Glimpse into Seamless Development
We’re diving deep into a concept that redefines frontend development: Hot Module Replacement. Imagine working on a sophisticated dashboard or a complex wizard-style form where user input and application state are critical. Every time you tweak a button’s color or refine a data fetching function, a full page refresh means losing all that state – you have to re-enter data, navigate back, and recreate the scenario. This constant interruption is not just annoying; it’s a significant drain on productivity.
HMR addresses this head-on. It’s trending because modern web applications are increasingly stateful and component-driven. Tools like React, Vue, and Angular thrive on component reusability, and HMR perfectly complements this by allowing individual components or modules to be updated in isolation. For instance, if you’re developing a chat application, you wouldn’t want to lose the chat history every time you adjust the message input field’s styling. HMR shines brightest in such scenarios, making it invaluable for SPAs (Single Page Applications), UI libraries, and any project where maintaining application state during development is crucial.
Our goal here isn’t to build a full HMR system from scratch – that’s a massive undertaking handled by bundlers like Webpack or Vite. Instead, we’ll build a simple JavaScript application and, more importantly, explore the principles of how HMR functions under the hood, showing you what it does for your code and why it’s a must-have for modern development. This way, you’ll gain a solid understanding of its power, even if you’re not implementing the HMR server yourself.
HTML Structure: The Canvas for Our HMR Exploration
Our HTML will be minimal, providing a basic container for our JavaScript application. It’s the stage where our modules will dynamically perform.
<main class="container">
    <h1>HMR Concept Demo</h1>
    <section class="app-card">
        <h2>My Dynamic App Module</h2>
        <p>This paragraph represents a module's content.</p>
        <div id="dynamic-content">
            <p>Initial dynamic content or a counter starts here.</p>
            <button id="increment-btn">Increment Counter</button>
            <p>Count: <span id="counter-display">0</span></p>
        </div>
        <p class="explanation">Imagine this section updating without a full page reload!</p>
    </section>
    <section class="info-card">
        <h3>Why HMR?</h3>
        <p>HMR helps preserve your application's state during development, significantly boosting productivity.</p>
    </section>
</main>
CSS Styling: Giving Our App a Fresh Look
We’ll add some simple CSS to make our basic application visually appealing and easier to understand. The styling will demonstrate how even CSS changes can be hot-reloaded with HMR.
:root {
    --primary-color: #2c3e50;
    --secondary-color: #3498db;
    --accent-color: #ecf0f1;
    --text-color: #f8f8f8;
    --card-bg: #3b4d61;
    --shadow: 0 4px 6px rgba(0, 0, 0, 0.1);
}

body {
    font-family: 'Segoe UI', Tahoma, Geneva, Verdana, sans-serif;
    margin: 0;
    padding: 10px;
    background-color: var(--primary-color);
    color: var(--text-color);
    line-height: 1.6;
    display: flex;
    justify-content: center;
    align-items: flex-start; /* Align at the top */
    min-height: 100vh;
}

.container {
    max-width: 900px;
    width: 100%;
    margin: 20px auto;
    padding: 20px;
    background-color: var(--primary-color);
    border-radius: 8px;
    box-shadow: var(--shadow);
}

h1 {
    text-align: center;
    color: var(--secondary-color);
    margin-bottom: 30px;
    font-size: 2.5em;
    letter-spacing: 1px;
}

.app-card, .info-card {
    background-color: var(--card-bg);
    padding: 25px;
    margin-bottom: 20px;
    border-radius: 6px;
    box-shadow: var(--shadow);
}

.app-card h2, .info-card h3 {
    color: var(--secondary-color);
    border-bottom: 2px solid var(--secondary-color);
    padding-bottom: 10px;
    margin-top: 0;
}

#dynamic-content {
    background-color: rgba(255, 255, 255, 0.05);
    padding: 15px;
    border-left: 4px solid var(--secondary-color);
    margin: 15px 0;
    border-radius: 4px;
}

#dynamic-content p {
    margin: 0 0 10px 0;
}

#increment-btn {
    background-color: var(--secondary-color);
    color: var(--text-color);
    border: none;
    padding: 10px 20px;
    border-radius: 5px;
    cursor: pointer;
    font-size: 1em;
    transition: background-color 0.3s ease;
}

#increment-btn:hover {
    background-color: #2980b9; /* Darker secondary */
}

.explanation {
    font-style: italic;
    color: var(--accent-color);
    font-size: 0.9em;
    text-align: center;
    margin-top: 20px;
}

/* Responsive adjustments */
@media (max-width: 768px) {
    h1 {
        font-size: 2em;
    }
    .container {
        margin: 10px auto;
        padding: 15px;
    }
    .app-card, .info-card {
        padding: 20px;
    }
}

@media (max-width: 480px) {
    body {
        padding: 5px;
    }
    h1 {
        font-size: 1.8em;
    }
    #increment-btn {
        width: 100%;
        box-sizing: border-box;
    }
}
Step-by-Step Breakdown: Understanding HMR JavaScript in Action
Now, let’s get to the core of how HMR works. While we won’t be building a HMR server ourselves, understanding the process conceptually is crucial. Think of HMR as an intelligent update mechanism that replaces only the changed parts of your application, without wiping everything clean. This is fundamentally different from a full page reload, which literally re-fetches all assets and re-executes all scripts.
The Role of a Module Bundler in HMR
Modern HMR implementations rely heavily on module bundlers like Webpack or Vite. When you’re using one of these tools, they do a lot of heavy lifting. They essentially create a “module graph” of your application, understanding all its dependencies. When a file changes, the bundler doesn’t just recompile everything; it identifies which modules were affected. For instance, if you modify button.js, the bundler knows that button.js needs to be updated. It then communicates this change to the browser via a WebSocket connection. The browser, running a small HMR runtime, receives this update.
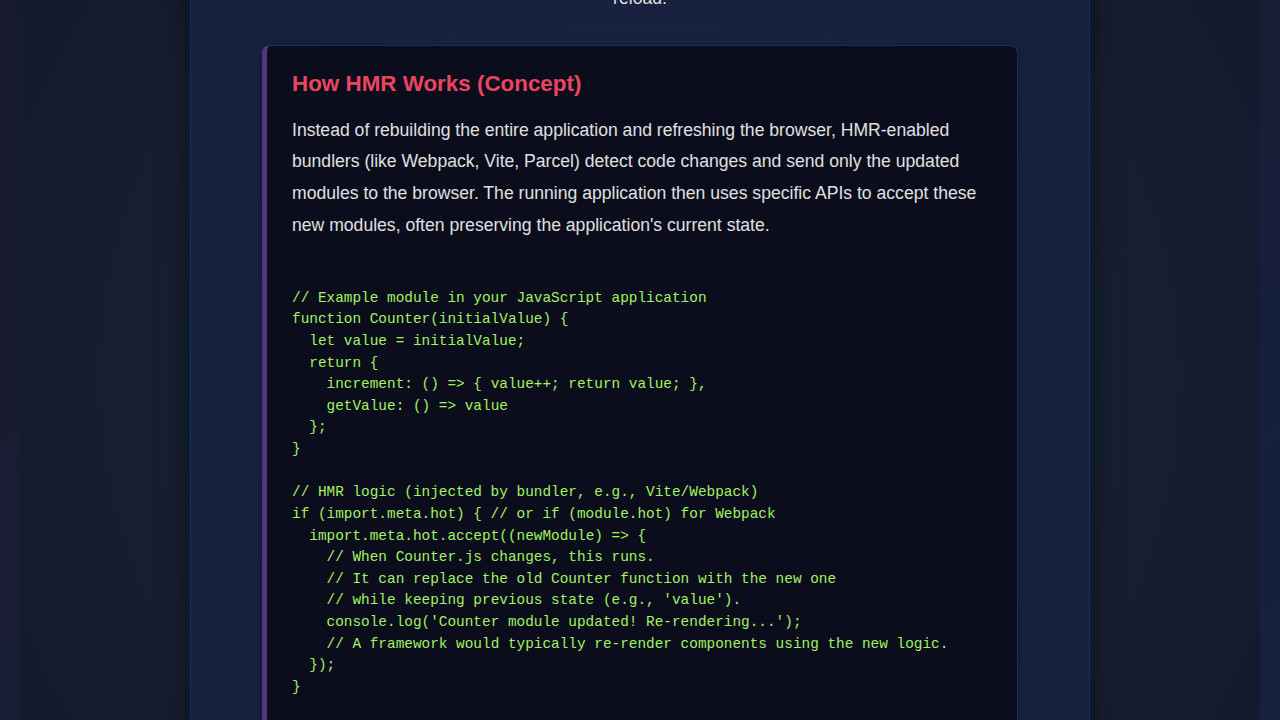
How HMR Works Its Magic
The HMR runtime in your browser then takes over. It identifies the old version of the changed module and “swaps” it out with the new version. Crucially, it attempts to re-evaluate the new module and re-apply its effects without touching other parts of the application. If button.js controlled a counter, HMR would update the button’s logic without resetting the counter’s value that’s already displayed on the screen. This preservation of state is the golden ticket. Consequently, if a component fetches data, HMR can update the UI without re-triggering the data fetch, saving precious development time. Moreover, this approach significantly reduces the time spent waiting for your application to recompile and reload, especially for large projects. You’re effectively building a living, breathing application that adapts to your changes instantly.
“HMR transforms development from a series of destructive reloads into a fluid, continuous interaction with your application’s evolving state.”
This is also where good Modular JavaScript Components: Architecture Tutorial practices come into play. The more isolated and self-contained your modules are, the easier it is for HMR to replace them without side effects. Well-defined interfaces and dependencies make HMR extremely efficient.
The module.hot API
Bundlers expose an API, typically module.hot, which allows you to programmatically define how a module should handle updates. You can tell a module to accept an update, or dispose of its old state before the new module takes over. This API is what allows bundlers to achieve state preservation. Without it, HMR would simply swap out the code, potentially losing any dynamic data or internal states that the module held. Therefore, understanding this API, even if you don’t write it manually often, is key to grasping HMR’s full potential. It’s a powerful mechanism that allows developers to fine-tune how their application reacts to live code changes.
// Example of how a module *might* handle HMR updates (conceptual)
// (This code won't run directly in a browser without a bundler's HMR runtime)

// In your main application entry point (e.g., index.js)
// Imagine 'app' is your main application instance
if (module.hot) {
  module.hot.accept('./myModule.js', function() {
    // When './myModule.js' is updated, this callback runs.
    // Here, you'd re-render the part of the UI that depends on myModule.js
    console.log('myModule.js was updated! Re-rendering relevant parts.');
    // For example, if myModule renders a component, you might re-mount it
    // or call a specific update function on an existing instance.
  });

  module.hot.dispose(function(data) {
    // This runs before the old module is replaced.
    // You can save state here to be re-injected into the new module.
    console.log('Old module being disposed. Saving state...');
    data.count = currentCount; // Store a variable, for instance
  });
}

// In a module that has state, e.g., a counter module
let currentCount = 0;

export function incrementCount() {
  currentCount++;
  console.log('Current count:', currentCount);
}

export function getCount() {
  return currentCount;
}

// If this module is updated and it previously used `dispose`,
// we could re-initialize `currentCount` from `module.hot.data`.
if (module.hot && module.hot.data && module.hot.data.count) {
  currentCount = module.hot.data.count;
  console.log('Restored count from HMR data:', currentCount);
}
Making It Responsive: Adapting to Every Screen
In today’s multi-device world, responsiveness isn’t optional; it’s fundamental. Our simple application will implement basic responsive design principles, ensuring it looks good and functions well across various screen sizes. We’ll utilize media queries to adjust layout and font sizes, adopting a mobile-first approach. This means we design for smaller screens first, then progressively enhance for larger displays. This strategy ensures a solid foundation for all users, regardless of their device.
Furthermore, tools like HMR accelerate the responsive design process. You can adjust your CSS media queries and instantly see the effect on different viewport sizes without constantly refreshing and losing your current test state, saving countless hours of development time. It’s truly a boost to your front-end workflow. You can explore more about Media Queries on MDN.
Final Output: Seeing the Seamless Updates
When all our pieces come together, what do we get? A simple web page, but one that conceptually demonstrates the power of HMR. Imagine a counter app: without HMR, every code change would reset the count to zero. With HMR, you could change the button’s styling, add a new feature to the counter, or refactor a utility function, and the counter’s value would remain undisturbed. This is the magic.
Our demo, while not a fully HMR-enabled project (as that requires a bundler), serves to visualize what HMR achieves. You’ll see a clean, functional layout. The key visual achievement isn’t just a pretty UI; it’s the implication of how effortlessly that UI could be iterated upon in a development environment powered by HMR. It’s about achieving a high-fidelity preview of your changes, preserving your context. You can also dive into how such dynamic logic is at play when building AI Agent Logic: Explain Decisions with JavaScript.
Conclusion: Why HMR JavaScript Boosts Your Workflow
We’ve journeyed through the core concepts of HMR JavaScript, understanding its pivotal role in modern web development. From its ability to preserve application state to its dramatic impact on development speed, HMR is more than just a convenience; it’s a fundamental shift in how we build and iterate on web applications. By intelligently swapping out modules without full page refreshes, it keeps you in the flow, reduces context switching, and ultimately leads to a more enjoyable and productive coding experience.
Adopting HMR, often through popular bundlers like Webpack or Vite, is a no-brainer for any serious JavaScript developer. It streamlines the debugging process, makes UI adjustments trivial, and significantly cuts down on the “wait time” that plagues traditional development cycles. So, the next time you kick off your development server, remember the power of HMR silently working behind the scenes, enabling you to build better, faster, and with less frustration. It’s a cornerstone of efficient frontend development, enabling complex features like those found in AI Orchestration: JS Agent Coordination without constant reloads. Embrace HMR, and watch your productivity soar! To learn more about advanced frontend techniques, consider exploring CSS-Tricks.