A Markdown Editor is an indispensable tool in the modern web landscape. It simplifies content creation by allowing users to write in a plain-text format that’s easily converted into rich HTML. Today, we’re going on an exciting journey to build our very own, fully functional Markdown editor using nothing but the foundational pillars of the web: HTML, CSS, and JavaScript. Get ready to transform raw text into beautifully formatted output in real-time!
What We Are Building: Your Custom Markdown Editor
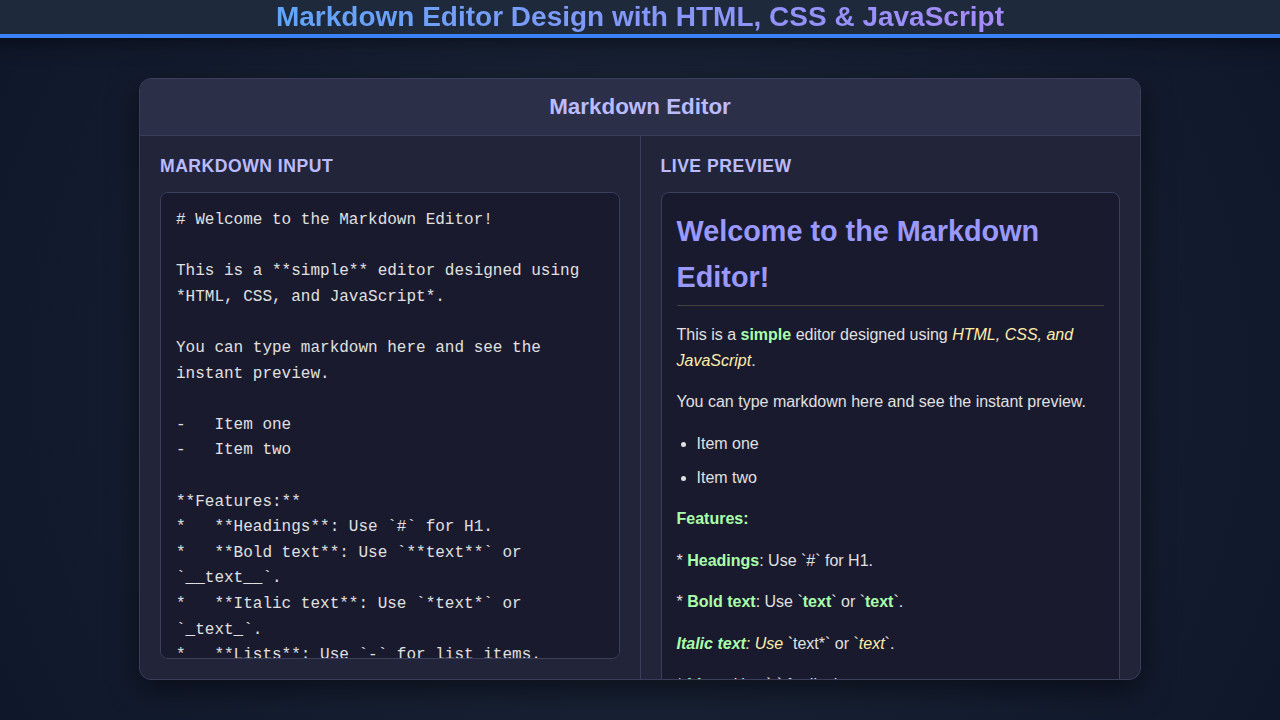
Imagine a sleek, two-panel interface. On one side, you have a pristine text area where you type your Markdown. On the other, you instantly see the rendered HTML preview. This is the essence of the Markdown Editor we’re creating. It’s a design pattern that has become ubiquitous, from developer documentation platforms to personal note-taking applications.
Why is this trending? Developers adore Markdown for its simplicity and efficiency. It lets you focus on content, not complex formatting tools. A good editor enhances this experience significantly. Our project will embody a clean, minimalist design, drawing inspiration from popular code editors and writing interfaces. It prioritizes readability and ease of use, ensuring a delightful content creation process.
This powerful tool isn’t just a fun project; it’s incredibly practical. You could integrate it into a custom CMS, a blog platform, or even a personal project management tool. Understanding its construction deepens your grasp of frontend interactions, real-time data processing, and dynamic UI updates. It truly is a fundamental building block for many interactive web applications.
Structuring Your Markdown Editor with HTML
Our HTML will lay the groundwork, creating the essential containers for our editor. We’ll need a primary container, a text input area for Markdown, and a display area for the rendered HTML. Let’s keep it semantic and straightforward.
index.html
<!DOCTYPE html>
<html lang="en">
<head>
    <meta charset="UTF-8">
    <meta name="viewport" content="width=device-width, initial-scale=1.0">
    <title>Markdown Editor</title>
    <link rel="stylesheet" href="styles.css">
</head>
<body>
    <div class="editor-container">
        <div class="editor-header">
            Markdown Editor
        </div>
        <div class="editor-main">
            <div class="editor-panel input-panel">
                <h2>Markdown Input</h2>
                <textarea id="markdown-input" placeholder="Type your markdown here...">
# Welcome to the Markdown Editor!

This is a **simple** editor designed using *HTML, CSS, and JavaScript*.

You can type markdown here and see the instant preview.

-   Item one
-   Item two

**Features:**
*   **Headings**: Use `#` for H1.
*   **Bold text**: Use `**text**` or `__text__`.
*   **Italic text**: Use `*text*` or `_text_`.
*   **Lists**: Use `-` for list items.

Happy editing!</textarea>
            </div>
            <div class="editor-panel preview-panel">
                <h2>Live Preview</h2>
                <div id="preview-output" class="preview-output"></div>
            </div>
        </div>
    </div>
    <script src="script.js"></script>
</body>
</html>
script.js
document.addEventListener('DOMContentLoaded', () => {
    const markdownInput = document.getElementById('markdown-input');
    const previewOutput = document.getElementById('preview-output');

    const convertMarkdownToHtml = (markdownText) => {
        let html = markdownText;

        // Escape HTML characters before converting markdown
        // This prevents XSS and ensures markdown characters aren't interpreted as HTML tags
        html = html.replace(/&/g, "&")
                   .replace(/</g, "<")
                   .replace(/>/g, ">")
                   .replace(/"/g, """)
                   .replace(/'/g, "'");

        // Convert headings (h1 only for simplicity)
        html = html.replace(/^#\s+(.*$)/gim, '<h1>$1</h1>');

        // Convert bold text
        html = html.replace(/\*\*(.*?)\*\*/gim, '<strong>$1</strong>');
        html = html.replace(/__(.*?)__/gim, '<strong>$1</strong>');

        // Convert italic text
        html = html.replace(/\*(.*?)\*/gim, '<em>$1</em>');
        html = html.replace(/_(.*?)_/gim, '<em>$1</em>');

        // Process lines to handle paragraphs and lists
        const lines = html.split('\n');
        let processedLines = [];
        let inListBlock = false;

        for (const line of lines) {
            if (line.trim().startsWith('- ')) {
                if (!inListBlock) {
                    processedLines.push('<ul>');
                    inListBlock = true;
                }
                processedLines.push(`<li>${line.trim().substring(2)}</li>`);
            } else {
                if (inListBlock) {
                    processedLines.push('</ul>');
                    inListBlock = false;
                }
                // Convert non-list, non-heading lines to paragraphs if they contain content
                if (line.trim() !== '' && !line.match(/^<h1>/i) && !line.match(/^<\/(strong|em)>/i)) {
                     // Check for existing block-level tags created by markdown replacement
                    if (!line.startsWith('<p>') && !line.startsWith('<ul>') && !line.startsWith('<li>') && !line.startsWith('<strong>') && !line.startsWith('<em>')) {
                        processedLines.push(`<p>${line}</p>`);
                    } else {
                        processedLines.push(line);
                    }
                } else {
                    processedLines.push(line); // Keep headings, empty lines, and already processed tags as is
                }
            }
        }
        if (inListBlock) {
            processedLines.push('</ul>'); // Close last list if it ended with list items
        }

        html = processedLines.join('\n');
        html = html.replace(/<p>\s*<\/p>/g, ''); // Remove empty paragraphs

        return html;
    };

    // Function to update the preview
    const updatePreview = () => {
        previewOutput.innerHTML = convertMarkdownToHtml(markdownInput.value);
    };

    // Listen for input changes in the textarea
    markdownInput.addEventListener('input', updatePreview);

    // Initial update on page load
    updatePreview();
});
Styling Our Markdown Editor with CSS
Once the HTML structure is in place, CSS steps in to make our editor visually appealing and functional. We’ll employ Flexbox for an elegant side-by-side layout, ensuring both the input and output panels are clearly defined and easy to use. Furthermore, we will add subtle styling for a professional touch.
styles.css
body {
    margin: 0;
    padding: 0;
    font-family: Arial, Helvetica, sans-serif;
    background-color: #1a1a2e; /* Dark background */
    color: #e0e0e0; /* Light text */
    display: flex;
    justify-content: center;
    align-items: center;
    min-height: 100vh;
    box-sizing: border-box;
    overflow: hidden;
    max-width: 100%;
}

.editor-container {
    display: flex;
    flex-direction: column;
    width: 90%;
    max-width: 1000px;
    height: 600px; /* Fixed height for cinematic view */
    background-color: #22253a; /* Slightly lighter dark */
    border-radius: 12px;
    box-shadow: 0 10px 30px rgba(0, 0, 0, 0.5);
    overflow: hidden; /* Important for inner elements */
    border: 1px solid #3c3e5e;
}

.editor-header {
    background-color: #2c2f48;
    padding: 15px 25px;
    font-size: 1.4em;
    font-weight: bold;
    border-bottom: 1px solid #3c3e5e;
    color: #bbbbff;
    text-align: center;
}

.editor-main {
    display: flex;
    flex: 1; /* Takes remaining height */
    gap: 1px; /* Visual separator */
    background-color: #3c3e5e; /* Separator color */
    overflow: hidden;
}

.editor-panel {
    flex: 1;
    padding: 20px;
    overflow-y: auto; /* Scroll for content */
    background-color: #22253a;
    box-sizing: border-box;
    display: flex;
    flex-direction: column;
}

.editor-panel h2 {
    margin-top: 0;
    margin-bottom: 15px;
    color: #bbbbff;
    font-size: 1.1em;
    text-transform: uppercase;
    letter-spacing: 0.5px;
}

textarea {
    flex: 1;
    width: 100%;
    padding: 15px;
    border: 1px solid #3c3e5e;
    border-radius: 8px;
    background-color: #1a1a2e;
    color: #e0e0e0;
    font-size: 1em;
    line-height: 1.6;
    resize: none; /* Disable manual resize */
    box-sizing: border-box;
    font-family: 'Courier New', Courier, monospace; /* Monospace for code/markdown input */
    outline: none;
    transition: border-color 0.3s ease;
}

textarea:focus {
    border-color: #8888ff;
}

.preview-output {
    flex: 1;
    width: 100%;
    padding: 15px;
    border: 1px solid #3c3e5e;
    border-radius: 8px;
    background-color: #1a1a2e;
    color: #e0e0e0;
    font-size: 1em;
    line-height: 1.6;
    box-sizing: border-box;
    font-family: Arial, Helvetica, sans-serif; /* Readable font for preview */
}

/* Basic styling for markdown elements in preview */
.preview-output h1 {
    color: #9999ff;
    margin-top: 0;
    margin-bottom: 0.5em;
    font-size: 1.8em;
    border-bottom: 1px solid #444;
    padding-bottom: 5px;
}
.preview-output strong {
    color: #aaffaa;
}
.preview-output em {
    color: #ffeeaa;
}
.preview-output p {
    margin-bottom: 1em;
}
.preview-output ul {
    padding-left: 20px;
    margin-bottom: 1em;
}
.preview-output li {
    margin-bottom: 0.5em;
}

@media (max-width: 768px) {
    .editor-main {
        flex-direction: column;
        height: auto;
    }
    .editor-container {
        height: auto;
        min-height: 80vh;
        width: 95%;
    }
    .editor-panel {
        height: 300px; /* Fixed height for panels on small screens */
    }
}
Bringing Your Markdown Editor to Life: The JavaScript Core
This is where the magic happens! JavaScript will orchestrate the real-time conversion from Markdown to HTML. We’ll listen for user input, process the Markdown, and update the preview pane instantly. This dynamic interaction is what makes our editor truly powerful.
Setting Up the Basic Layout and Event Listeners
Firstly, we select our key elements: the textarea for input and the div for output. Then, we attach an event listener to the textarea. The 'input' event is perfect for capturing every keystroke and change. This ensures our preview updates as the user types, offering an immediate visual feedback loop. You want your code to be robust and easy to understand. Considering best practices for managing your JavaScript logic can dramatically improve maintainability. Check out this guide on JavaScript Code Review: Best Practices for Developers for valuable insights.
Real-time Markdown Conversion
Inside our event handler, we grab the current value of the textarea. The core challenge is then converting this plain Markdown text into renderable HTML. For a basic editor, we can handle common Markdown syntaxes like bold (**text**), italics (*text*), and perhaps even headings (# Heading) using simple string manipulations or regular expressions. Regex patterns are incredibly useful for tasks like this. They allow you to search for and replace specific text patterns efficiently. If you’re new to them or need a refresher, this resource on Regex Patterns: JS Explained – Quick Guide can be very helpful.
“The beauty of Markdown lies in its simplicity. It’s designed to be human-readable, even in its raw form, yet powerfully expressive when rendered.”
For instance, to convert **bold text** to <strong>bold text</strong>, you might use a regex like /\*\*(.*?)\*\*/g and replace it with <strong>$1</strong>. Similarly for italics. After processing, we inject the resulting HTML into our preview div using element.innerHTML. Remember that using innerHTML directly can be a security risk if you’re rendering untrusted content. For this local project, it’s fine, but in production, consider sanitizing input!
Enhancing User Experience with Toolbar Actions
A great editor often includes a small toolbar. Buttons for bold, italic, or adding links can significantly improve the user experience. When a user clicks a ‘Bold’ button, we can insert ** at the cursor’s position or wrap selected text. This involves more advanced text area manipulation, often requiring knowledge of selectionStart, selectionEnd, and setSelectionRange properties of the textarea element. We also ensure a smooth typing experience. The input event is fired whenever the value of an <input>, <select>, or <textarea> element has been changed. You can learn more about this event on MDN Web Docs.
Making Our Markdown Editor Responsive
A truly modern web application must adapt to different screen sizes. Our Markdown Editor is no exception. We’ll use CSS media queries to adjust the layout when viewed on smaller screens, such as mobile phones or tablets. The goal is to provide a seamless experience, regardless of the device.
Instead of the side-by-side layout, we can stack the input and output panels vertically. This often provides a better user experience on narrower screens. We will typically set the flex direction to column within our media query. Furthermore, adjusting font sizes and padding ensures readability. Flexbox is an incredibly powerful tool for responsive design. If you need a deeper dive into its capabilities, I highly recommend checking out A Complete Guide to Flexbox on CSS-Tricks.
The Final Look of Your Markdown Editor
Upon completion, your Markdown Editor will present a clean, functional interface. You’ll have a clear distinction between the Markdown input area and the live HTML preview. The design will be intuitive, allowing users to effortlessly switch between writing and seeing their formatted output. We achieved a responsive layout that adapts gracefully to various screen sizes. This is a testament to the power of combining HTML for structure, CSS for presentation, and JavaScript for dynamic interactivity.
“Building interactive tools like this Markdown editor empowers you to understand the web at a deeper level, connecting user actions to visual and data transformations.”
Conclusion: Beyond Your First Markdown Editor
Congratulations! You’ve successfully embarked on building a functional Markdown Editor from the ground up. We explored HTML for structure, CSS for elegant styling, and JavaScript for the real-time conversion magic. This project serves as a fantastic foundation for understanding fundamental web development concepts. It also highlights how simple technologies can combine to create powerful tools.
Where can you take this next? Consider adding more advanced Markdown parsing capabilities, perhaps integrating a third-party library for a comprehensive feature set. You could also implement local storage to save drafts automatically or integrate it with a backend to persist content. When thinking about connecting to a backend, a well-structured API is crucial for seamless data exchange. Exploring API Design: Principles Explained with JavaScript will be a valuable next step. This project equips you with the skills to tackle a myriad of web development challenges, pushing you further into the exciting world of interactive web applications!