Hey there, fellow developers! Get ready to dive into one of the most exciting frontiers in web development today: the AI Agent API. Imagine building web applications that don’t just react but truly anticipate user needs, generate dynamic content, and even automate complex tasks. That’s the magic we’re unlocking together! This tutorial will guide you through integrating an AI Agent API into your JavaScript projects, making your applications smarter and more powerful than ever before. Let’s build something incredible!
What We Are Building
We’re going to create a simple yet powerful web application. This app will demonstrate how to interact with an AI Agent API. Think of a smart assistant or a content generator. Users will input a prompt or query. Our JavaScript code will send this to the AI agent. Then, it will display the AI’s intelligent response directly in the browser. It’s an interactive experience, showcasing the agent’s capabilities in real-time.
Why is this trending? AI agents are transforming how we build software. They move beyond simple data retrieval. They perform complex reasoning and generate creative outputs. This approach opens doors to applications for customer support, content creation, and personalized learning. The possibilities truly feel endless! From creating interactive storytellers to powerful data analyzers, these agents offer immense potential. You might even find parallels with building robust interfaces like an AI Code Assistant UI, where intelligent responses are key.
Where can you use this? Everywhere! Consider a marketing tool that drafts social media posts based on keywords. Picture an e-commerce site offering highly personalized product recommendations. Imagine an educational platform that generates tailored exercises. Our project will lay the groundwork for these advanced systems. It provides a clear path to integrating intelligence into your web projects.
HTML Structure
First, we’ll set up the basic structure of our web page. This HTML will define our input area, a button to trigger the AI agent, and a display area for the results. It’s clean, semantic, and easy to understand.
index.html
<!DOCTYPE html>
<html lang="en">
<head>
    <meta charset="UTF-8">
    <meta name="viewport" content="width=device-width, initial-scale=1.0">
    <title>AI Agent API Integration</title>
    <link rel="stylesheet" href="styles.css">
</head>
<body>
    <div class="container">
        <h1>AI Agent API Integration with JavaScript</h1>
        <p>Enter a prompt and get a response from a hypothetical AI agent.</p>
        <div class="interaction-area">
            <textarea id="promptInput" placeholder="Type your query here..." rows="4"></textarea>
            <button id="sendPromptBtn">Send to AI Agent</button>
            <div class="response-display">
                <h2>AI Agent Response:</h2>
                <pre id="agentResponse"></pre>
            </div>
        </div>
    </div>
    <script src="script.js"></script>
</body>
</html>
script.js
document.addEventListener('DOMContentLoaded', () => {
    const promptInput = document.getElementById('promptInput');
    const sendPromptBtn = document.getElementById('sendPromptBtn');
    const agentResponseDisplay = document.getElementById('agentResponse');

    // Mock API endpoint for demonstration purposes
    // In a real application, this would be your backend API gateway
    const API_ENDPOINT = 'https://api.example.com/ai-agent/process'; // Replace with your actual API

    sendPromptBtn.addEventListener('click', async () => {
        const prompt = promptInput.value.trim();
        if (!prompt) {
            agentResponseDisplay.textContent = 'Please enter a prompt.';
            return;
        }

        agentResponseDisplay.textContent = 'Thinking...';
        sendPromptBtn.disabled = true;

        try {
            // In a real scenario, you'd call your actual API_ENDPOINT
            // For demonstration, we'll use a mock fetch function if the actual API isn't available.
            // Uncomment `window.fetch = mockFetch;` below to enable the mock.
            const response = await fetch(API_ENDPOINT, {
                method: 'POST',
                headers: {
                    'Content-Type': 'application/json',
                    // 'Authorization': 'Bearer YOUR_API_KEY' // Include API key if required
                },
                body: JSON.stringify({ prompt: prompt })
            });

            if (!response.ok) {
                throw new Error(`HTTP error! Status: ${response.status}`);
            }

            const data = await response.json();

            // Display the agent's response
            agentResponseDisplay.textContent = JSON.stringify(data, null, 2);

        } catch (error) {
            console.error('Error integrating with AI Agent API:', error);
            agentResponseDisplay.textContent = `Error: ${error.message}. Please check console for details. (This might be due to a mock API call for demonstration.)`;
        } finally {
            sendPromptBtn.disabled = false;
        }
    });

    // --- Mock Fetch Function for Local Testing (Optional) ---
    // Uncomment the line below 'window.fetch = mockFetch;' to use this mock
    // if you don't have a live API endpoint and want to see the UI interaction.
    async function mockFetch(url, options) {
        console.log("Mock API Call to:", url, "with options:", options);
        return new Promise(resolve => {
            setTimeout(() => {
                const requestBody = JSON.parse(options.body);
                const mockResponseData = {
                    agentId: "agent-alpha-1",
                    query: requestBody.prompt,
                    response: `Hello! I am an AI agent. You asked: "${requestBody.prompt}". My capabilities include natural language understanding and general knowledge retrieval.`,
                    timestamp: new Date().toISOString(),
                    status: "success"
                };
                resolve({
                    status: 200,
                    ok: true,
                    json: async () => mockResponseData
                });
            }, 1500); // Simulate network delay
        });
    }
    // window.fetch = mockFetch;
});
CSS Styling
Next, let’s make our application visually appealing and user-friendly. Our CSS will ensure a modern, clean design. It will improve readability and enhance the overall user experience. We’ll use Flexbox for layout and add some subtle animations.
styles.css
body {
    font-family: Arial, Helvetica, sans-serif;
    background-color: #1a1a2e; /* Dark background */
    color: #e0e0e0; /* Light text */
    margin: 0;
    display: flex;
    justify-content: center;
    align-items: center;
    min-height: 100vh;
    box-sizing: border-box;
    overflow: hidden; /* For general robustness, as requested */
}

.container {
    background-color: #2e2e4a; /* Slightly lighter dark background for container */
    border-radius: 8px;
    padding: 30px;
    box-shadow: 0 4px 15px rgba(0, 0, 0, 0.5);
    max-width: 800px;
    width: 100%;
    box-sizing: border-box;
    text-align: center;
}

h1 {
    color: #8be9fd; /* A vibrant blue for headings */
    margin-bottom: 20px;
}

p {
    margin-bottom: 30px;
    line-height: 1.6;
}

.interaction-area {
    background-color: #1a1a2e;
    border-radius: 6px;
    padding: 20px;
    margin-top: 20px;
    box-shadow: inset 0 0 10px rgba(0, 0, 0, 0.7);
    text-align: left;
}

textarea {
    width: calc(100% - 20px); /* Account for padding */
    padding: 10px;
    margin-bottom: 15px;
    border: 1px solid #4a4a6e;
    border-radius: 4px;
    background-color: #3a3a5e;
    color: #e0e0e0;
    font-family: Arial, Helvetica, sans-serif;
    font-size: 1em;
    resize: vertical;
    box-sizing: border-box; /* Ensure padding/border included in width */
    max-width: 100%; /* Important for code rule */
}

textarea::placeholder {
    color: #a0a0b0;
}

button {
    background-color: #6272a4; /* A soft purple/blue */
    color: #ffffff;
    border: none;
    padding: 12px 25px;
    border-radius: 4px;
    cursor: pointer;
    font-size: 1.1em;
    transition: background-color 0.3s ease;
    box-sizing: border-box;
    max-width: 100%;
}

button:hover {
    background-color: #7a89b8;
}

.response-display {
    margin-top: 30px;
    text-align: left;
    background-color: #22223a;
    padding: 15px;
    border-radius: 6px;
    border: 1px solid #4a4a6e;
}

.response-display h2 {
    color: #50fa7b; /* Green for response heading */
    margin-bottom: 10px;
    font-size: 1.2em;
}

pre {
    background-color: #1a1a2e;
    color: #f8f8f2;
    padding: 15px;
    border-radius: 4px;
    overflow: auto; /* Allow scrolling for long responses */
    max-width: 100%; /* Ensure it doesn't overflow */
    box-sizing: border-box;
    white-space: pre-wrap; /* Wrap long lines */
    word-wrap: break-word; /* Break words if necessary */
}
Step-by-Step Breakdown: Integrating the AI Agent API
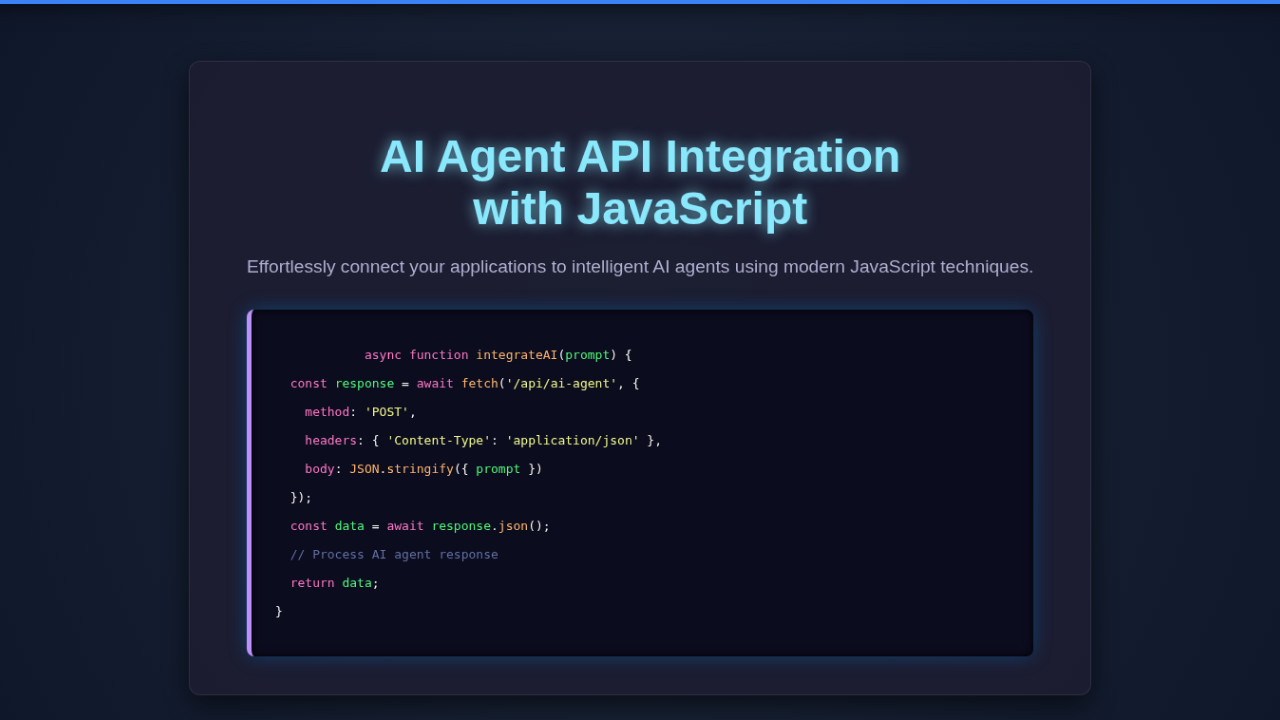
Now, for the exciting part: the JavaScript! This is where we bring our AI agent to life. We will handle user input, make API calls, and display the agent’s responses. Each step is crucial for a smooth integration.
Setting Up the Environment and Fetching Elements
We begin by getting references to our HTML elements. These include the input field, the submit button, and the result display area. We also define our API endpoint and a placeholder API key. Remember to replace this placeholder with your actual key for a production environment. For more advanced token management, you might consider building a dedicated LLM Token Counter UI to manage API usage effectively.
const promptInput = document.getElementById('prompt-input');
const generateButton = document.getElementById('generate-btn');
const responseDisplay = document.getElementById('response-display');

const API_ENDPOINT = 'YOUR_AI_AGENT_API_URL'; // Replace with your actual API endpoint
const API_KEY = 'YOUR_API_KEY'; // Replace with your actual API key
Handling User Input and API Requests
When the user clicks the ‘Generate’ button, we need to capture their input. We then construct a request to our AI Agent API. This request typically involves sending the user’s prompt. It also includes any necessary authentication headers. We use the fetch API for this, a powerful, built-in browser tool.
generateButton.addEventListener('click', async () => {
    const prompt = promptInput.value.trim();
    if (!prompt) {
        responseDisplay.textContent = 'Please enter a prompt!';
        return;
    }

    responseDisplay.textContent = 'Thinking...'; // User feedback

    try {
        const response = await fetch(API_ENDPOINT, {
            method: 'POST',
            headers: {
                'Content-Type': 'application/json',
                'Authorization': `Bearer ${API_KEY}` // Assuming Bearer token authentication
            },
            body: JSON.stringify({ prompt: prompt })
        });

        if (!response.ok) {
            throw new Error(`API error: ${response.statusText}`);
        }

        const data = await response.json();
        // Assuming the AI agent's response is in data.response or data.text
        responseDisplay.textContent = data.response || data.text || 'No response received.';

    } catch (error) {
        console.error('Error fetching AI agent response:', error);
        responseDisplay.textContent = `Error: ${error.message}. Please try again.`;
    }
});
“The future of user interaction lies in proactive intelligence, not just reactive responses. AI agents are the key to unlocking that potential, making web apps truly dynamic and helpful.”
Displaying the AI Agent API Response
Once we receive the response from the API, we update our UI. We simply set the textContent of our display element. This makes the AI’s generated content visible to the user. Error handling is also critical here. We must provide clear feedback if something goes wrong. This ensures a robust and user-friendly experience. Remember, a good interface always keeps the user informed.
This entire process, from input to display, happens asynchronously. The user interface remains responsive. This provides a smooth experience for your users. You are effectively integrating a powerful backend service. It works seamlessly within your frontend JavaScript application. Think about how this real-time interaction could enhance a Code Playground, offering instant suggestions!
Making It Responsive
A great web application works flawlessly on any device. We will implement responsive design principles using media queries. This ensures our layout adapts beautifully to different screen sizes. Our focus will be mobile-first. This means designing for smaller screens first. Then, we progressively enhance the design for larger displays.
@media (max-width: 768px) {
    .container {
        width: 90%;
        padding: 15px;
    }

    h1 {
        font-size: 1.8em;
    }

    #prompt-input {
        min-height: 80px;
    }

    #generate-btn {
        padding: 10px 20px;
        font-size: 0.9em;
    }
}

@media (max-width: 480px) {
    .container {
        width: 95%;
        padding: 10px;
    }

    h1 {
        font-size: 1.5em;
    }

    #prompt-input {
        min-height: 60px;
    }

    #generate-btn {
        width: 100%;
        margin-top: 10px;
    }
}
These media queries adjust padding, font sizes, and button widths. They ensure optimal viewing on smaller devices. We prioritize readability and ease of interaction. This approach guarantees a consistent experience for all users. Furthermore, it follows modern web development best practices. Learn more about responsive design techniques on CSS-Tricks.
Final Output
After bringing all these pieces together, you’ll have a fully functional AI agent integration. Users will input text. They will then receive an intelligent, AI-generated response. The interface will be clean, intuitive, and responsive. It works great on desktops, tablets, and mobile phones. Our application features a clear input area. It has a prominent ‘Generate’ button. Finally, it includes a dynamic display zone for the agent’s output. These elements combine for a smooth user flow.
“The true power of AI in web development isn’t just about raw processing; it’s about crafting delightful, intelligent user experiences that feel natural and intuitive.”
Conclusion: Unleashing the Power of the AI Agent API
Congratulations, developers! You’ve successfully integrated an AI Agent API into a JavaScript web application. You’ve learned to build an interactive interface. You’ve mastered sending prompts to an AI and displaying its responses. This project provides a strong foundation. You can now develop even more complex and intelligent web applications. The possibilities are truly boundless.
Remember, this is just the beginning. You can expand on this foundation. Explore advanced features like streaming responses. Implement more sophisticated error handling. Integrate multiple AI agents for specialized tasks. The world of AI is evolving rapidly. Staying curious and experimenting with new technologies is key. Keep building amazing things, and continue pushing the boundaries of what’s possible on the web!